Measuring Up: How to Calculate the Size of Objects in Open Source Material
Accurately measuring objects in photos and videos can provide essential information for open source researchers. It can help clarify the distance between a victim of a shooting and an alleged shooter, help assess the calibre of a rocket remnant or quantify damage identified in an image.
Many digital investigators will be familiar with the ruler tool on Google Earth Pro; this enables you to measure a distance or an object on a “flat” or two-dimensional surface.
However, digital investigators may also need to measure vertical objects in photos, videos and satellite images. This task may be further complicated by the angle of an object in relation to the camera, lens distortion, and the quality of the video or image.
This guide aims to expand digital investigators’ arsenal of tools for measuring objects in images. It starts by providing a brief theoretical explanation about perspective and then provides several examples showing how to measure objects using tools that are traditionally used for geolocation and chronolocation.
By measuring objects in photos, video stills and satellite images using the methods described below we can achieve accurate estimations of an object’s size — rather than determining its actual size. In order to achieve more accurate results, open source researchers should use them together with other methods of verification and corroborate the results with as much information as possible.
Explaining Perspective
Perspective is an optical illusion — one that photographers have long experimented with to achieve interesting images by warping and distorting perspective. While useful for photographers to produce intriguing images, these very factors can make a digital investigator’s job more difficult.
Digital investigators must be aware of how perspective affects the perception of objects depicted in images and footage. In the same way as perspective affects our vision, perspective impacts the perception of objects in an image which is a “flat” or two-dimensional representation of a three-dimensional world. While the actual size of objects remains unchanged, perspective typically makes the objects in the foreground of an image appear larger than the objects in the background.

Overcoming Perspective with an Object of Reference
To mitigate the effects of perspective when measuring an object of interest, digital investigators must use an appropriate object of reference. An object of reference must comply with the following requirements:
- It must be in the same image as the object of interest.
- It must be on the same image plane as the object of interest (at the same distance and angle from the camera).
- Its actual dimensions must be known beforehand (either from a reliable third party or measured ourselves).
Finding a suitable object of reference is the critical first step to overcoming perspective in an image. The accuracy of measurements can be significantly increased if:
- The object of reference is close to the object of interest.
- Neither item is extremely long (typically shorter objects are less susceptible to distortion caused by camera lens than longer objects)
An Overview of Measurement Tools and Methods for Use
Now that we are familiar with the role perspective plays, let’s look at some of the tools digital investigators can use to measure objects. Below we will provide an overview of how to use an Image Measurement Tool (IMT) such as the imagemeasurement.online tool; SunCalc and Google Earth Pro.
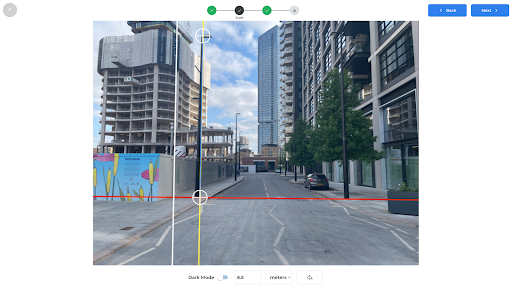
Image Measurement Tools
Image Measurement Tools are online tools that can be used to measure objects in an image. You must know the measurement of at least one object in an image (object of reference), in order to use an Image Measurement Tool. By using a known measurement you can apply it to your object of interest and achieve an estimate of its dimensions.
There are two-steps to the process, which are illustrated below.
Step 1. Place the measurement tool over the object you know the measurement of — the object of reference — and manually input its length (5cm)
Step 2. Place the line over the object of interest that you want to measure, it will tell you the measurement of the object of interest (1.9 inches / 5cm) using your previous measurement as a guide
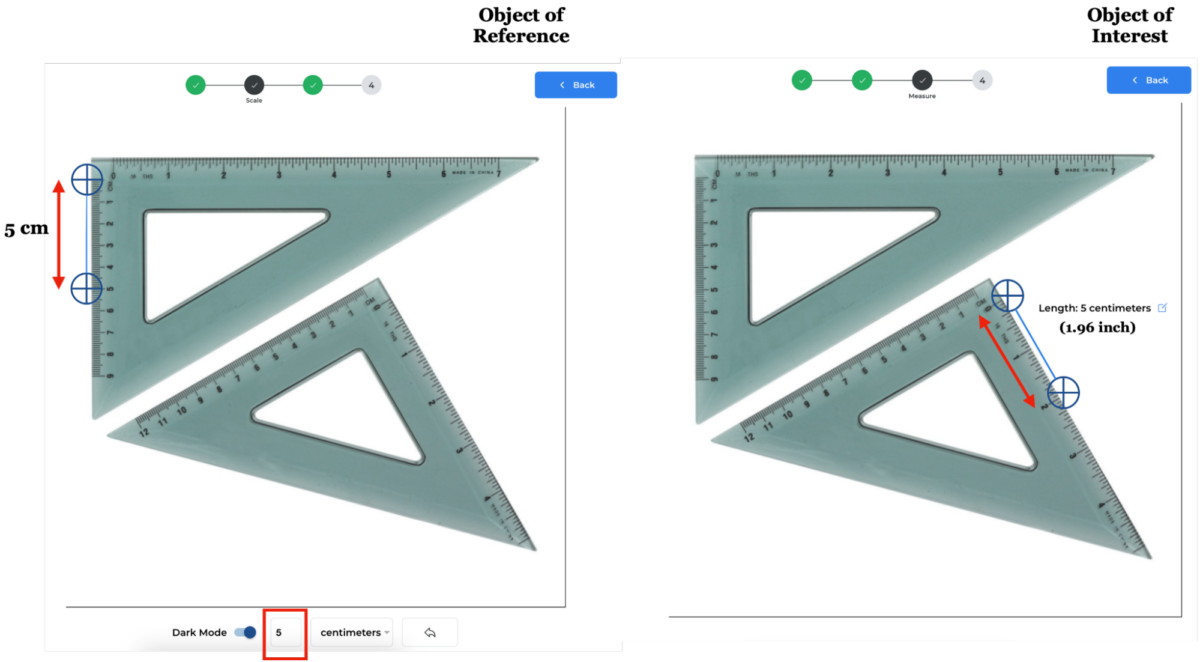
We can see in the image above the Image Measurement Tool accurately estimated the length of the selected part of the bottom triangle, using the upper triangle as a reference. Notice that both triangles are on the same image plane, so in this example, the problem of perspective did not arise.
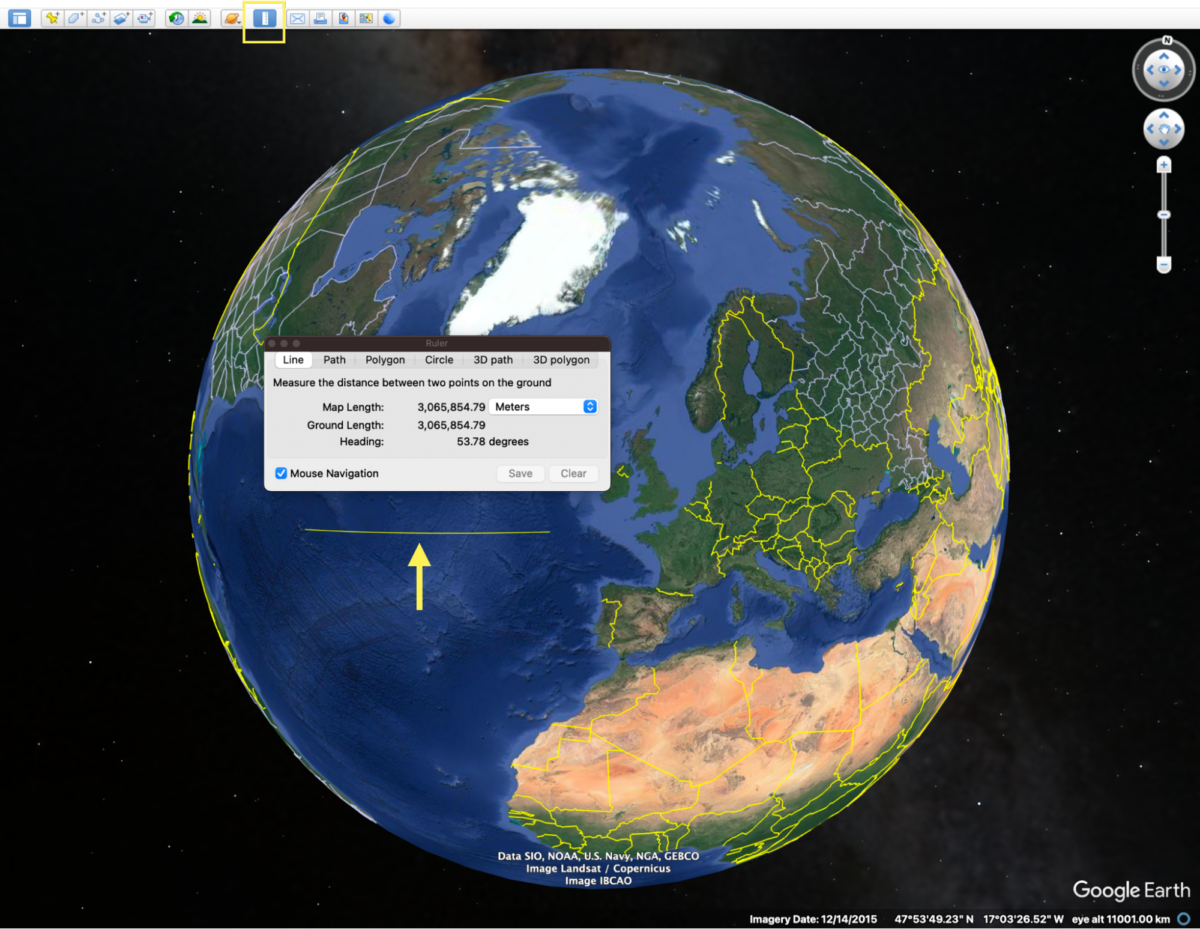
The Google Earth Pro Ruler
Google Earth Pro includes a ruler that can measure the distance between two points on the ground in a satellite image.
Google Earth Pro’s ruler has a good degree of accuracy when used to measure flat objects in a high quality satellite image, as long as the edges of the object are distinguishable.
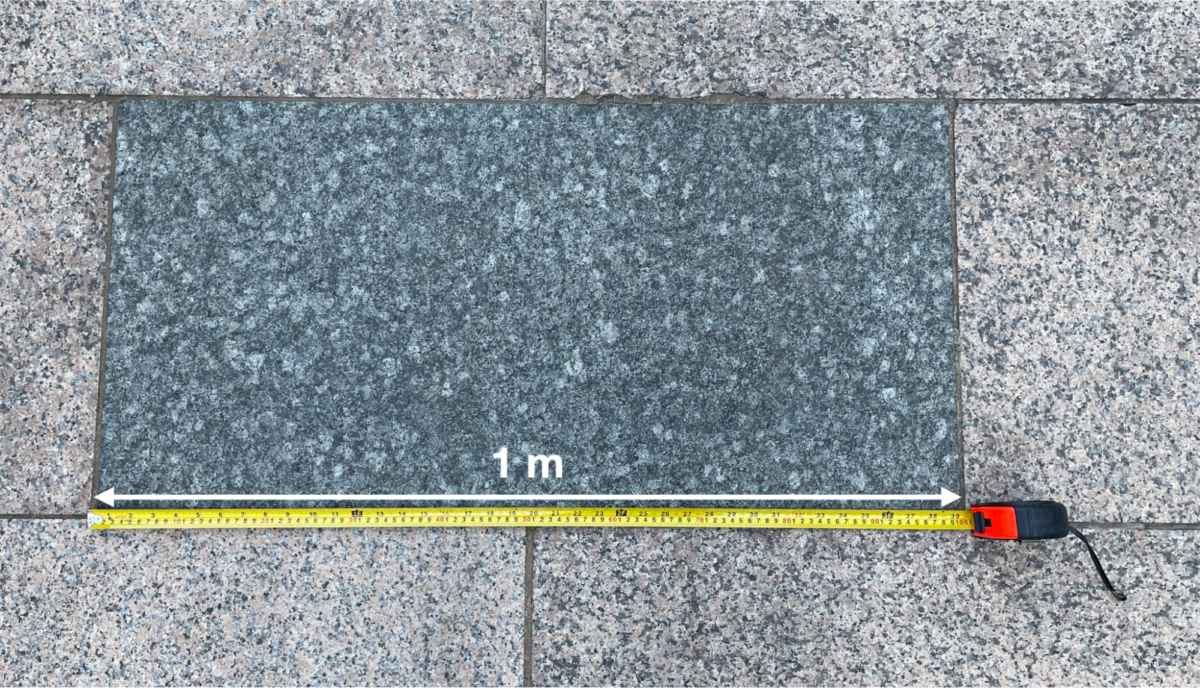
In the next example, we’re going to estimate the length of the black tile located at 51.502646, -0.015950.
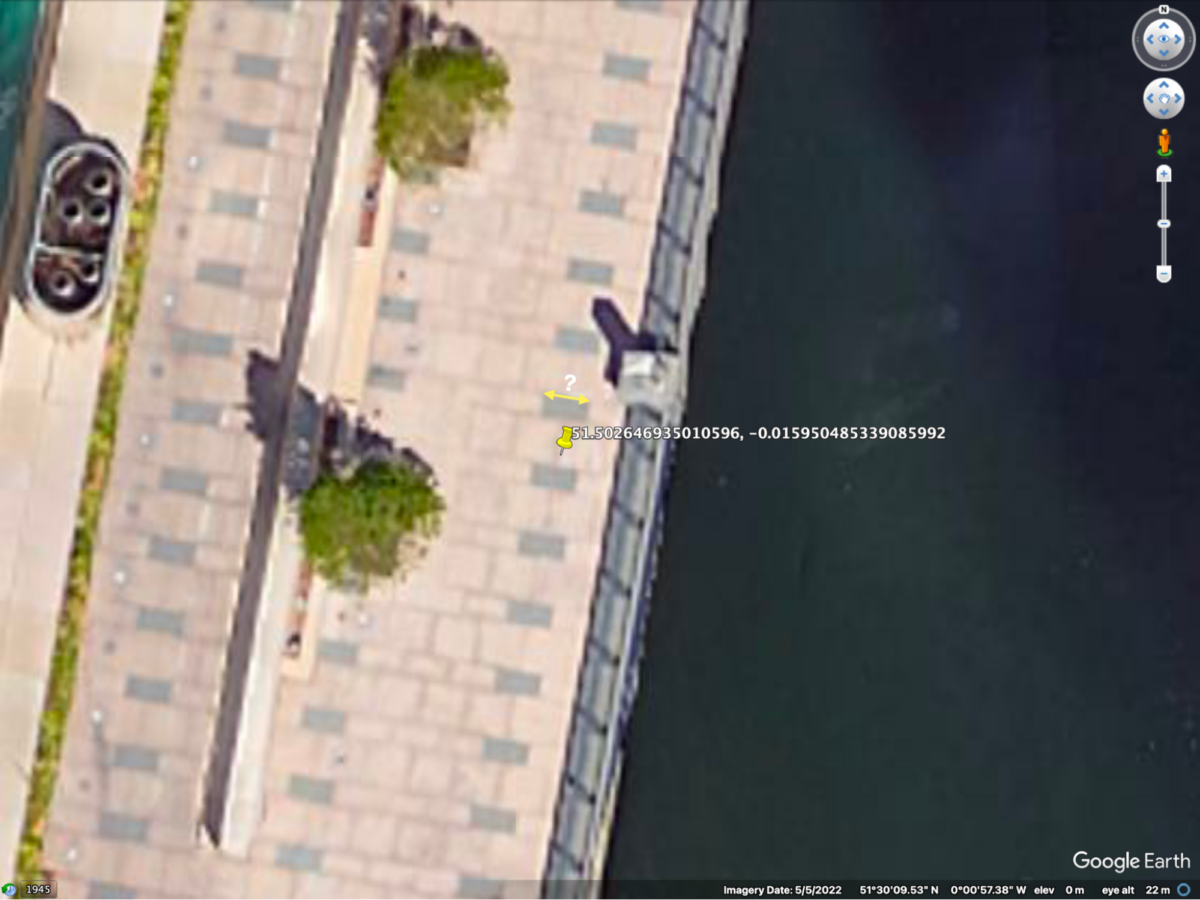
The Google Earth Pro ruler estimates that the length of the black tile equals 0.99 metres.
We measured this tile manually with a physical ruler — and found it was exactly one metre.
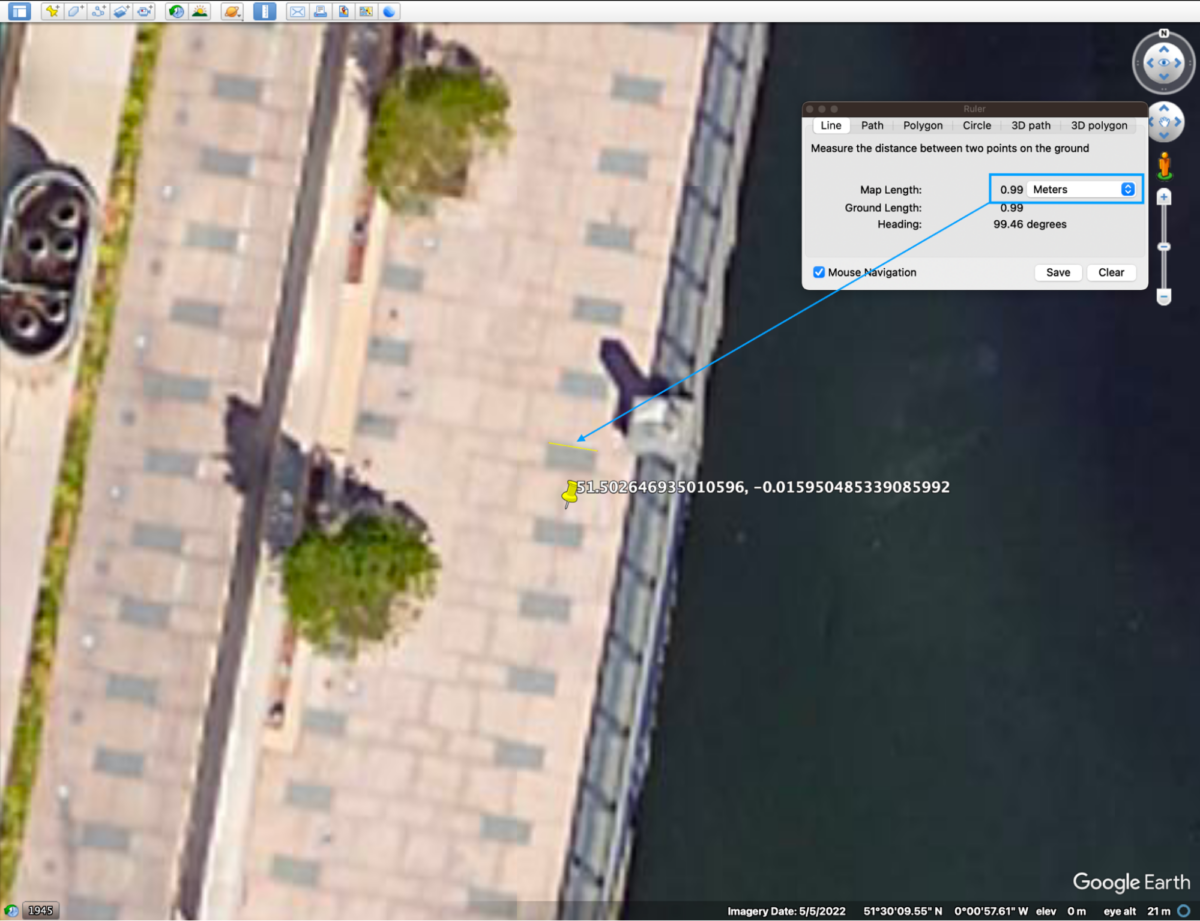
This experiment indicates that the measurements of objects visible in satellite images using the Google Earth Pro ruler can be performed with a high degree of precision. The large quantity of high-quality satellite imagery — both historic and current — available via Google Earth Pro makes it possible to measure flat objects located outdoors. Therefore, Google Earth Pro’s ruler is a good measuring tool and also a useful source for finding objects of reference.
It should be noted, however, that the quality of satellite imagery may vary in different regions of the world. It may not be possible to take such precise measurements with lower resolution satellite imagery.
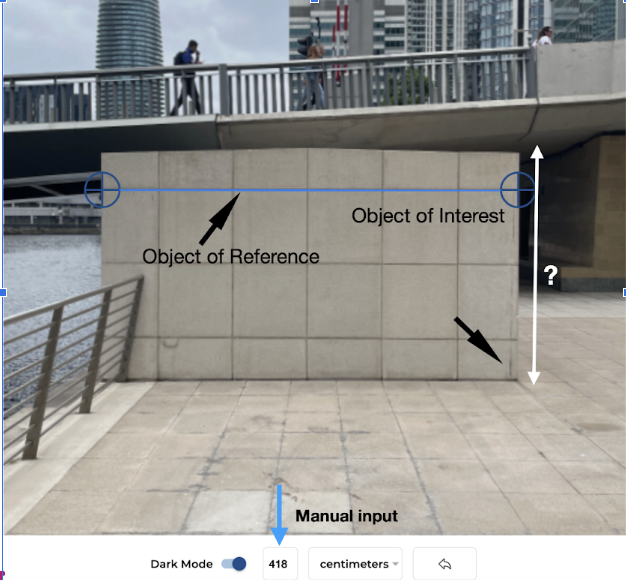
Scenario 1: Measuring the Height of a Concrete Block using a Combination of Google Earth Pro and Image Measurement Tool
In this example we’re going to try and establish the height of the concrete block located at 51.503151, -0.015800.
The concrete block will serve as both the object of interest and the object of reference.
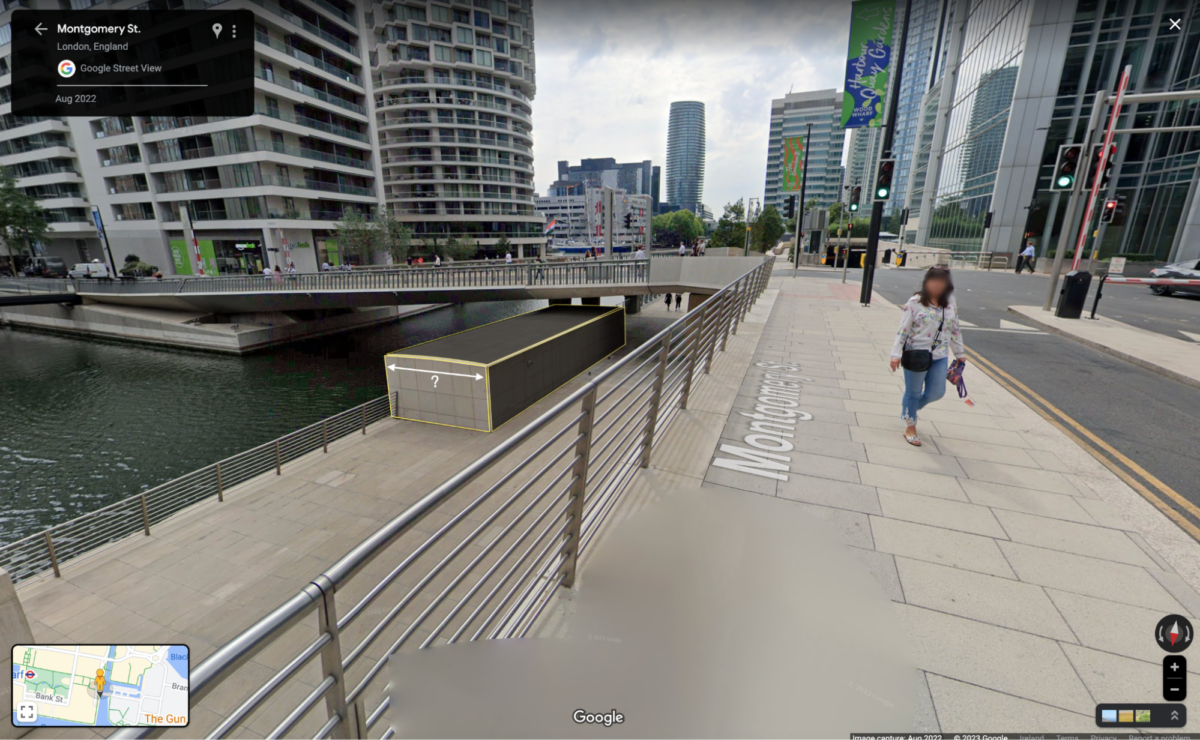
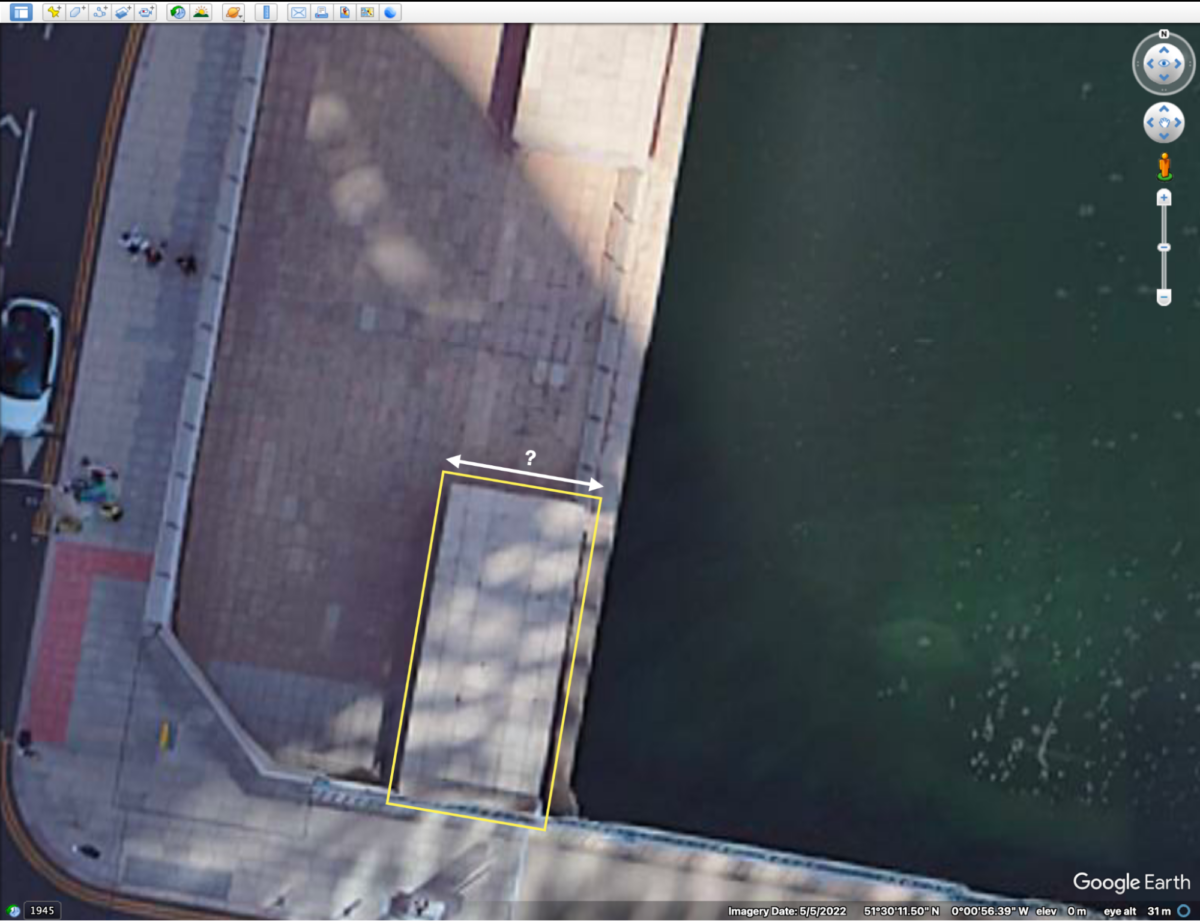
Step 1: Measure the Width the Concrete Block
The concrete block appears to be a perfect rectangular shape: the width at the top of the block appears to be the same as at the base. Since the block is clearly visible on Google Earth Pro, it’s possible to measure the width of the top of the block using Google Earth Pro’s ruler.
Note that the concrete block’s width appears to vary slightly depending on the date the satellite image was taken. This happens because the angle at which the satellite is taking pictures varies slightly on different dates.
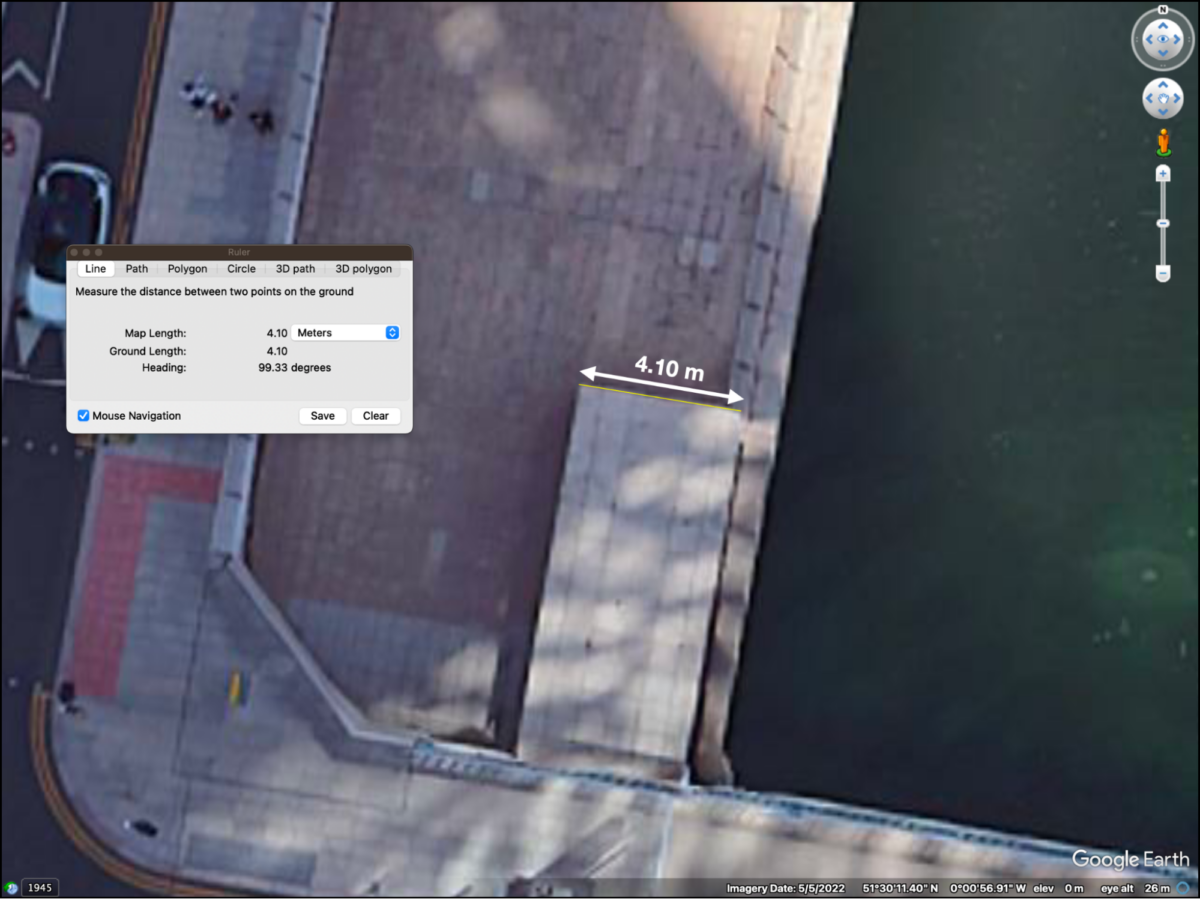
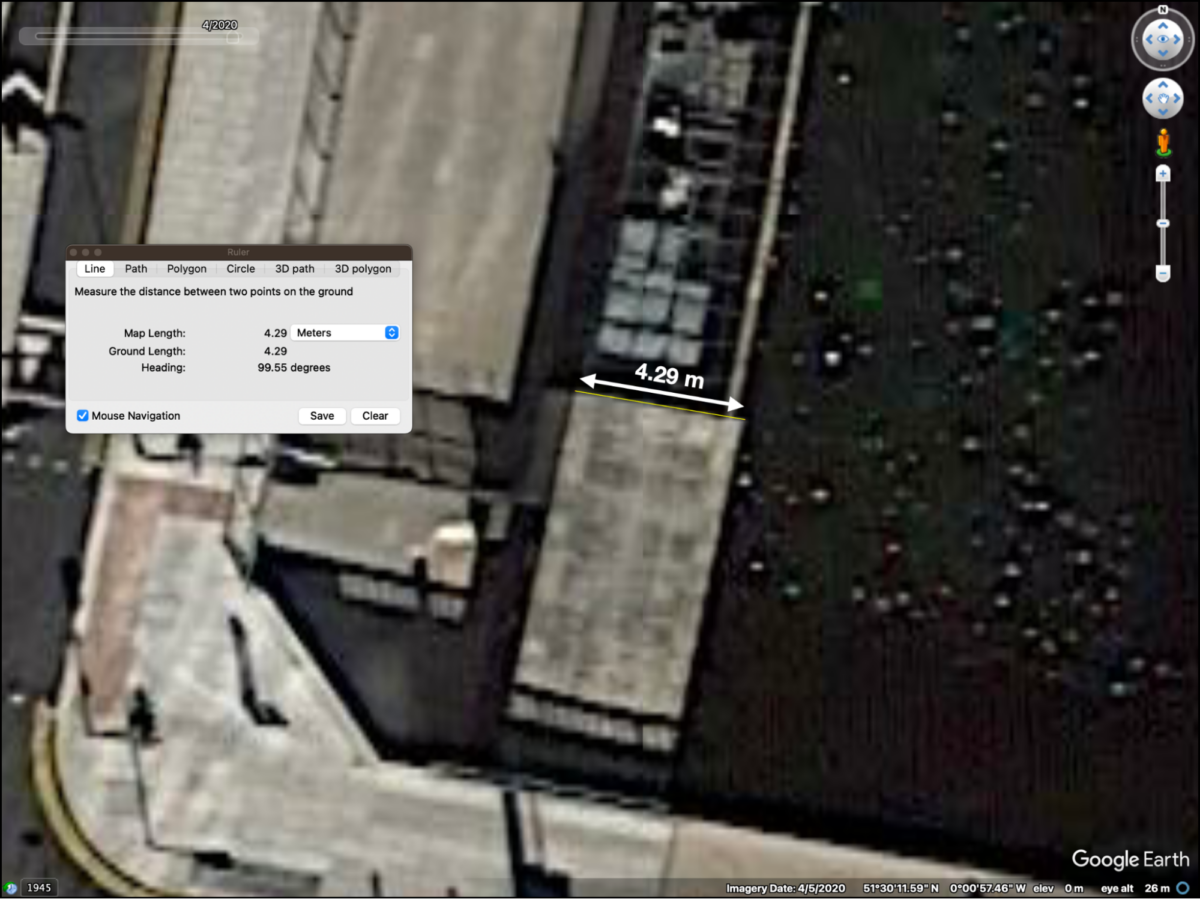

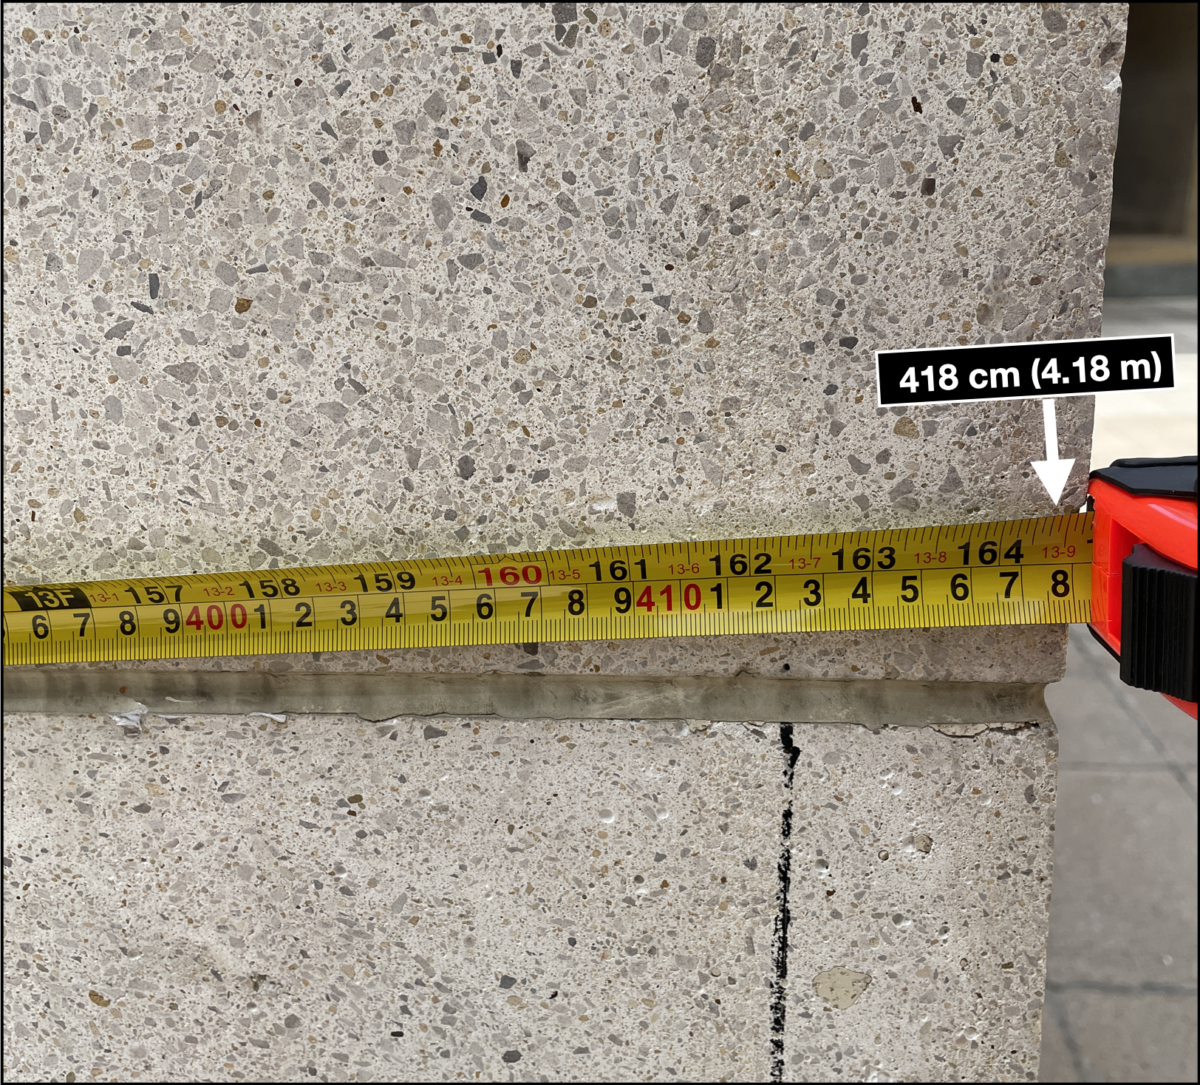
We can estimate the width of the block by measuring it in at least three different satellite images and calculating the average – in this case we measured its width as: 4.10m, 4.29m, 4.17m. By adding these measurements together and dividing by three we arrive at an average width (4.10m + 4.29m + 4.17m = 12.56/3 = 4.186m). This measurement corresponds to the measurement done onsite using a physical ruler 418cm (4.18m).
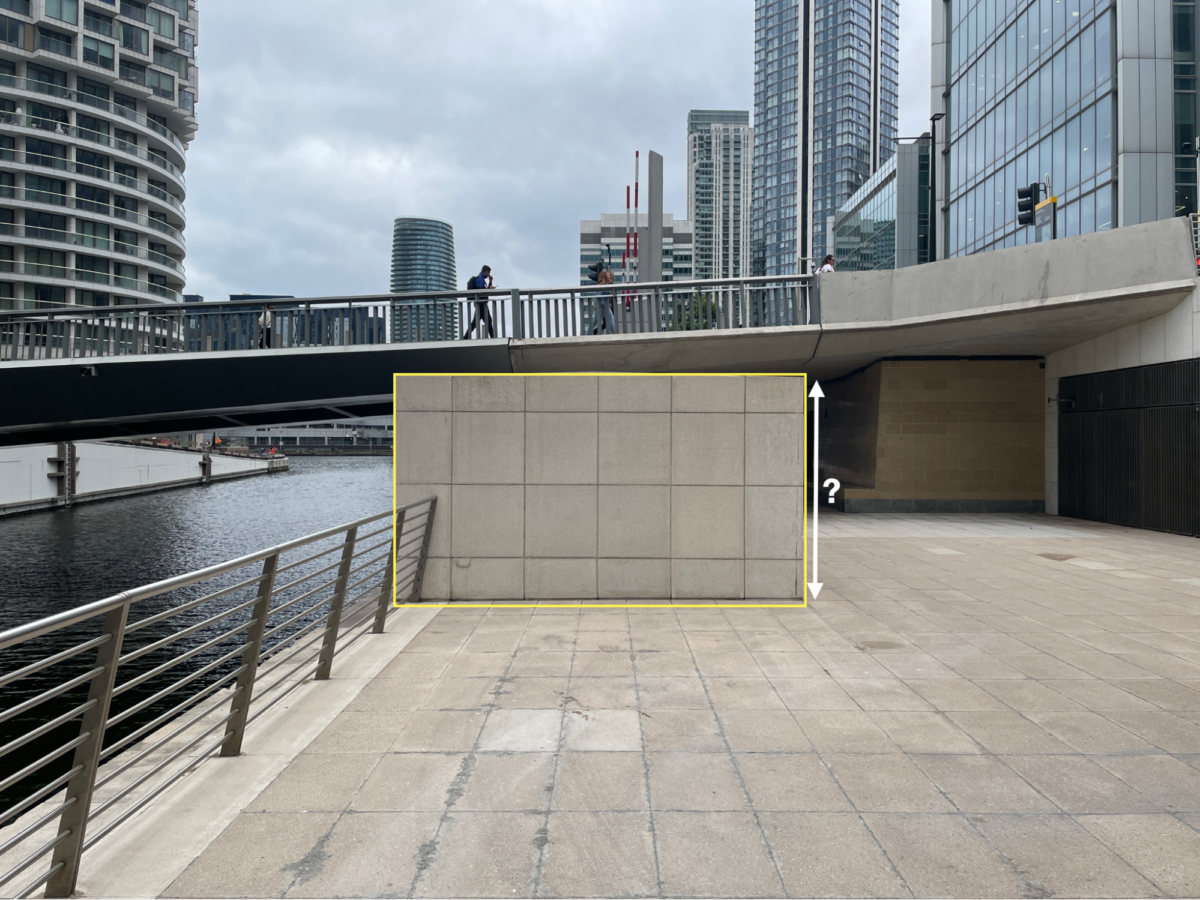
Step 2: Measure the height of the concrete block
Now that the width of the concrete block has been measured, we can use it to measure its height using the Image Measurement Tool.

Use the Image Measurement Tool to draw a line along the width of the block and manually input the width as 418cm (4.18 m), which was previously established. The width of the concrete block is now our object of reference.
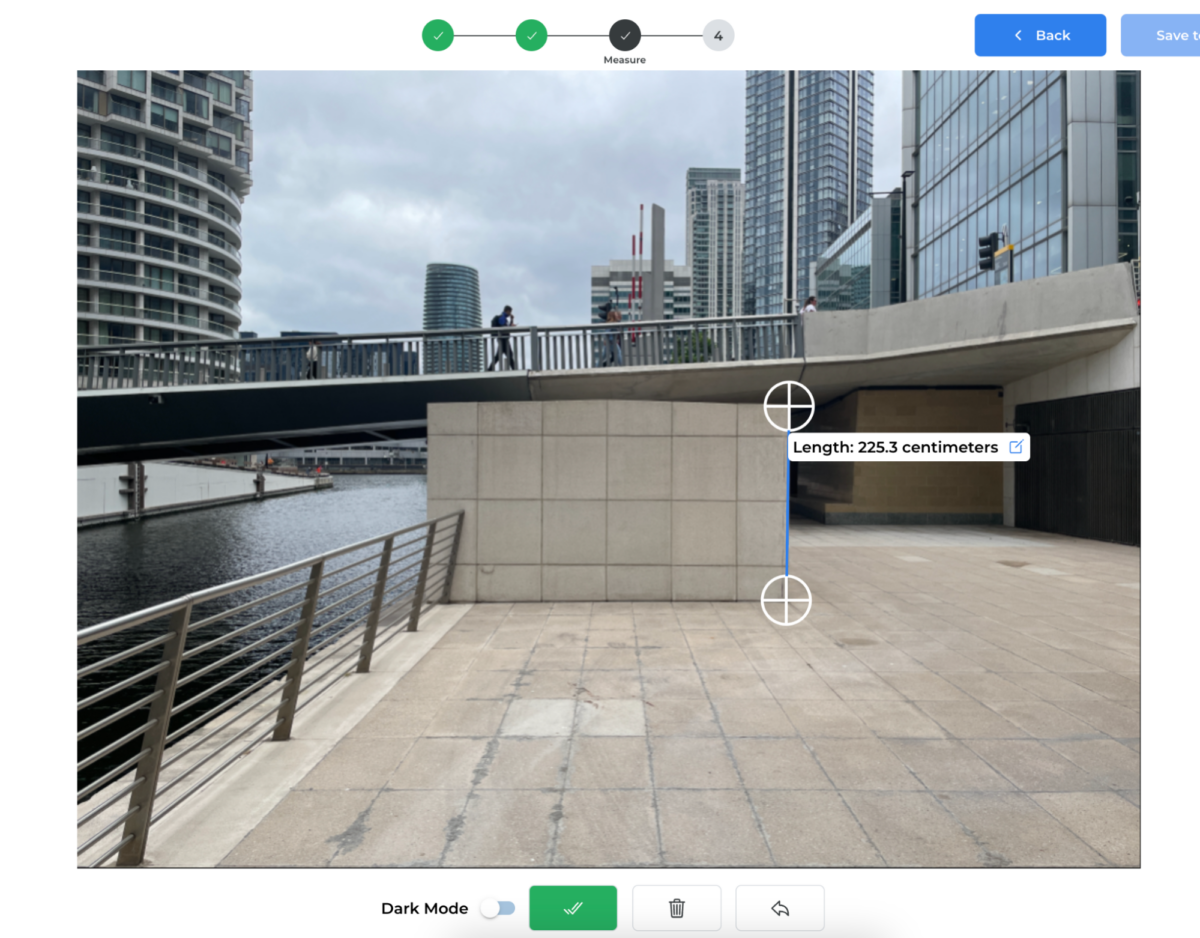
Next, draw a line along the vertical side (height) of the concrete block. The Image Measurement Tool will calculate the height based on our previous measurement. It produces an estimate of 225.3cm (2.25m).
This result closely corresponds to the measurement taken onsite with a physical ruler 225 cm (2.25m).
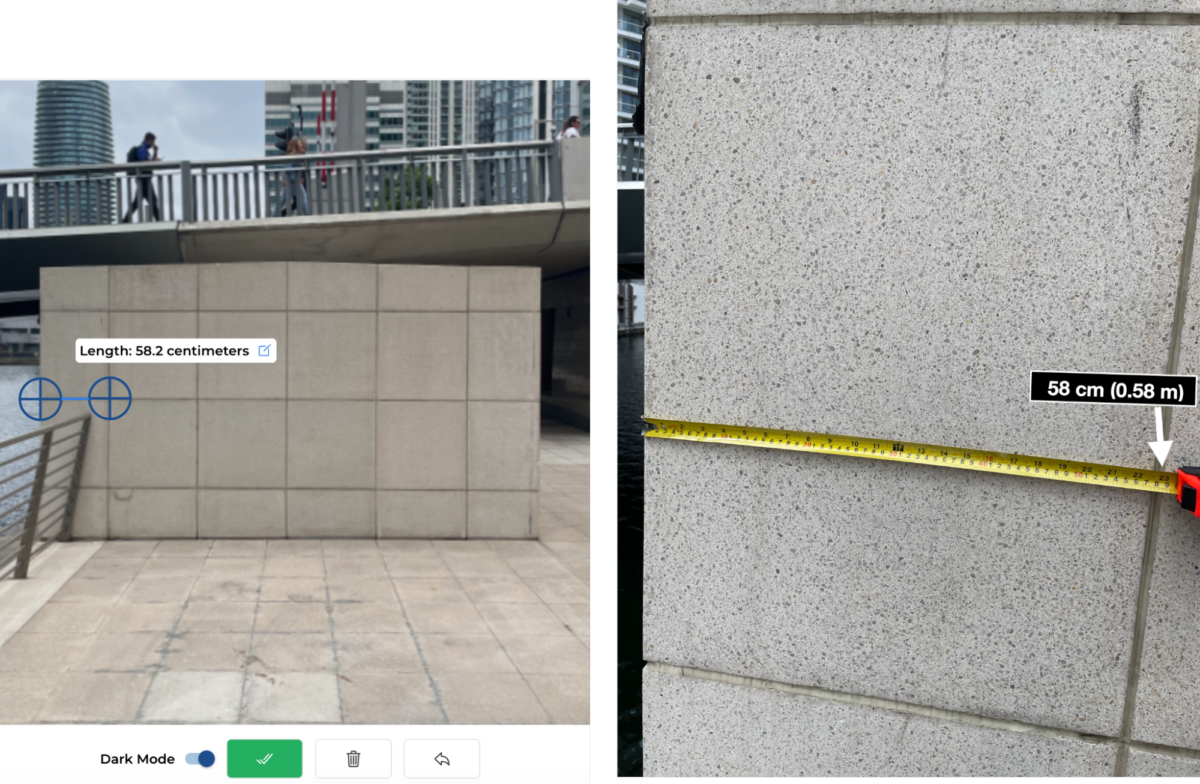
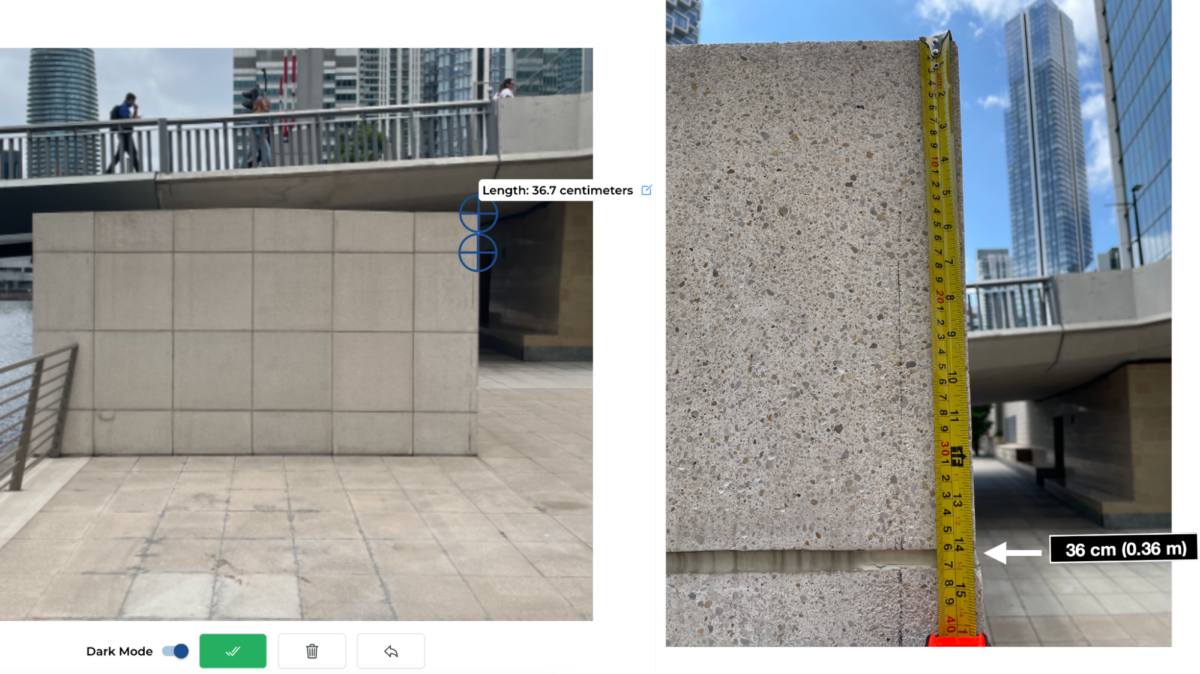
Using the Image Measurement Tool and an object of reference it’s also possible to measure the size of the individual tiles which make up the concrete block. The measurements made using Image Measurement Tool correspond to the measurements performed onsite using a physical ruler — as outlined below.
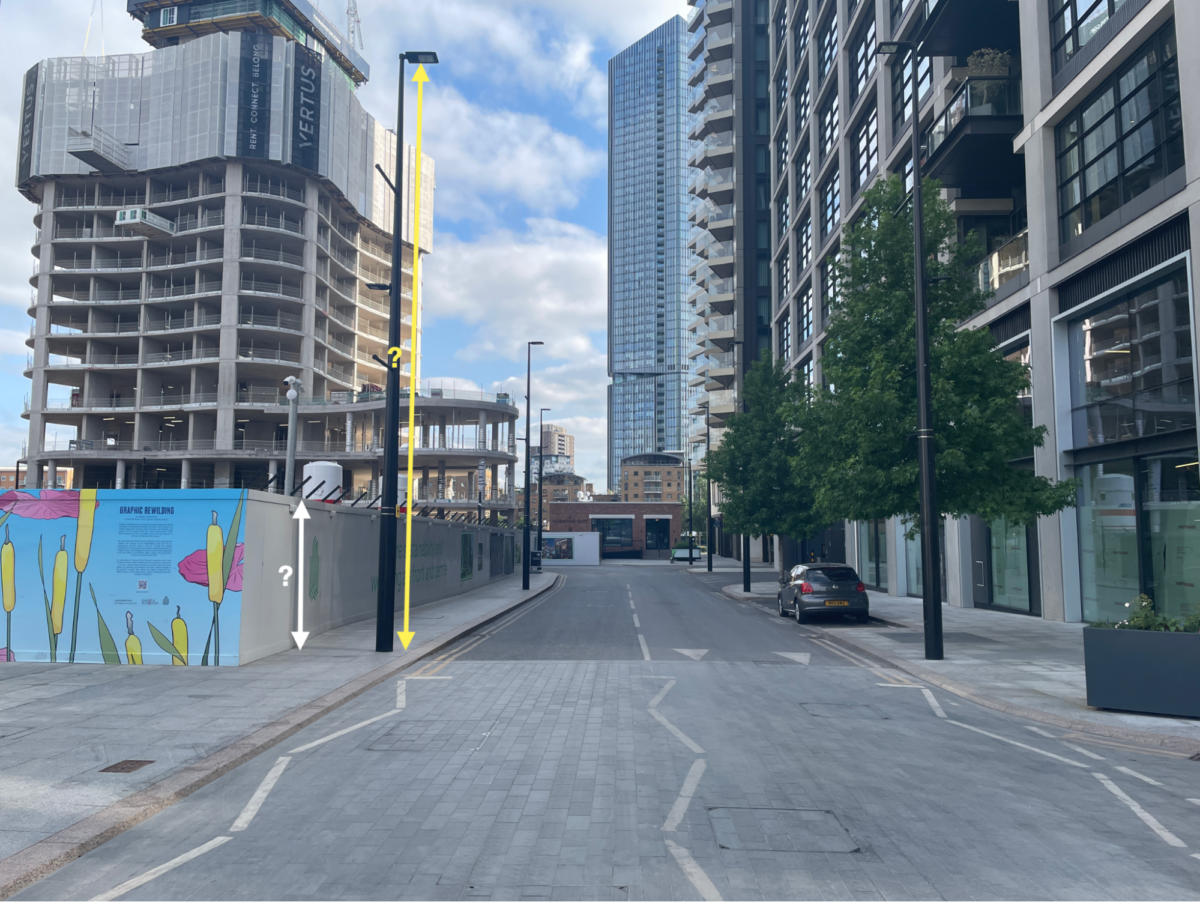
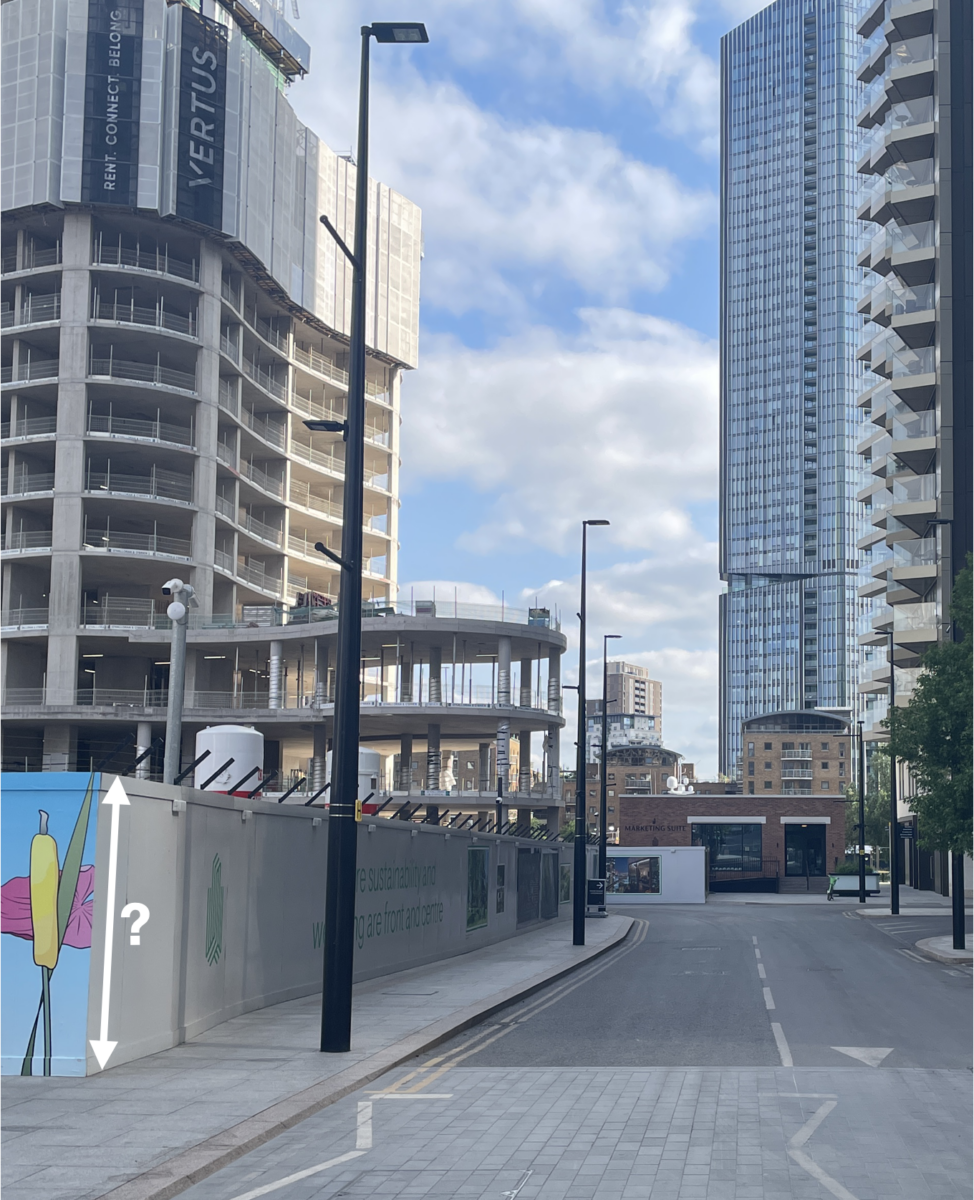
Scenario 2. Measuring the Height of a Lamp Post and Fence
In this example, we’re going to measure the height of a lamp post and a construction fence located at 51.503242, -0.012470. We will use two different methods to carry out the measurement.
Measuring the Height of the Lamp Post and the Fence Using a Combination of Google Earth Pro and Image Measurement Tool
As in the example above, we’re going to first use the Google Earth Pro ruler to take a measurement. This time, however, the effects of perspective arise and must be taken into consideration when selecting the object of reference.
Step 1. Identify and Measure the object of reference using Google Earth Pro.
As explained earlier, to mitigate the effect of perspective, the objects of interest and the object of reference must be on the same image plane.
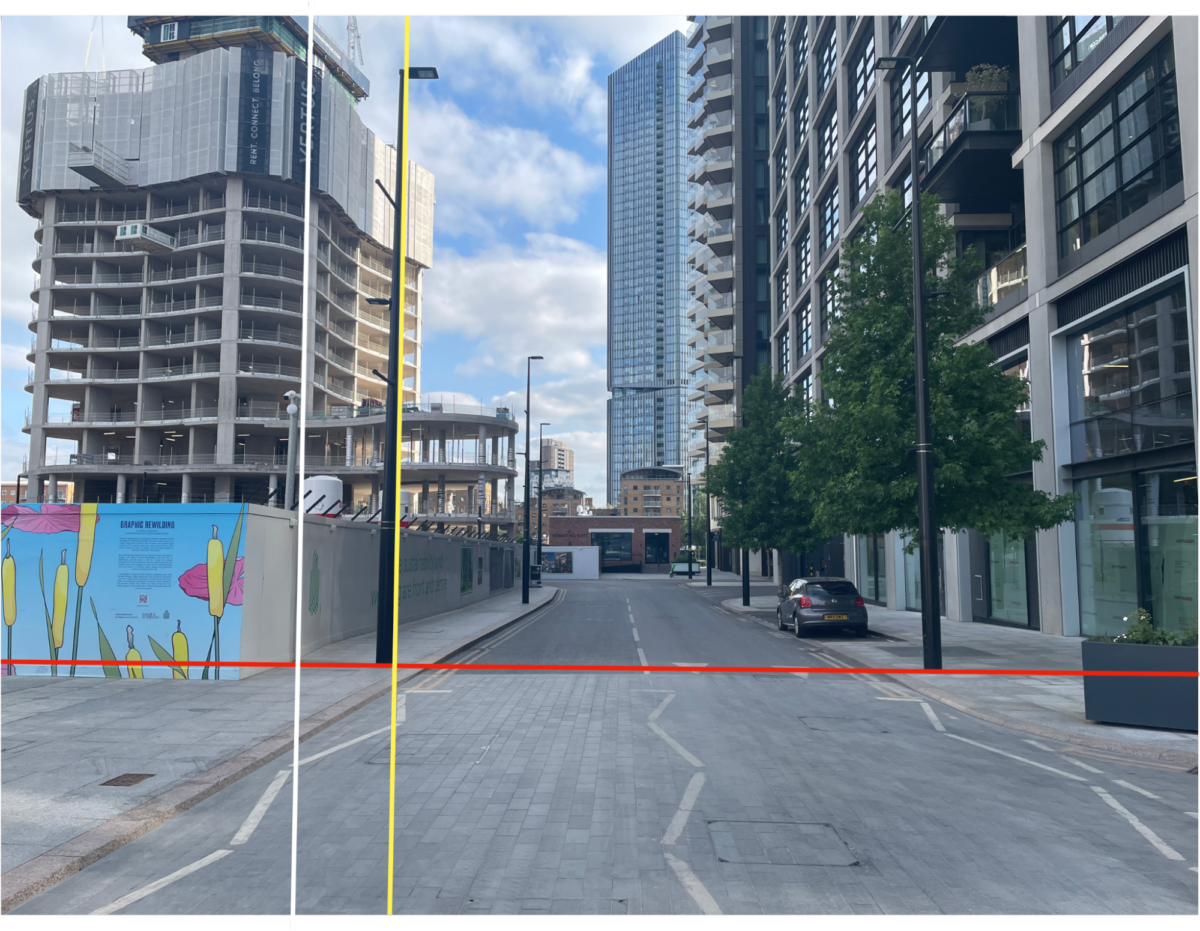
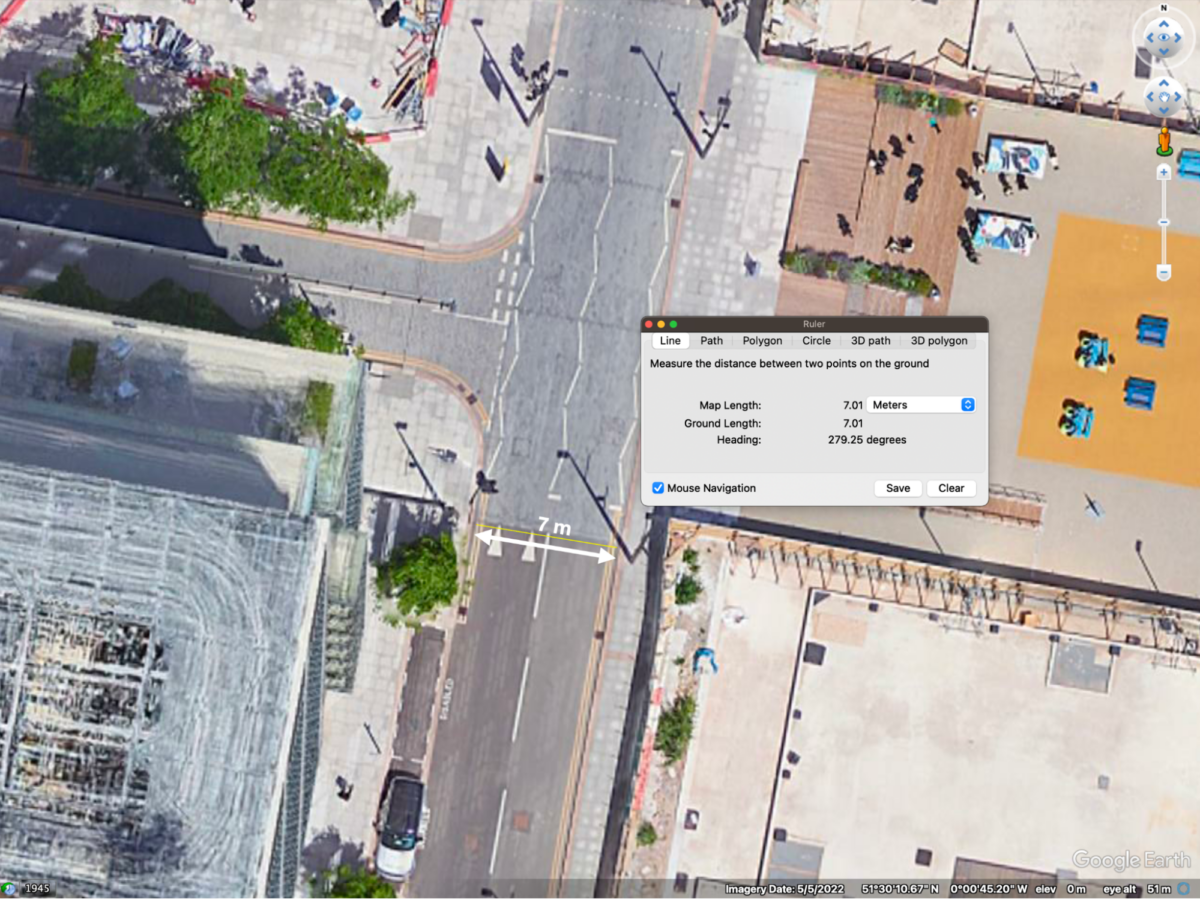
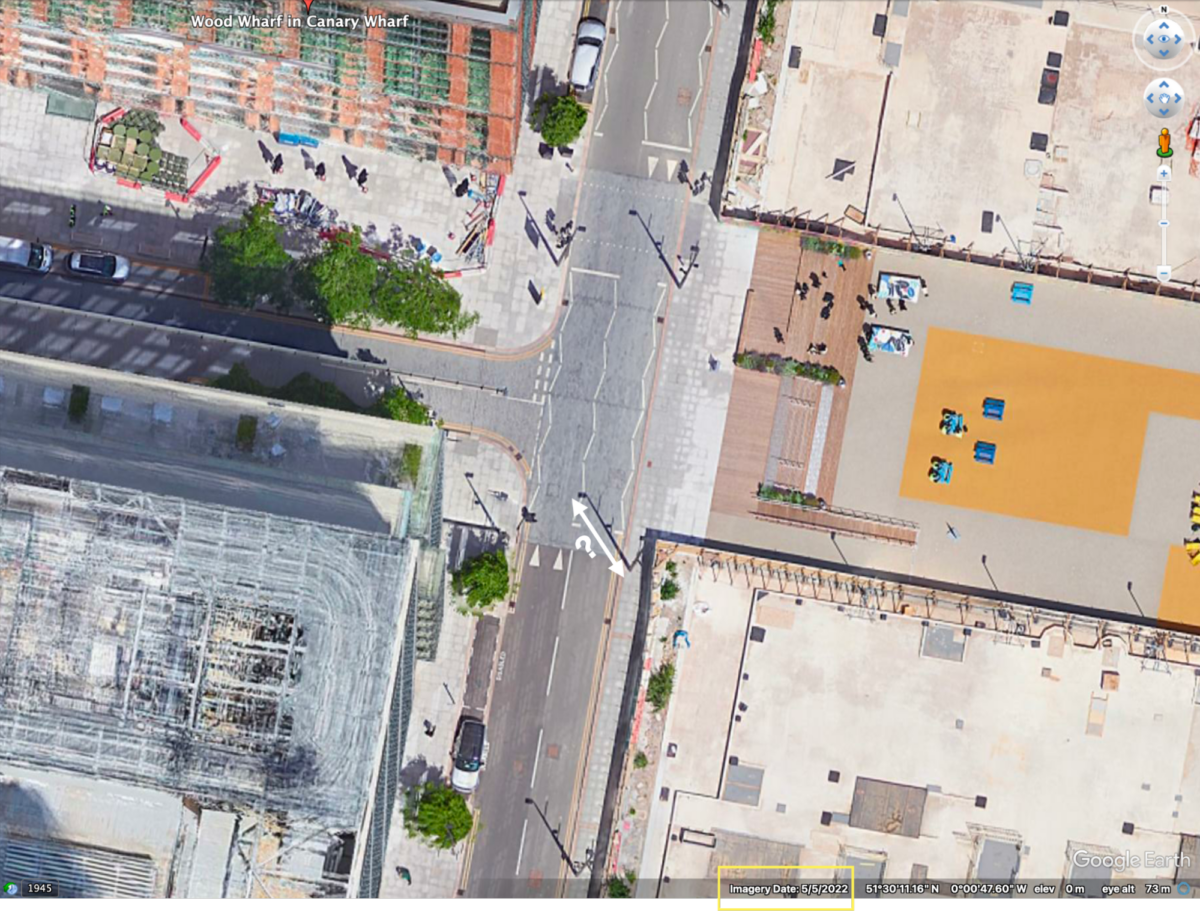
By drawing a straight line over the objects of interest in the image we can establish that both the lamp post and fence are on the same image plane. The road at the bottom of the two objects of interest appears to be the only useful object of reference because (a) it is located in the same image plane (perpendicular to them) (b) it is clearly visible in satellite images on Google Earth Pro so we can measure it and achieve a good estimation of its length.
Using Google Earth Pro ruler, we measured the width of the road three times — across different satellite images — and calculated the average width of the road was seven metres.
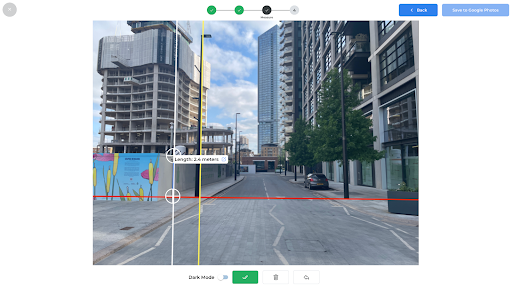
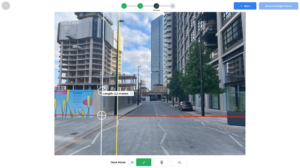
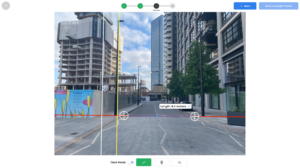
Step 2. Measure the Height of the Lamp Post and the Fence Using Image Measurement Tool
Using the width of the road, it’s now possible to estimate the height of both the lamp post and the fence using the Image Measurement Tool.
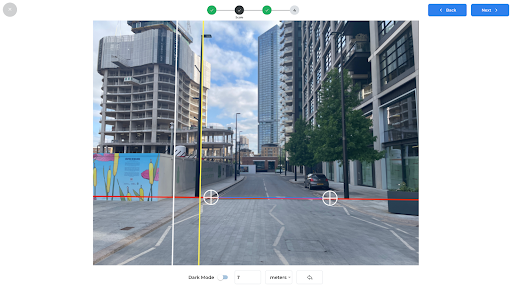
First, measure the road and manually enter the measurement (7m) in the Image Measurement Tool. Note that it is important to measure the road exactly below the lamp post; not in the foreground of the image, where perspective may warp or alter how wide the road appears.
Next, draw a line along the fence. The Image Measurement Tool indicates that the height of the fence is 2.4m, which corresponds to the measurements performed onsite using a physical ruler (2.4m). Repeat these steps and apply it to the lamp post; the Image Measurement Tool indicates that its height of this object is 9.5m — we were not able to measure this onsite.
It should be noted that if you are not able to confirm measurements on the ground, there may be other ways to corroborate your calculations. In this example, you could ring the local authority to confirm the height of lamp posts or try reverse image search the objects to confirm that the dimensions match those calculated via open sources or found in manuals online.
SunCalc: Establishing a Correlation Between Shadow Length and Object Height
SunCalc is a tool that simulates the movement of the sun through the sky on different dates and locations across the Earth. Bellingcat has previously written about uses of SunCalc to measure shadows and estimate when an image was taken (chronolocation).
SunCalc can also be used to estimate the height of an object based on the length of the shadow it casts. If a vertical object satisfies the following criteria, it is also possible to estimate an object’s height.
- The exact location of the object casting shadow must be known (geolocated)
- The object should be tall enough (ideally over 1m) to cast a shadow distinguishable on the satellite imagery
- The entire shadow cast by the object should be clearly visible on a flat surface
- The date of the satellite image must be established beforehand, as the sun’s position impacts the shadow’s length.
When zoomed in on SunCalc the app often uses satellite imagery supplied by Maxar Technology, which is also used in Google Earth Pro. This creates two advantages that can significantly improve the accuracy of measurements using SunCalc. Firstly, the date of the satellite image is often indicated by Google Earth Pro, which eliminates the need to chronolocate the satellite image. Secondly, it makes it possible to use the Google Earth Pro ruler to confirm the estimates provided by SunCalc.
The following section demonstrates how this works in practice. It also addresses some of the practicalities and issues associated with identifying and measuring an appropriate object of reference.
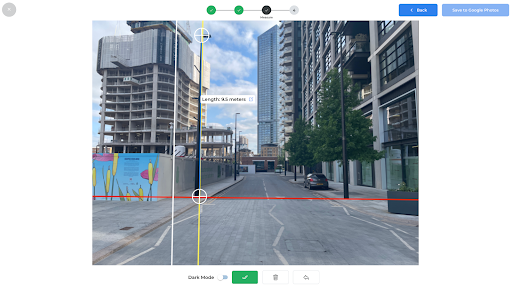
Measure the Height of the Fence using a Combination of SunCalc and Image Measurement Tool
If you have an image where the only object that can possibly be used as an object of reference is vertical, the Google Earth Pro ruler is of little use. However, if the image or relevant satellite image depicts a clear shadow cast by the object of interest, it’s possible to estimate that object’s height using SunCalc.
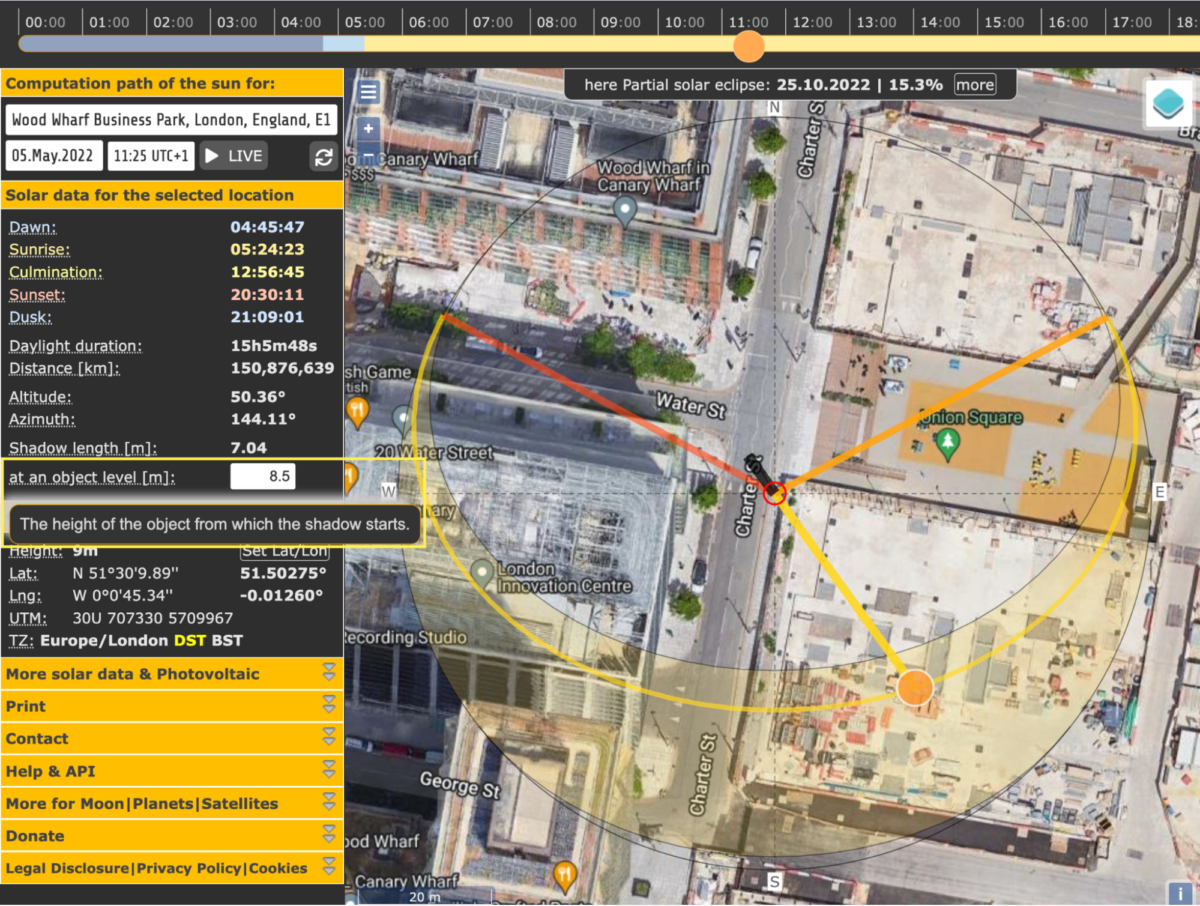
In this example, the fence will serve as the object of interest and the lamp post will serve as the object of reference; the road will be used to evaluate the accuracy of the estimate. At this point, the height of neither object is known. However, we can see that the lamp post casts a distinct shadow in the satellite imagery that SunCalc uses. As indicated above, SunCalc often relies on the same satellite imagery used in Google Earth Pro, which is dated May 5, 2022. The shadow that the lamp post casts is clearly visible in this satellite image.
First, set the date of SunCalc to May 5th, 2022, (when the satellite image was taken) and place the SunCalc tool over the exact spot occupied by the lamp post. Next, select the “at an object level” tool in the toolbar on the left hand side and increase the height of the object until the black stripe (simulating the shadow) entirely covers the actual shadow cast by the lamp post.
By doing this, SunCalc shows that on this date, a shadow of 7.04m would have been cast by an object of 8.5m height.
Now, using the estimated height of the lamp post as an object of reference, we can estimate the height of the fence with the Image Measurement Tool by following the steps outlined above. The Image Measurement Tool calculates the height of the fence to be 2.2m. When this is repeated and applied to the road, the road is estimated to be 6.4m.
The accuracy of the results obtained using this method appear to be lower than the first method. This can possibly be explained by the author’s error in determining the exact location of the lamp post as well as possible distortions of the shadow cast by the lamp post, which is depicted in the satellite imagery, or both. In any case, while the method used in this example yields less precise results, if a digital investigator takes this into account, it could still offer potentially valuable insights in a situation where no other suitable object of reference can be identified.
If no suitable satellite image was found, but the object depicted on the image casts a clear shadow (for instance, the lamp post’s shadow falls on the middle of the street) you can try to simulate that shadow by using the SunCalc instead.
Bonus scenarios! Using SunCalc to Measure Massive Objects
You can also use SunCalc to measure the height of massive objects, such as the Eiffel Tower or Burj Khalifa.
Bonus Scenario 1. Measuring the Height of the Eiffel Tower Using SunCalc
At the time of writing this guide, SunCalc uses what appears to be the same image as Google Earth Pro; the date it was taken is not stated.
In this situation, it is essential to find other suitable images that depict a clearly visible shadow cast by the Eiffel Tower which states the date it was taken.
After exploring the historical imagery, a suitable satellite image was identified on Google Earth Pro, which is dated August 22, 2019. In this image, the shadow of the Eiffel Tower can be clearly seen- it almost reaches a pontoon on the opposite side of the Seine. Since the very same pontoon is seen on SunCalc and nothing suggests that it was moved, it will serve as the endpoint of the shadow.
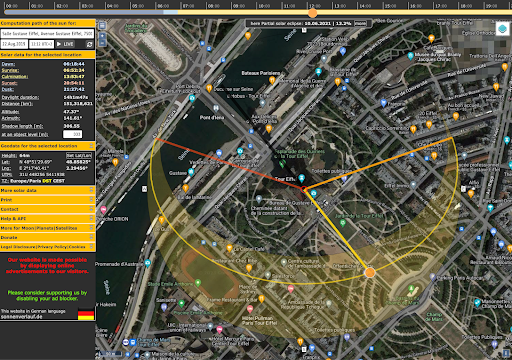

Google Maps indicates that the centre of the Eiffel Tower (and, hence, the location of its spire) is located at 48.85825, 2.29456, indicating the exact coordinates at which to place the simulated object on SunCalc.
Using the method outlined above: select “at an object level” tool from the toolbar on the left hand side of SunCalc and increasing the height of the object until the black stripe (simulating the shadow) entirely covers the actual shadow cast by the Eiffel Tower. SunCalc indicates that the height of the Eiffel Tower is 333m. The satellite image used to perform the measurement was taken on August 22, 2019, when the reported height of the Eiffel Towers was 324m.
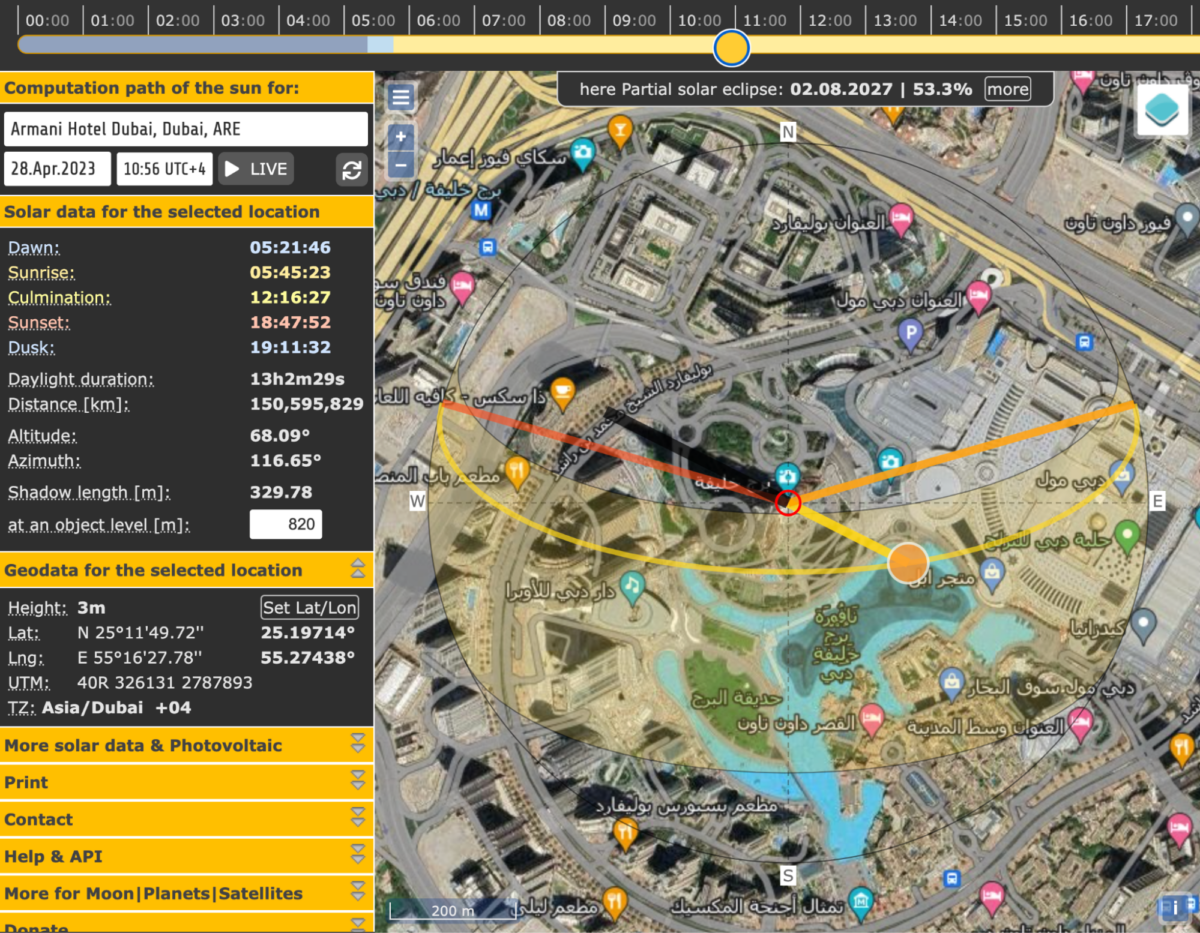
Bonus Scenario 2. Measuring the Height of the Burj Khalifa Using SunCalc
This process can be repeated with the Burj Khalifa in Dubai, UAE. Since SunCalc uses the same image as Google Earth Pro, taken on April 28, 2023, we can proceed to measure the shadow cast by the Burj Khalifa straight away. SunCalc indicates that on this date, the shadow of that length must have been cast by an object of 820 metres. The officially reported height of Burj Khalifa is 828m (830m including its tip).
Accurate Estimations and Further Verification
When dealing with measurements in photos, videos and satellite images — you must always take into account possible distortions caused by the lens and position of a camera that can impact perspective. Just as lenses can vary with different cameras, so too can measurement results.
As such, the application of the methods described above — especially when shadows are used to measure the height of an object — should be viewed as accurate estimates of an object’s size rather than determining its actual size. In order to achieve more accurate results, open source researchers should use them together with other methods of verification and corroborate the results with as much information as possible.
Open source researchers should also think about contacting relevant local authorities, architecture firms, construction companies, manufacturers or any other group that may have detailed measurements who can help corroborate measurements taken using open source techniques.
Bellingcat is a non-profit and the ability to carry out our work is dependent on the kind support of individual donors. If you would like to support our work, you can do so here. You can also subscribe to our Patreon channel here. Subscribe to our Newsletter and follow us on Twitter here and Mastodon here.