
More than Mountaineering: Using PeakVisor for Geolocation
A short, shaky video and a single photograph show mourners standing on a mountainside as a row of bodies lie shrouded, about to be buried. Both images appear to be taken from close viewpoints and at nearly the same time — 17:53 UTC on May 28, 2022. But where exactly were they taken?
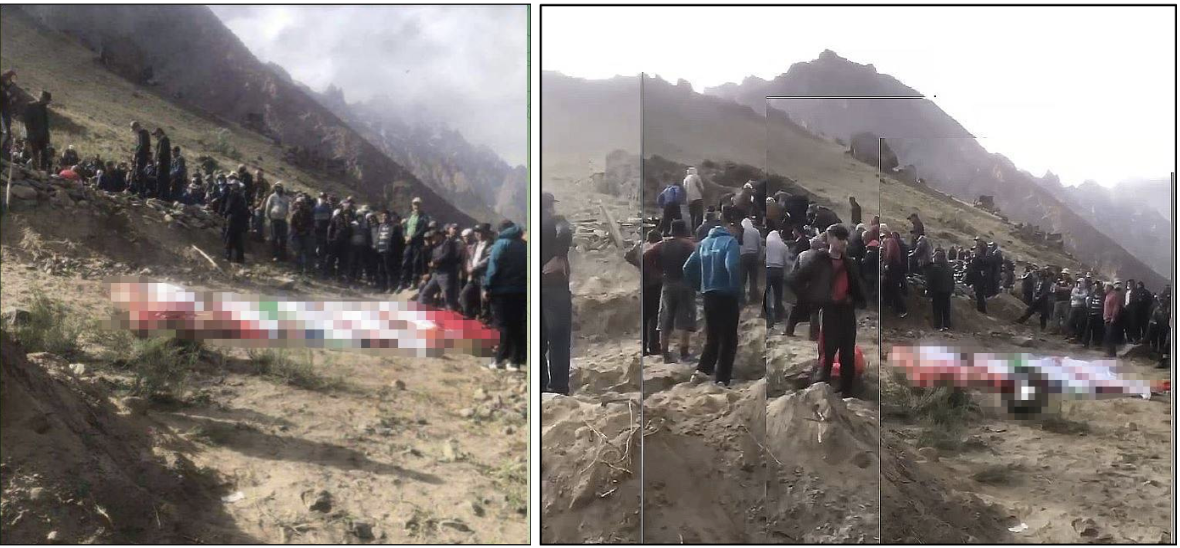
While the first Telegram posts have since been deleted, these images and a video can still be found online as they had been shared by other Tajik Telegram users shortly after the initial posts.
Accompanying text on the Telegram post by Pamir Daily News which contained these images claimed that the burial took place in the Rushon District of Tajikistan, and that the dead had been killed by government troops during a crackdown in the remote Gorno-Badakhshan autonomous region in the east of the country.
There are a few further clues. As the mourners are dressed in anoraks and trainers rather than climbing gear, it is likely that the paths to this location were not extremely steep. This suggests a location in the foothills, rather than higher up the mountains.
But that’s where geolocating this footage stalled. There is no Google Street View in this remote area. The only footage available on Mapillary points down the main Pamir Highway from the perspective of a car travelling in one direction. Google Earth’s “ground-level view” rendered the real-life jagged terrain as too smoothed to show distinctive rock features.
In this type of landscape, PeakVisor is a valuable tool. This app was originally developed to help mountaineers and hikers orientate, navigate and share geographic information on their smartphones. It has come to play a growing role in open source investigations, confirming geolocations in Bellingcat’s stories as far afield as Armenia, Ethiopia, Italy and Mexico.
PeakVisor offers a number of functions, including a 3D panorama allowing users to place themselves at any coordinates of their choice to scan a highly accurately rendered 360 degree landscape. A 2D contour map allows users to view the inclines of all natural slopes in a selected region, be that in a rural or urban environment.
The tool’s PhotoFit feature allows users to overlay the silhouettes of any skyline or natural landmark onto a photograph, allowing for comparison and therefore verification of the location of the image. However, it must be noted that PeakVisor is generally best used for rendering natural geographic features. It doesn’t recognise structures such as buildings, although it often displays man-made entities such as canals or slag heaps.
Crucially, PeakVisor also renders some of the most detailed and accurately shaded virtual landscapes currently available.
To distinguish between the multiple peaks and valleys in regions such as the Pamir Mountains, as much silhouette detail as possible is needed, showing against either the skyline or contrasting terrain. Below is a comparison between a photograph of a known location in the Rushon Valley (centre), and a 3D rendered panorama of the same location in Peakvisor (left) and Google Earth Pro (right).
As you can see, PeakVisor is clearly the more detailed option.
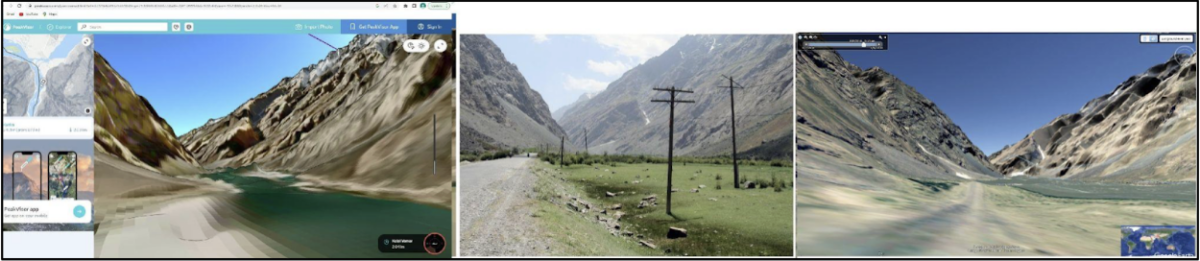
PeakVisor’s terrain shading and topology rendering algorithms make the valley floor’s raised road and grassy river basin distinct, and they adjust both seasonally and for time of day. Google Earth Pro’s rendering is far more homogenous, in both shading and in flattened topography. Its rendered 3D panoramas in the area represent the valley floor as flat and the terrain as evenly textured right up to the foot of the mountains on either side. PeakVisor also provides a much more defined skyline. Google’s algorithms produce smoothed skylines which aren’t consistent with its own photographs of the jagged peaks of the general area.
Here’s how PeakVisor helped solve this geolocation from the burial in Tajikistan.
Clues From Contours
Let’s look at the imagery from the presumed burial.
We are searching for a location on a slope near the base of the mountains, with some turf and a little earth visible, possibly also a path. Given the Rushon district is spread over a wide area, we’ll need to figure out where within this area is best to start looking.
In many investigations, a tip-off or information posted on social media channels can provide further contextual details as well as help narrow down a large search area. This is what happened in this instance, with posts suggesting the burial had taken place to the east of Rushon village.
This would make sense given the local custom is to bury the dead within a few hours and earlier videos of bodies covered in shrouds could be geolocated to Rushon village. Any burial therefore was unlikely to have taken place too far from where the shrouded bodies were pictured.
The tip as to the burial being east of Rushon village allowed us to create an area of interest to hone our search.
Given the source images show people walking up steeply slanting ground, we can already narrow down within the search area east of Rushon to regions with similar slopes.

PeakVisor’s 2D map window (which can be seen in the top left of the app or web platform) helps with this as it displays contour lines set at 10 metres apart in elevation. This allows us to see where hills and peaks begin to rise and fall, at what gradient and at what angle.
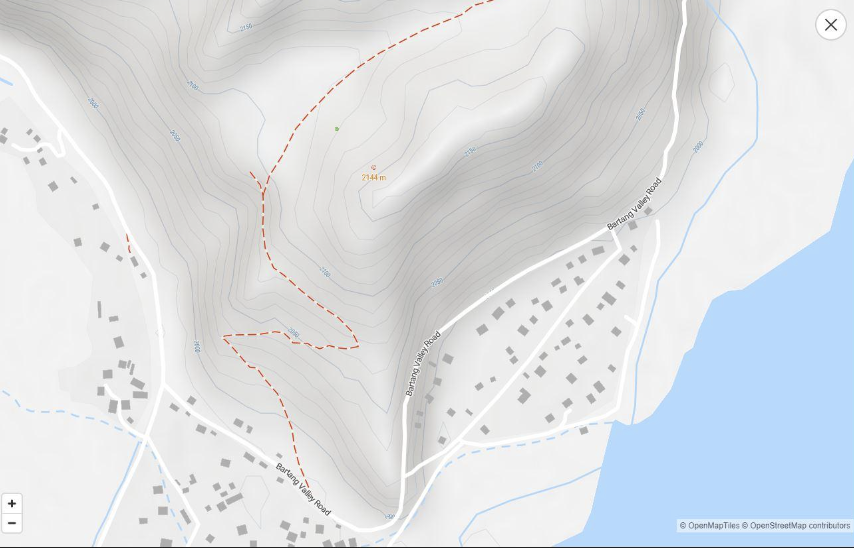
As we can see several areas of elevation in the burial image, we can begin to compare these two sources to identify potential search areas.
By annotating a screenshot of the area (which has to be done outside of the PeakVisor app as it doesn’t yet have this functionality), we can begin to establish a boundary for our search by excluding areas which are too high or steep (orange) or too low or flat (purple) compared to what can be seen in the burial image. In this instance, we are looking for sloping ground with a view uphill to a skyline of peaks.
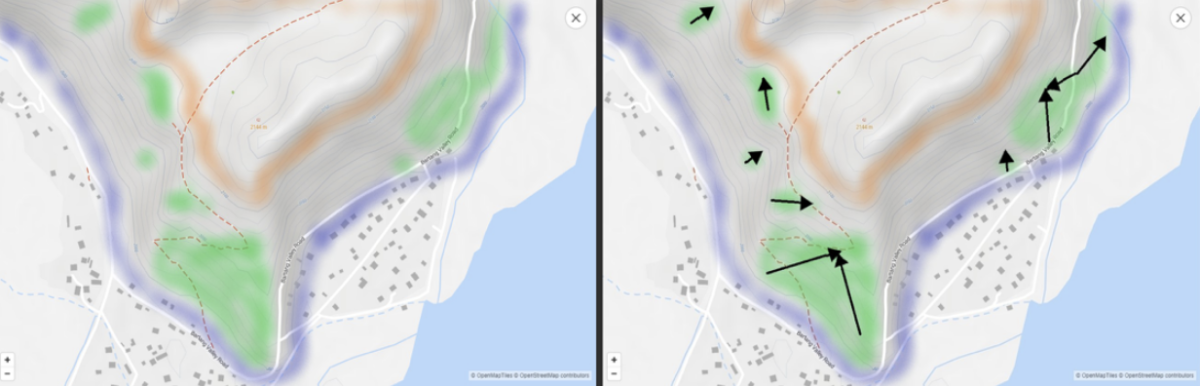
The green areas show sites of potential interest with the black arrows suggesting the viewpoint the camera could have had in the burial image.
By looking within these prioritised search areas, we now have a strategy of how to use Peakvisor’s 3D Panorama function (described below) to test our hypothesis, potentially matching the platform’s virtual panoramas to what can be seen in the source image. It should be noted, though, that while this method can sound simple it can often entail virtually visiting lots of sites and painstakingly attempting to make visual comparisons between the peaks and landscapes between PeakVisor and in the source image. This is especially the case in mountainous districts like Rushan because the view is more likely to change rapidly over relatively small distances than in flatlands.
Nevertheless, this targeted approach is significantly more manageable than searching the entire Rushon District and hoping to find a match.
Building a Panorama
PeakVisor’s 3D Panorama function allows us to view the landscape from any chosen set of coordinates. It also includes a dynamic location feature which re-renders the resulting image in almost real time as the user moves along the virtual landscape.
Using PeakVisor’s 3D Panorama Function
The 3D Panorama function in PeakVisor allows users to place themselves at a set of coordinates of their choosing and to see a high resolution virtual view of the surrounding landscape.
Obviously, this is useful in situations when investigators are trying to geolocate footage in mountainous or hilly areas. But it is also worth noting that PeakVisor can be useful in other areas with distinctive natural features.
To utilise this function, a user can either type precise coordinates, or the name of a town or peak that they wish to search for, in the PeakVisor search bar. If precise coordinates are not available, it is possible to simply drag and drop the map pin to a suspected area of interest.
Note that PeakVisor may display local versions of place names in the 2D map, e.g. Рушон is the Cyrillic version of “Rushon”.
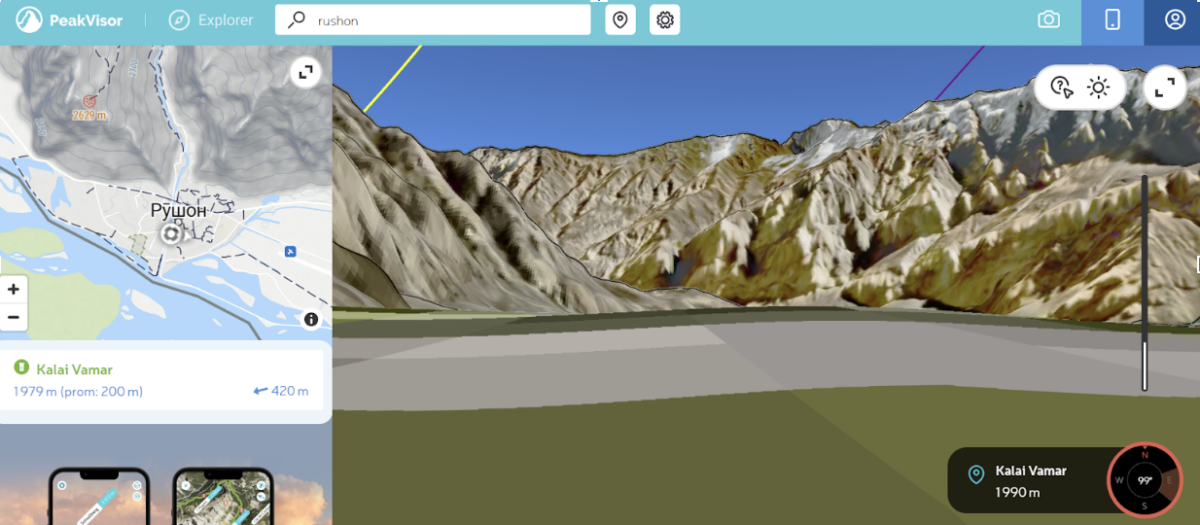
For example, if we wanted to begin our 3D search in one of the green areas near Rushon identified in our aforementioned strategy we would drag and drop the 2D map pin to our area of interest. If we knew the coordinates or name of a place we wanted to go to, we could also type those in and then press the “Teleport” button to change the PeakVisor viewpoint to that location.
In the example below we drag the 2D pin to an area to the east of Rushon, looking on to one of the potential search areas we highlighted earlier with black arrows.
In this instance, it was not possible to match the peaks or identifying features to the source image so we can cross this area off the list, go back to our search strategy and enter in a new set of coordinates. Or, alternatively, we can drag the cursor on the 2D map to our next site of interest. Some users may find the 2D map (which can be seen in the top left of the GIF below) too small. If that’s the case it is possible to maximise the 2D map window. The 3D Panorama will then regenerate with the view from the new location, as can be seen in the GIF below.

With this functionality in mind, a set of digital search routes was plotted to best traverse the prioritised green search areas defined in our strategy. The direction of the search routes was chosen so as to cross the maximum number of contour lines at least once, since altitude changes were likely to alter the visible panorama landscape most rapidly.
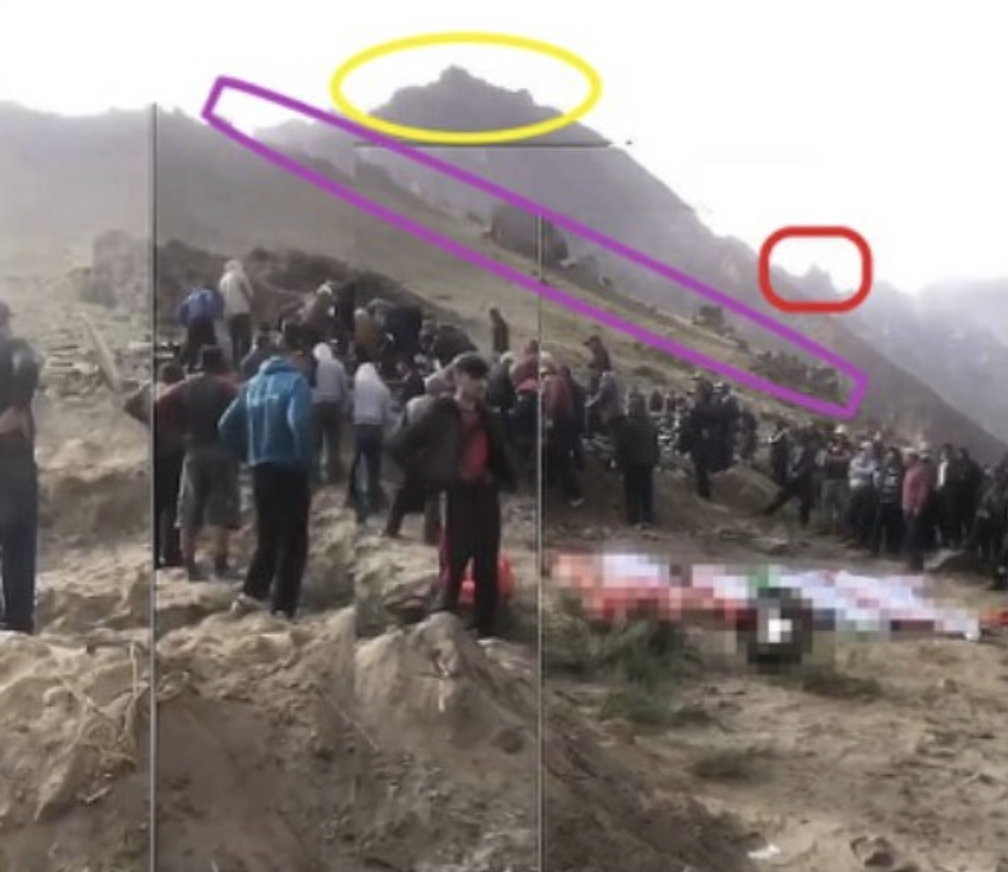
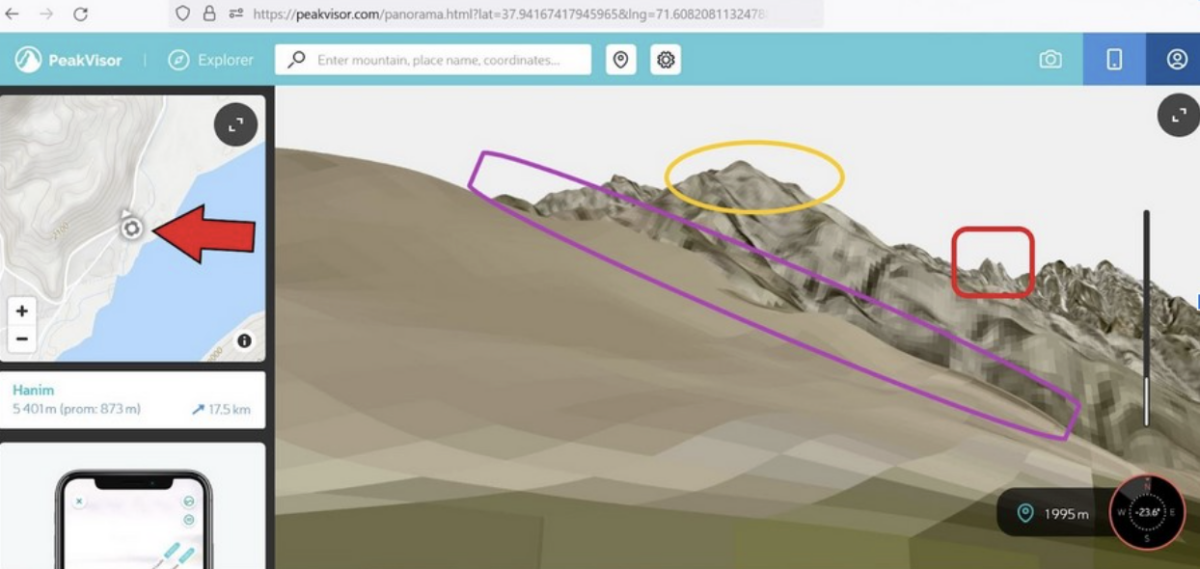
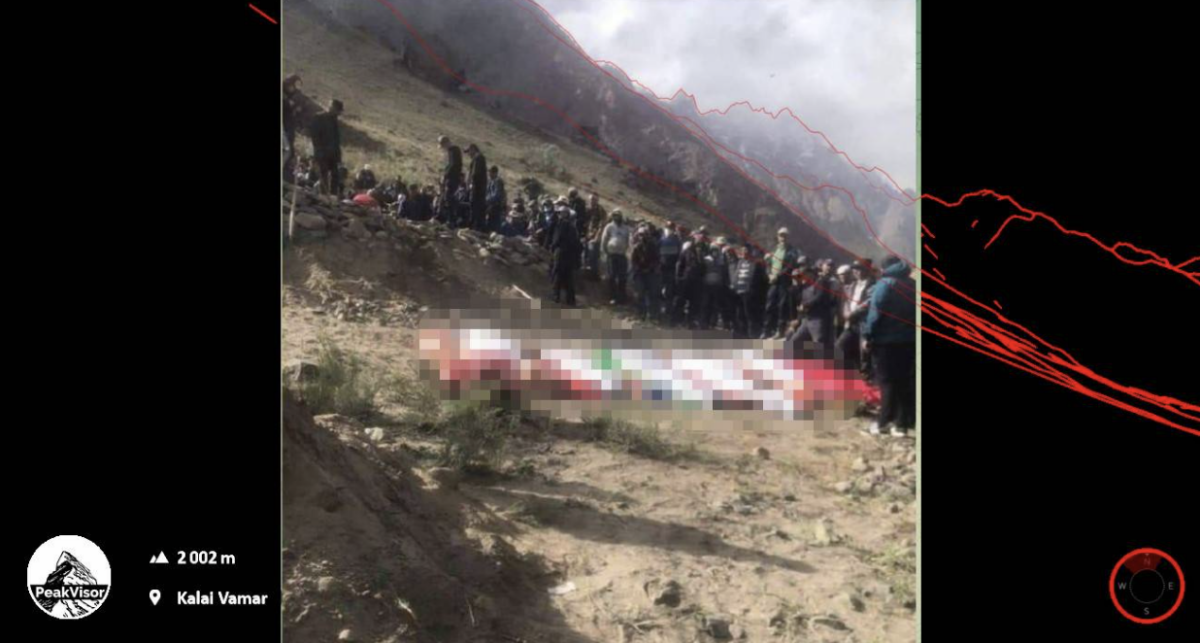
The goal was to find a vantage point where key geographic identifying features matched those seen in the imagery and video from the burial scene. These were the ‘warty’ peak at the top centre (outlined in yellow below), the foreground diagonal cross-slope (purple) and the ‘snaggletooth’ ridge on the right of the image (red).
A potential image match was found on the edge of one of the green highlighted areas towards the east at coordinates 37.943078, 71.609766 in the Bartang Valley.
Helpfully, PeakVisor’s 2D map (inset on the left, below) shows both the location and the direction of the virtual image viewpoint (the small white circle with compass pointer seen in the inset map). The red arrow was added by Bellingcat.
The ‘warty’ peak, cross-slope and ‘snaggletooth’ ridge can all be seen from this vantage point.
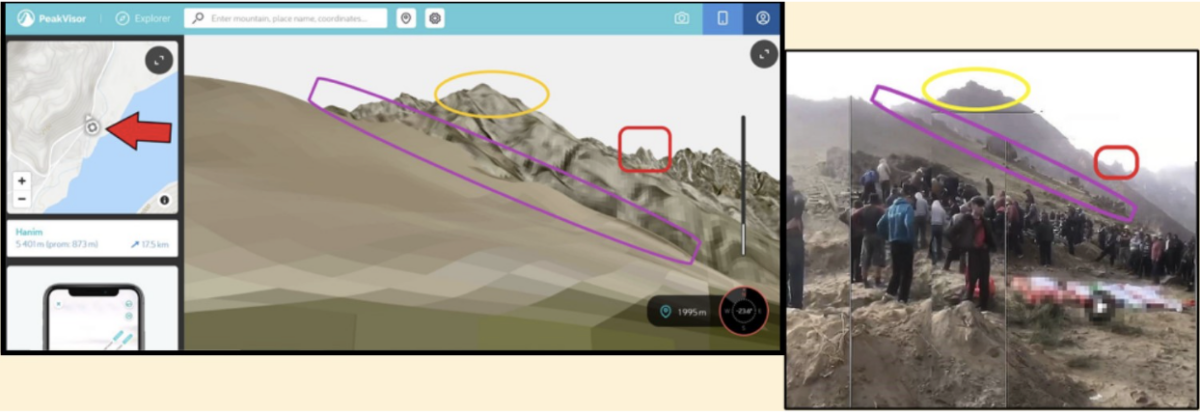
The video composite image was the first to be matched, because it contained the distinctive mountain peak. Nevertheless, the still photograph was easily matched as the location was nearby, although the camera pitch was lower.
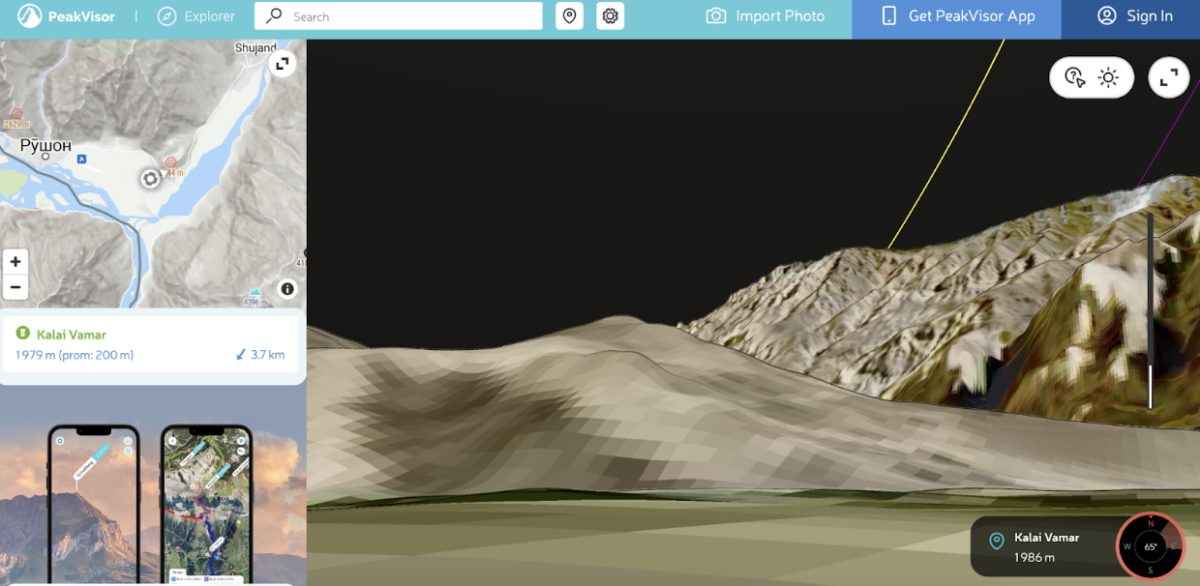
Let’s check the same location with Google Earth Pro’s panorama function.
The image below compares the equivalent Google view of this location (right) with the PeakVisor panorama (left) and the composite view of the location of the burial (centre). It is clear that the PeakVisor panorama is rendered with much more detail than Google, justifying the use of PeakVisor in this instance.

Near or Far?
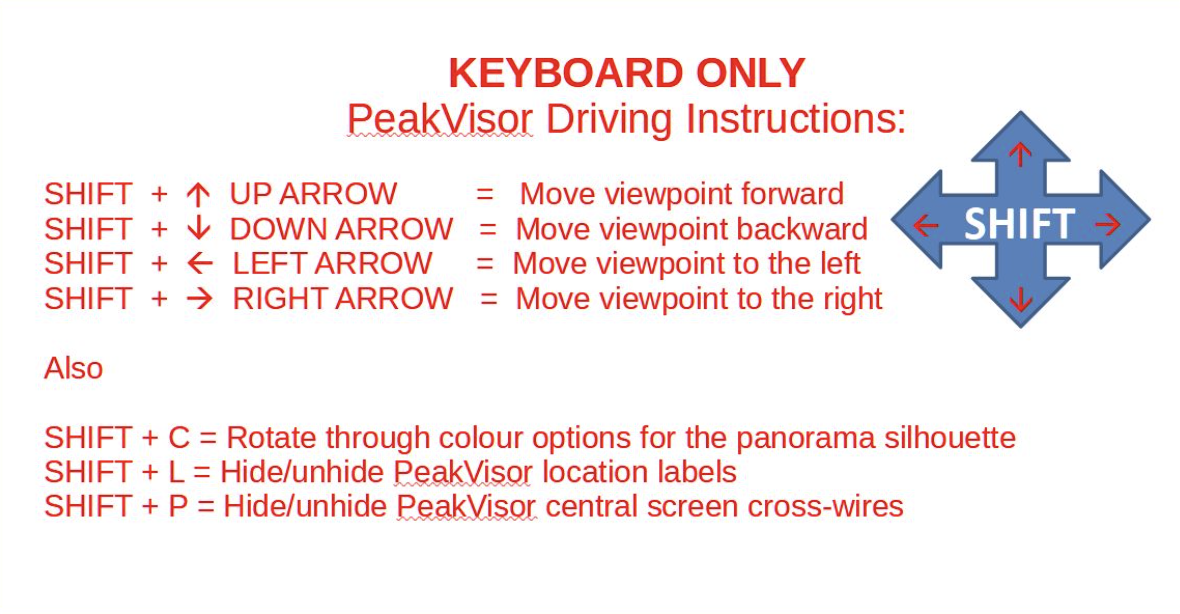
This match could be further confirmed by selecting distinct landmarks in PeakVisor’s 3D virtual panorama and measuring the distance from each to the presumed location. PeakVisor displays the names of mountains in the panorama, stating their distance from the viewpoint in kilometres. These labels can be switched on and off using SHIFT + L for ease of use, whilst SHIFT + P similarly toggles a useful centre screen ‘crosswire’ guide for accurate pixel selection within the panorama (a full list of PeakVisor keyboard shortcuts is detailed below).
This distance check confirms whether the landmarks seen in the panorama were either small and close by or large and further away. This cannot be discerned reliably in rendered panoramas and is strongly affected by the horizontal field of view setting in the system – a feature which will not be discussed in detail in this practical guide but will be covered in future Bellingcat training materials.
As can be seen below, Hanim Mountain is shown as 17.3 kilometres away from the position.
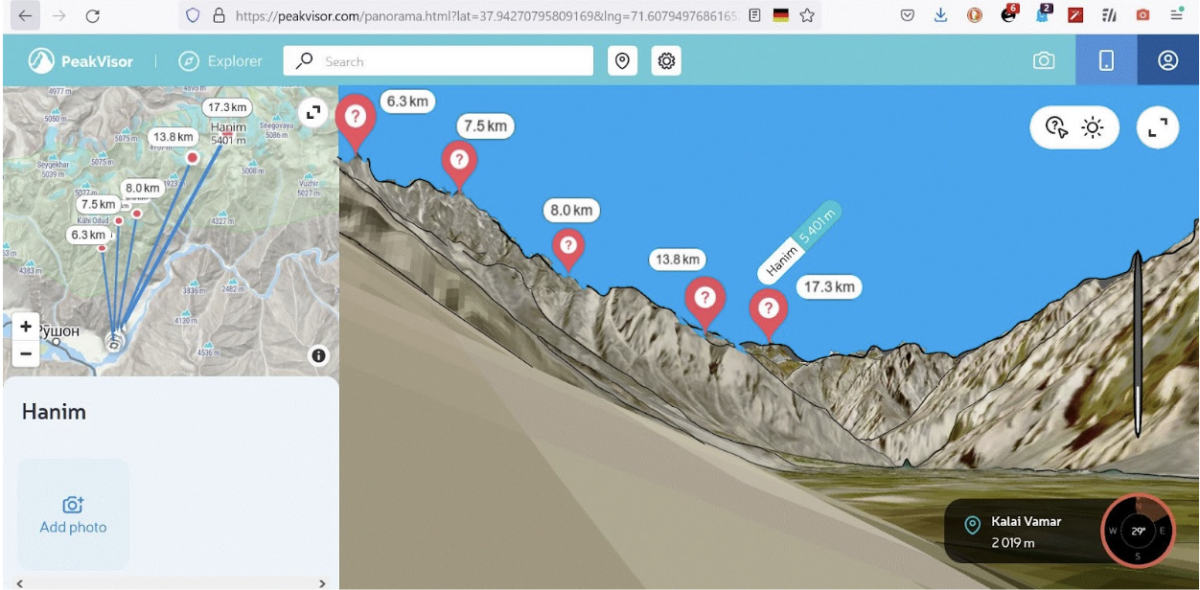
We can double check this by measuring the distance from the coordinates of our location to Hanim Mountain on the likes of Google Maps, which offers this functionality, or a printed map with scale.

The feature which measures distance between points within the 3D panorama is not available in Google Earth’s equivalent “ground level view”.
PeakVisor also offers a Teleport function which can be used to change the viewpoint of the panorama to that of any selected pixel in the entire 3D panorama.
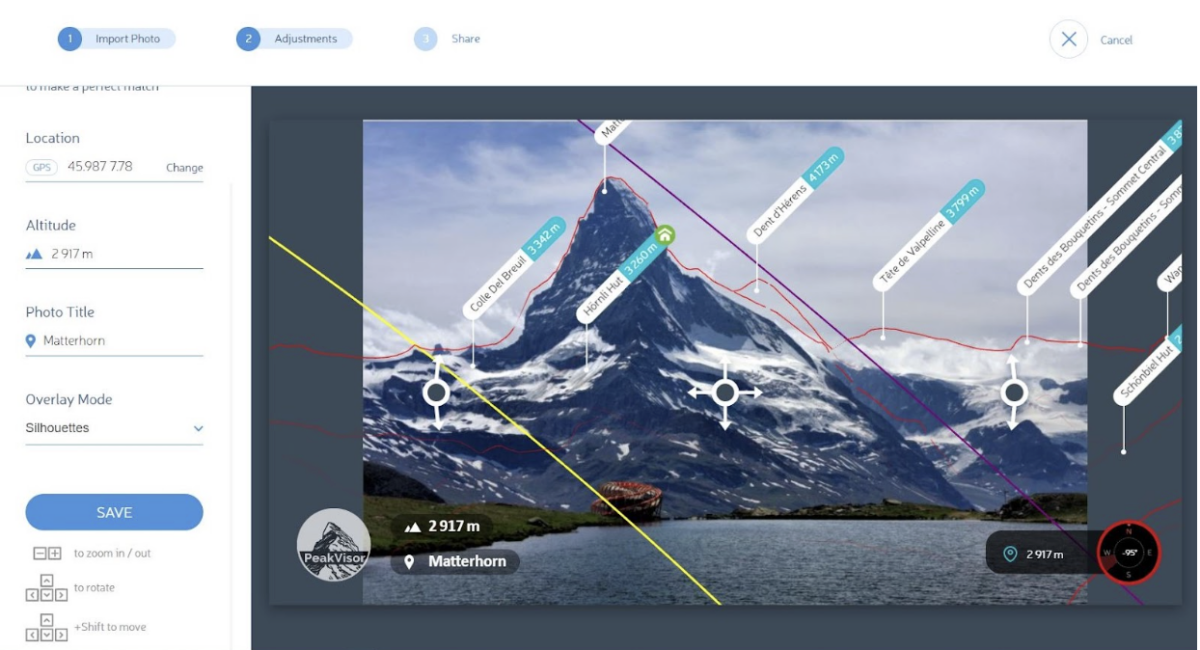
Making the Photo Fit
One way to be sure that we have located the correct spot is to overlay PeakVisor’s virtual view at this location onto our source imagery – in this case, the picture of the burial.
We can do this by uploading our source image to PeakVisor. Simply select the import photo option atop the right of the menu bar.
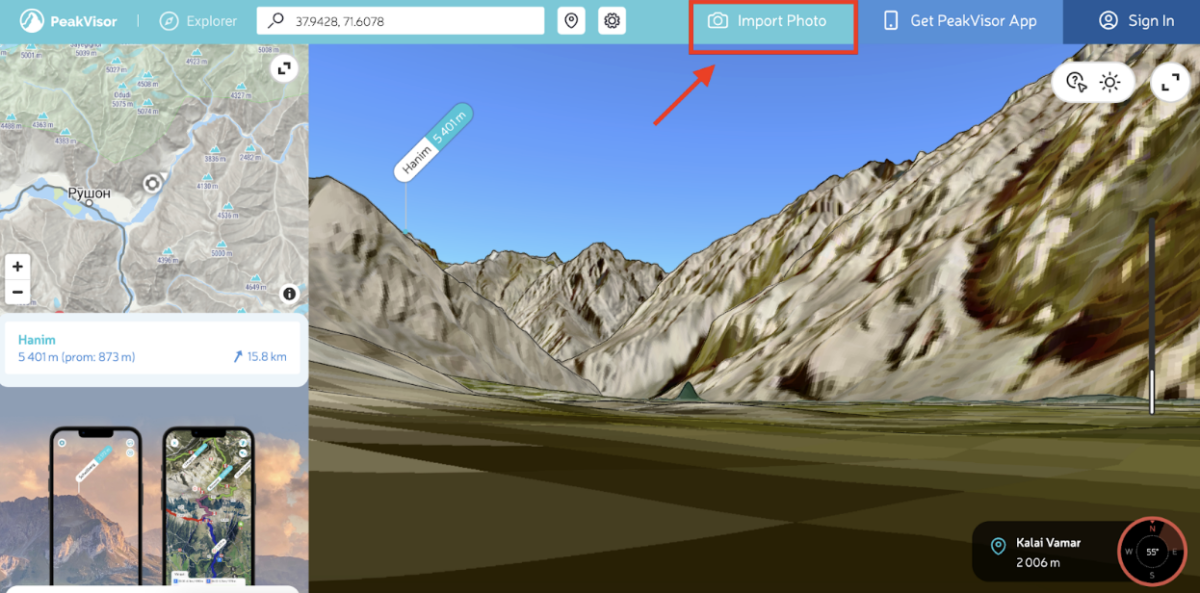
You will then be prompted to enter the coordinates of the location that you want to compare to your image.
By default, PeakVisor will use the location you have most recently been looking at so it is possible to simply press ‘Apply’ to initiate the comparison.
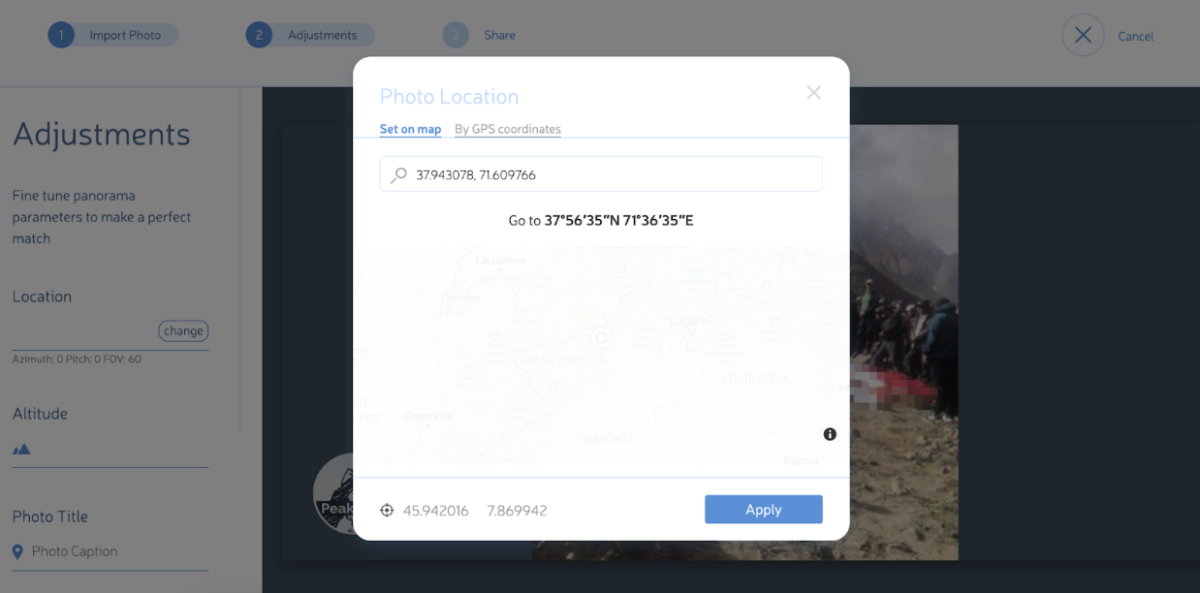
We are then presented with a rendering of the panorama from our selected location overlaid onto our source image.
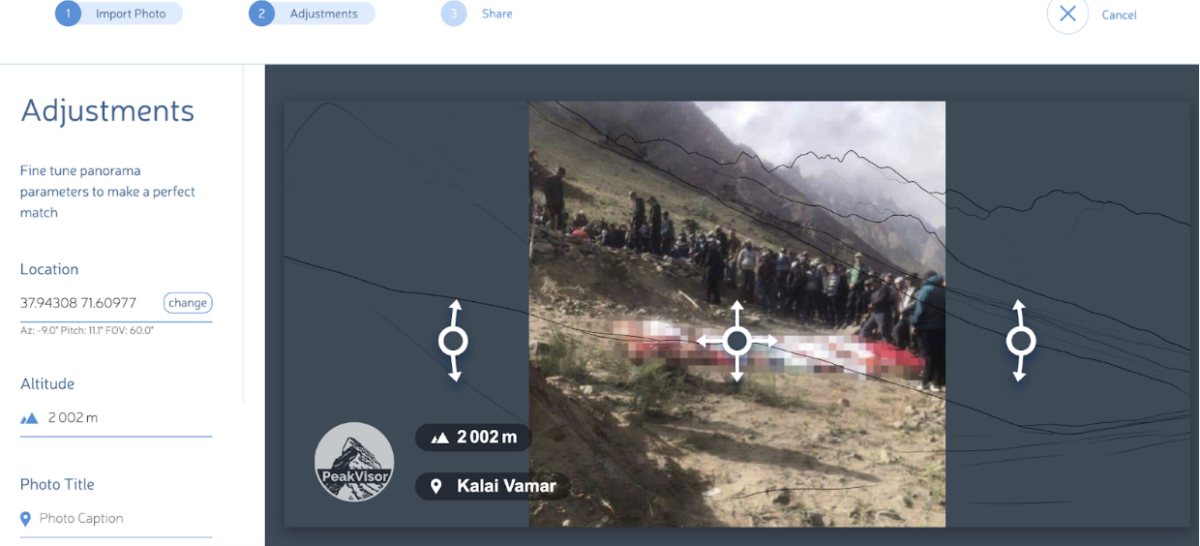
In almost all circumstances user adjustment of several parameters is needed to align the panorama and image. This is because, even at the same exact location, several other parameters need to be matched between the way the image was photographed and the way the panorama was generated. For example, if the photographer was standing on a slope or at an angle that would be reflected in how the image appeared. A user would therefore need to manually adjust the rotation of the panorama to match using the on-screen arrows. Similarly, the photographer’s camera lens is set to a specific angle of view, and the user can move the scroll wheel to vary this property in PeakVisor to try and match that.
In such scenarios, users can alter the alignment of the image by clicking on the arrows displayed on screen and dragging up, down, left or right. This process is displayed in the GIF below.

To get the best contrast between the image and the overlay, we can press SHIFT + C to flick through colour options for the overlay lines (which also applies to contour lines in the 2D view). Below it can be seen in red.
Satellite Confirmation
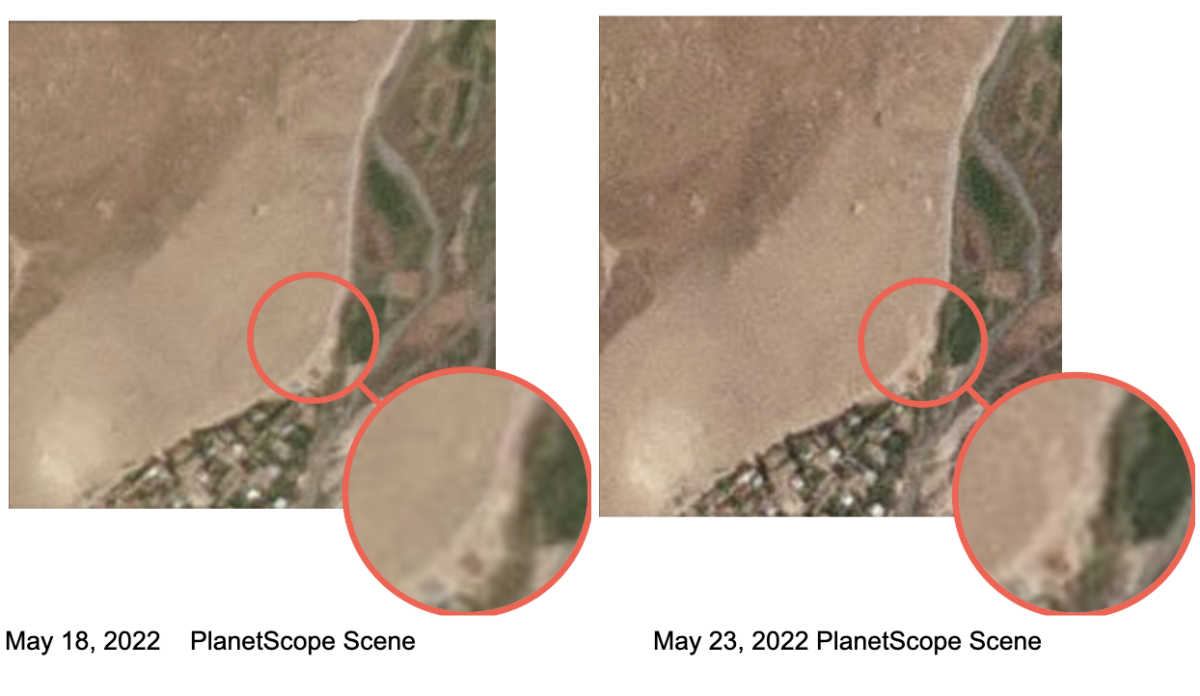
To obtain further confirmation and accuracy, these coordinates were submitted to the Planet satellite imaging service to obtain satellite imagery around the date claimed for the burial.
Planet’s satellite images of the area were taken multiple times a week. An area of ground near the coordinates found in PeakVisor had changed between May 18 and May 25, 2022. Satellite imagery from May 23 showed that a patch of land on the mountain near the road had seemingly been disturbed. By May 25 this patch had slowly settled back into homogeneity.
It is not possible from open sources alone to establish the cause of this disturbed ground by looking at satellite imagery alone. But its appearance around the time of the burial is noteworthy.
However, inputting the coordinates of the PeakVisor match into Google Earth showed a distance of around 176 metres from the coordinates of the disturbed earth on satellite imagery.
The characteristics of extreme terrain such as this mean that small movements in viewpoint can result in large variations in PeakVisor’s 3D panorama. An obvious way to check whether to use the satellite-derived location or the PeakVisor-derived location was to compare the panorama views of the two locations in PeakVisor. The location (37.9428, 71.6078) of the disturbed earth on the satellite image was fed back into PeakVisor to see what kind of viewpoint it generated for that location.
The coordinates of the satellite derived location yielded a 3D panorama which was an even closer match than that found earlier.
The mountain peak and distant rock formations were well-matched with the photographic image using PhotoFit at both locations. However, in the foreground slope was far better matched in both size and inclination at the location found with the help of satellite imagery.
With this dual approach, using both PeakVisor and satellite imagery, each method can be used to assess confidence in the results of the other.
Future Functionalities and the POPSI Project
A version of PeakVisor is now being developed specifically to support Open Source investigations in a voluntary collaboration between PeakVisor and the online open source community, called the POPSI Project. The author of this article instigated this work after replying to a message from PeakVisor to its users and introducing the PeakVisor development team to open source investigations as a discipline.
Over the past 18 months, many functionality upgrades have been released through this project for open source work. The most important is the introduction of an option that offers near ‘real time’ location change within the 3D panorama. Using the SHIFT + arrow keys, this allows for fine tuning of viewpoint location. It was not available when this Tajik geolocation was originally completed using PeakVisor, but it was ready for use in time for the satellite imagery location to be checked as part of this article. This may explain the 170m discrepancy between the two methods.
Other functionality upgrades include allowing users to select different colours for optimal contrast by using SHIFT + C. Additionally, a central cross wire is switched on and off using SHIFT + P. Labels can be toggled with SHIFT + L. Sun and moon trails have been added, along with user-specified date and time to colour the panorama. Distance calculation for any user-selected point (SHIFT + Left Mouse Click) delivers important image depth confirmation. A “Teleport” function allows the user to reset the 3D Panorama viewpoint to that of any selected location visible in the panorama image.
Future work in development includes path elevation plots (helpful for establishing lines of sight between two points), storing user and group data such as locations and paths, and modelling imagery from a camera moving along a user-defined path. Probably most importantly, a ‘goodness of fit’ measure is being developed to provide an automated assessment of a PhotoFit match, alongside the human eye. This is intended as a stepping stone toward automating some PhotoFit searches.
In this work, the Open Source community is having a say in third-party tool development, rather than just repurposing useful tools after release. Everyone in the open source community is welcome to make suggestions and share the resultant improvements and functionality.
The POPSI (Peakvisor OPen Source Investigation) Project, instigated by the author, is a collaborative technical initiative between PeakVisor’s developers and the open source community. It has entered its second year of identifying and implementing within the PeakVisor web app those features which support open source investigations. If you use PeakVisor for open source investigations we’d love to hear about it and particularly any suggestions on new functionality to support open source work, so please contact us on Twitter at @PVforOSINV or via this form.
The author would like to confirm that they have no financial or legal interest in PeakVisor nor prior personal relationship with its founders and employees; this promotion of its tool is strictly from the perspective of an open source researcher.
Foxtrot from Bellingcat’s Global Authentication Project (GAP) contributed to this report, alongside Bellingcat’s Aiganysh Aidarbekova, Miguel Ramalho and Johanna Wild.