Having an early warning system is an incredibly useful tool in the OSINT world. Being able to monitor search engines and other sites for keywords, IP addresses, document names, or email addresses is extremely useful. This can tell you if an adversary, competitor or a friendly ally is talking about you online. In this blog post we are going to setup a keyword monitoring pipeline so that we can monitor both popular search engines and Pastebin for keywords, leaked credentials, or anything else we are interested in.
The pipeline will be designed to alert you whenever one of those keywords is discovered or if you are seeing movement for a keyword on a particular search engine.
We will build all of this out into a virtual machine so that you can self-host everything on your local box. If you are comfortable managing your own server, or you just want to have your monitoring run 24×7 without having to keep your virtual machine running feel free to get some free Digital Ocean time by using my referral link here.
Let’s get started!
Setting up Searx
Searx is this really cool project that provides you a self-hosted interface to search multiple search engines at once. This is called a meta-search engine and was all the rave in the late 90s. Yeah, I am that old.
One thing that Searx also provides is the ability to query it and receive the results back in JSON. This gives us the ability to write Python code to talk to it and to process the results without having to use web scraping techniques or paying for an expensive API key.
Setting up Searx
Watch the video below to setup Searx if you have never setup a VirtualBox VM or done any work in Ubuntu before. It will help you walk through everything from start to finish.
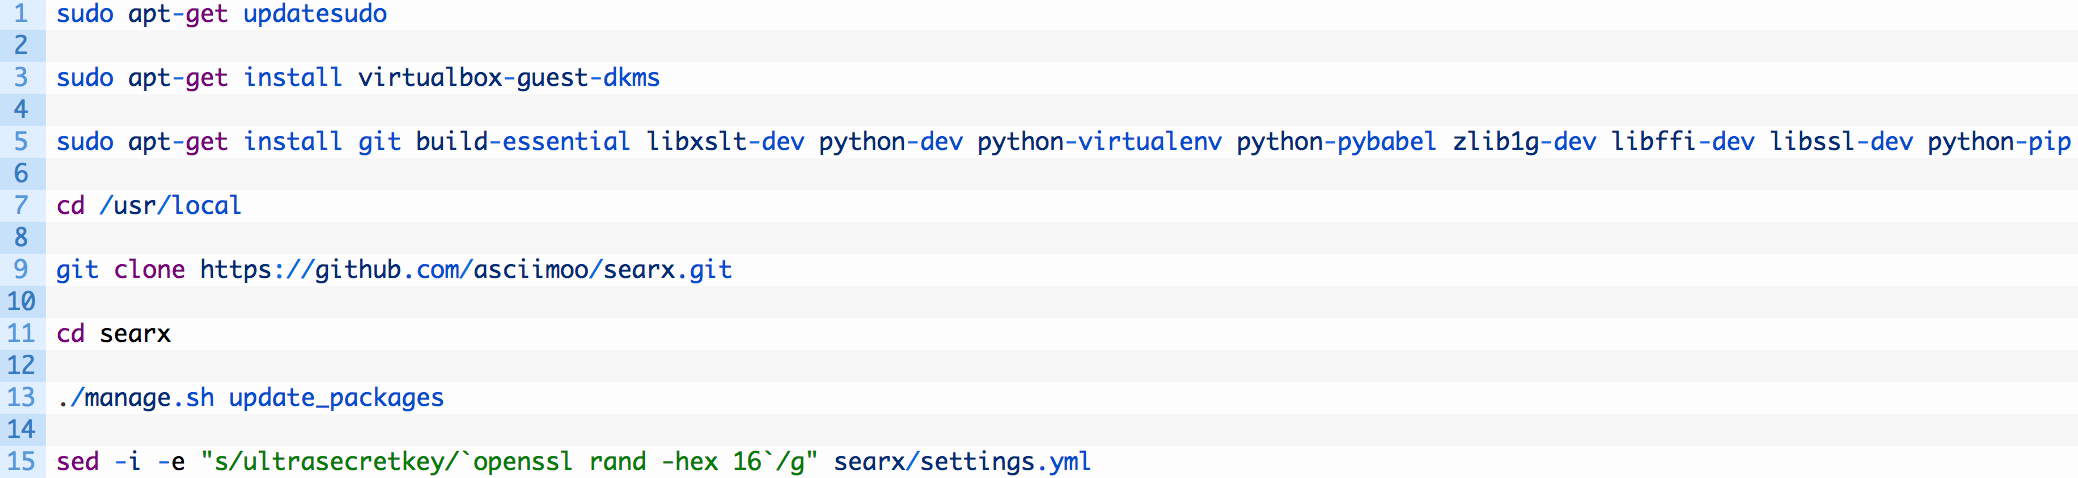
Now that you are logged in to your server you can run the following commands. These steps have been adapted from the Searx setup guide here. Feel free to copy and paste these steps.
Now we just need to edit the settings.yml file so that we can access the Searx search interface across the Internet. Do the following:
Now find the bind_address entry and change it to 127.0.0.1 which will cause Searx to listen only on the machine it is installed on.
It should now look like this:
bind_address : “127.0.0.1”
Once you have edited that setting hit CTRL+O and then CTRL+X to exit nano.
Now you are ready to test it out! Run the Searx web application like so:
Testing Your Searx Installation
If you now use your browser to browse to:
http://127.0.0.1:8888
When you browse to it you should see a web page appear as shown below, and you can test running some searches to make sure it is all working.
Awesome. Now let’s move on to getting setup with a Pastebin Pro account.
Pastebin Pro
Pastebin is the go-to site for data dumps after a breach, ominous messages from Anonymous or for bits of code that people have posted. While you can certainly attempt to scrape data from Pastebin pages, you will find that they will rate limit you by your IP address or potentially ban you.
The best thing to do is to spend the $29 for a lifetime Pastebin Pro account which gives you the ability to whitelist your IP address and then using their API to pull down pastes to your heart’s content. If you can afford to do it, go spend the money now and come back to this blog post.
Once you have done that you will need to head to here to whitelist your IP address. If you are using Digital Ocean or another provider make sure to put the public IP address of your server. Otherwise you can search Google for: what is my IP and then enter that address into the text field:
You are now setup to start writing code for the Pastebin Scraping API (documentation here). Let’s get started!
Building A Keyword Monitor
Now let’s start writing some code that will continually monitor search results from Searx and Pastebin. Then it will connect to your GMail account and send you an alert email when there are hits. If you don’t have a GMail account I recommend you get one, or modify the code to connect to your own mailserver.
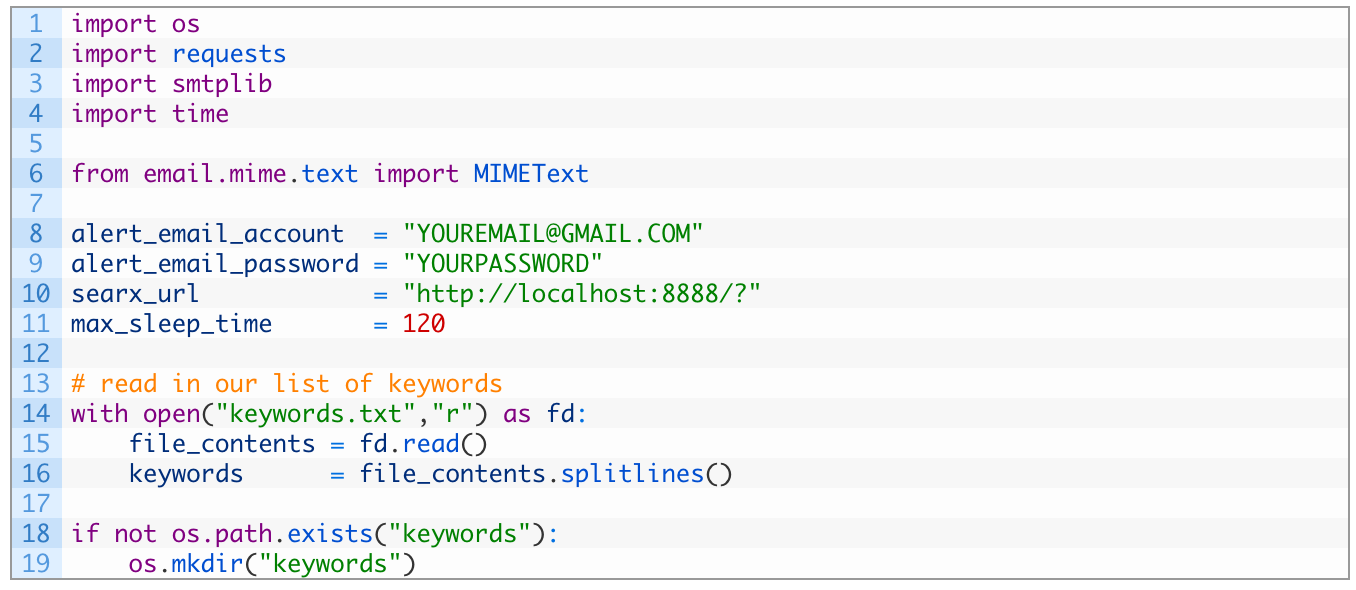
Crack open a new Python script (full source code here), call it keywordmonitor.py and start punching in the following code:
This is pretty straightforward. We are importing the necessary libraries, and then setting up some variables for our email account and for the path to Searx. We then pull in the stored keywords we want to track and create a directory where we can store all URLs so that we don’t have duplicate results.
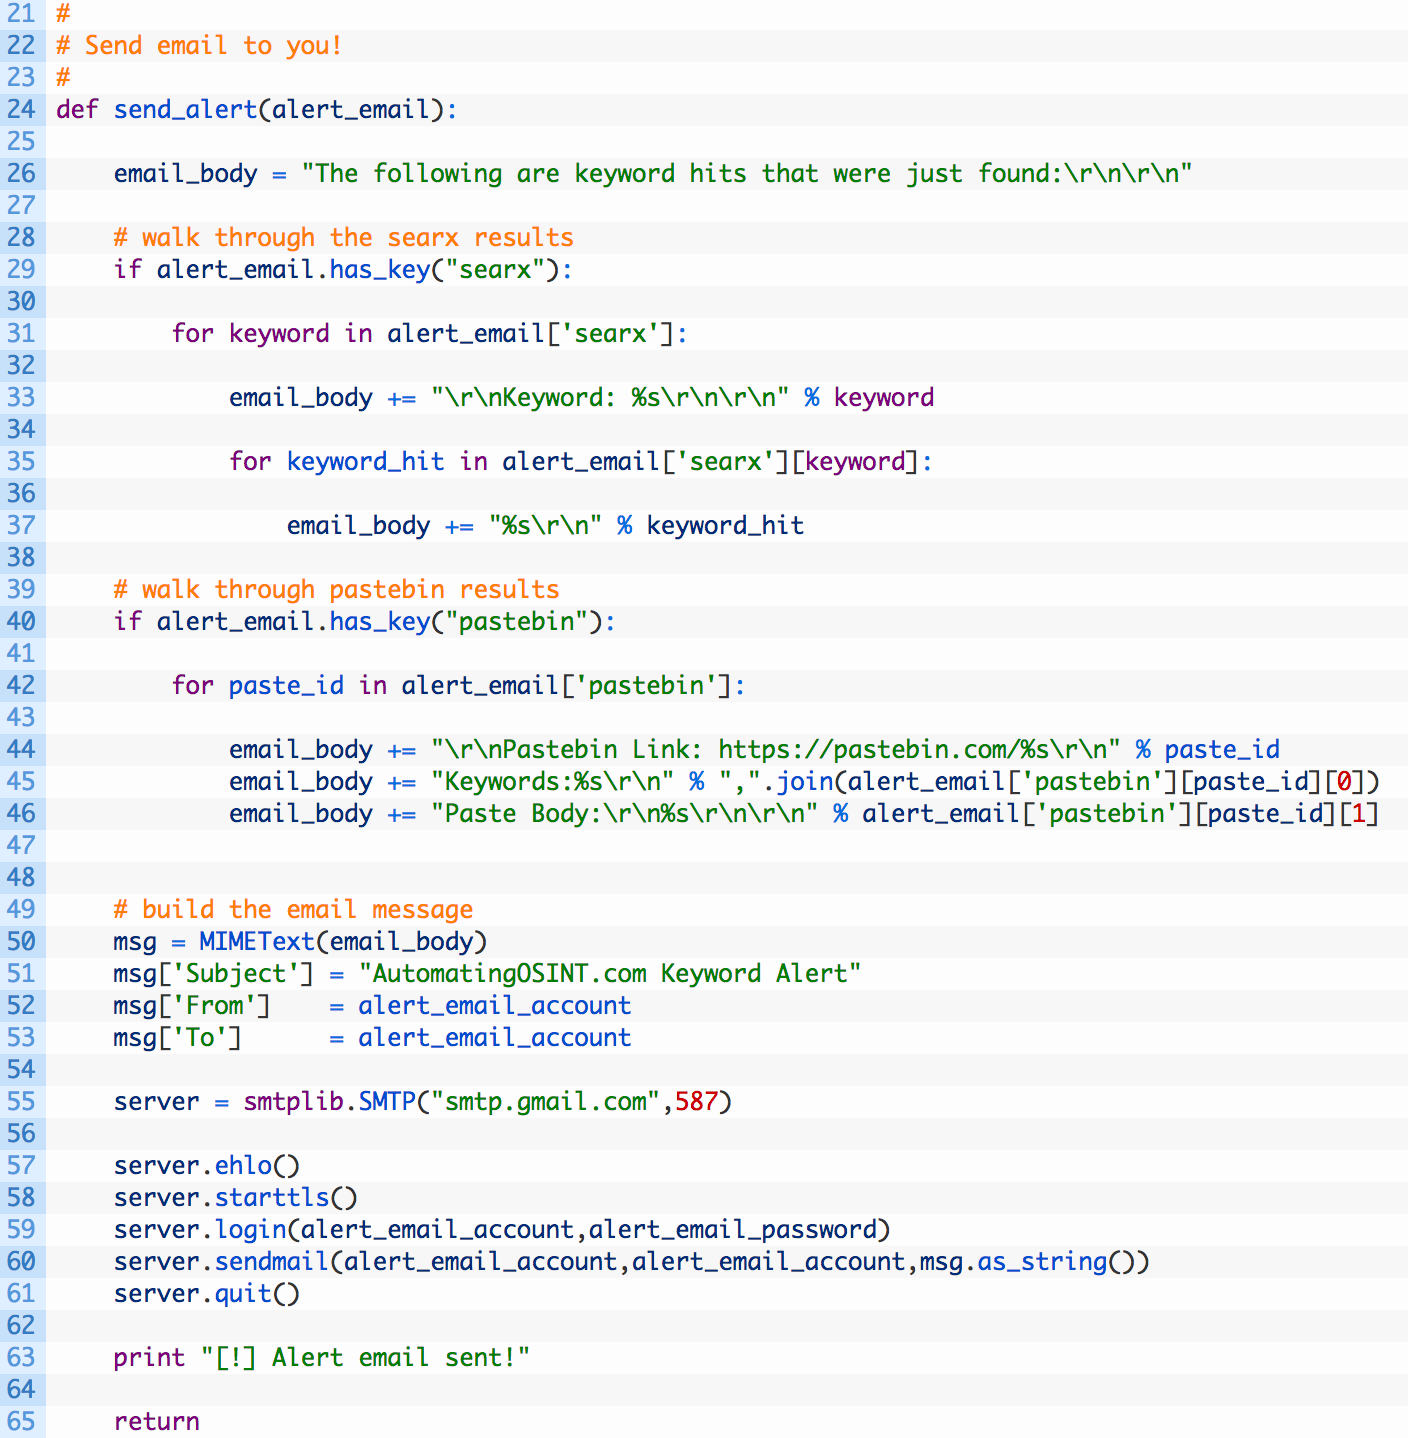
Now let’s build our email alert function. Keep adding code to your script:
Let’s break this code down a bit:
Line 24: we define our send_alert function and it takes a single parameter alert_email. This parameter is a dictionary that we build from our keyword hits.
Lines 29-37: here we are testing if there are results from Searx (29) and if so we walk through each of the keywords that had hits (31) and then add each hit for that keyword (35-37).
Lines 40-46: we test if there are results from Pastebin (40) and if we have some we walk through each result (42) and print out the information from Pastebin including the original text of the paste. We do this because people tend to delete pastes, and this way we’ll always have a record of it.
Lines 50-54: we build our email object and set the Subject, From and To fields of the email.
Line 55: here we are initializing our connect to the GMail servers.
Lines 57-61: these lines of code deal with connecting to the mail server (57,58), logging in to the server (59) and then sending the email off (60).
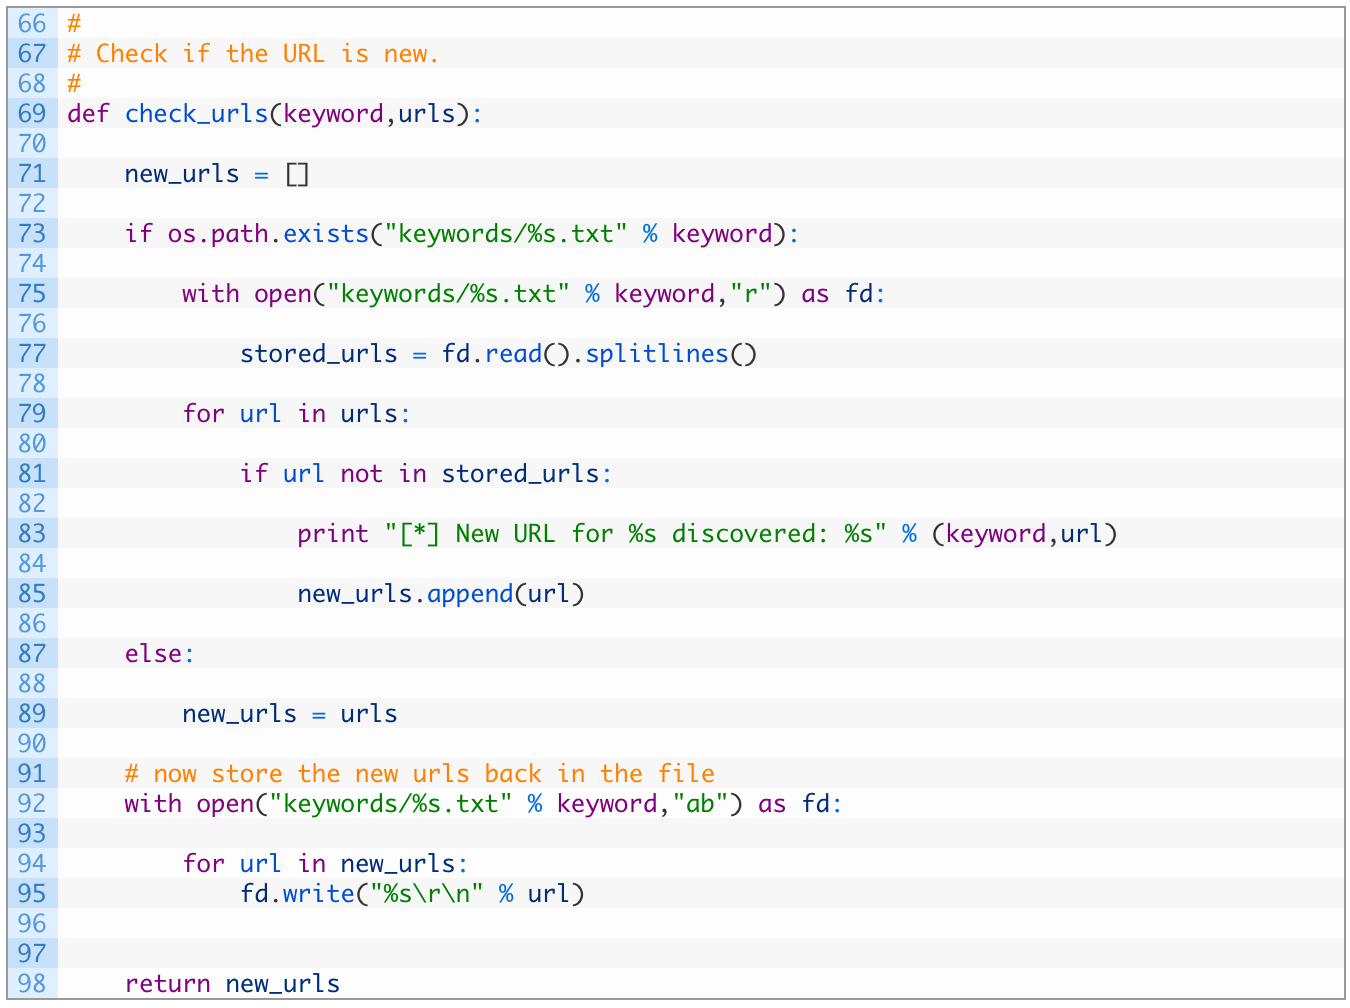
Now we are going to build another support function that will check URLs discovered from Searx against our stored list of URLs. This will determine whether a hit for a keyword is a new URL or something that we have encountered already.
Let’s add this code now:
Line 70: we define our function to take in the keyword that the matches correspond to and the list of urls that we are going to check.
Lines 74-78: we check to see if we have a file with results for the current keyword (74), and if not we open the file (76) and read each line into a list (78).
Lines 80-86: we walk through our list of results (80) and if we don’t already have the URL stored (82) we add it to our new_urls list (86) so that we can store it later.
Line 90: if we don’t have a record of any hits for the current keyword, we take all of the results and put them in our new_urls list.
Lines 93-99: we crack open the keywords file that has all of the results stored (93) and then add each of the new URLs that we have discovered (95,96). We then return the list of newly discovered URLs (99) so that we can include them in our email alert.
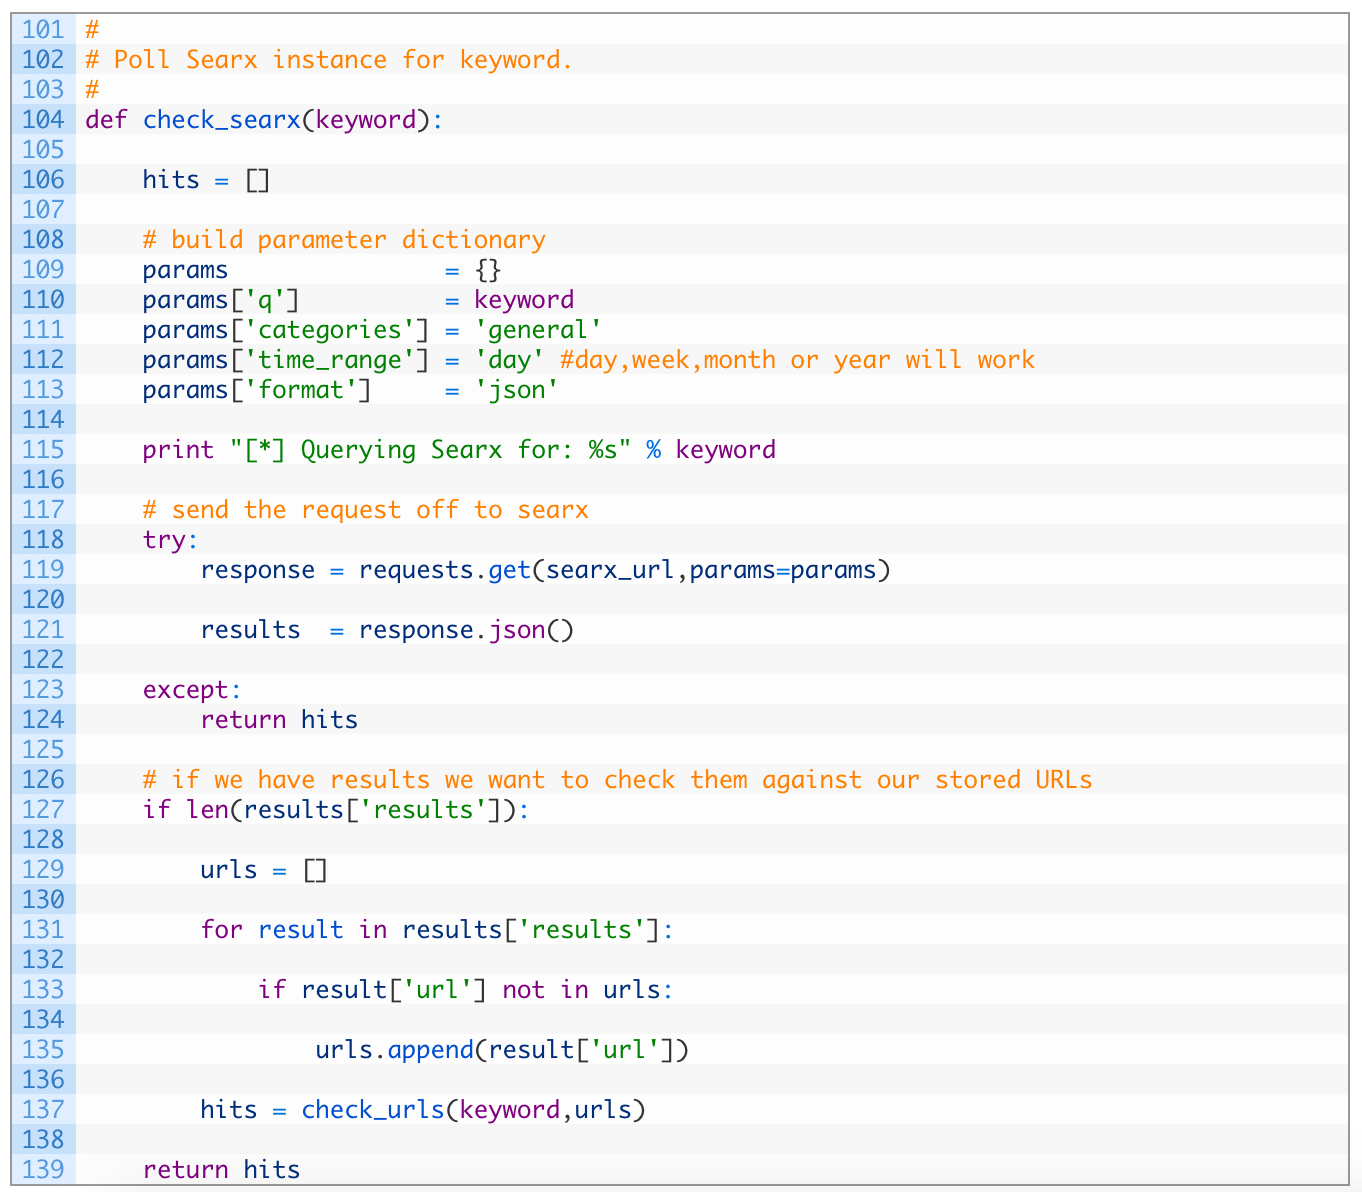
Alright so we have the plumbing in place to deal with alerting and managing new results from our Searx results. Now let’s start putting the functions in place to actually do the searching piece. First we’ll start with Searx, so start adding the following code:
Let’s examine this function a little more closely:
Line 105: we define our check_searx function that accepts a single keyword parameter.
Lines 110-114: we setup the parameters for our query to our Searx instance. Note that you can set the time_range value on line 113 to a time period of your choosing.
Lines 119-122: we send off our request (120) passing in our parameters dictionary we have created. We then parse the JSON result from Searx (122). If either the request or the JSON parsing fails, we return an empty list (125).
Lines 128-140: if we have a list of good results (128) we walk through each of the results (132) and then add each unique result to our urls variable (136). Once we have walked through all of the results we use our previously developed check_urls function (138) to determine which of the URLs are new hits. Lastly we return the hits (140) so we can send them out in our alert email.
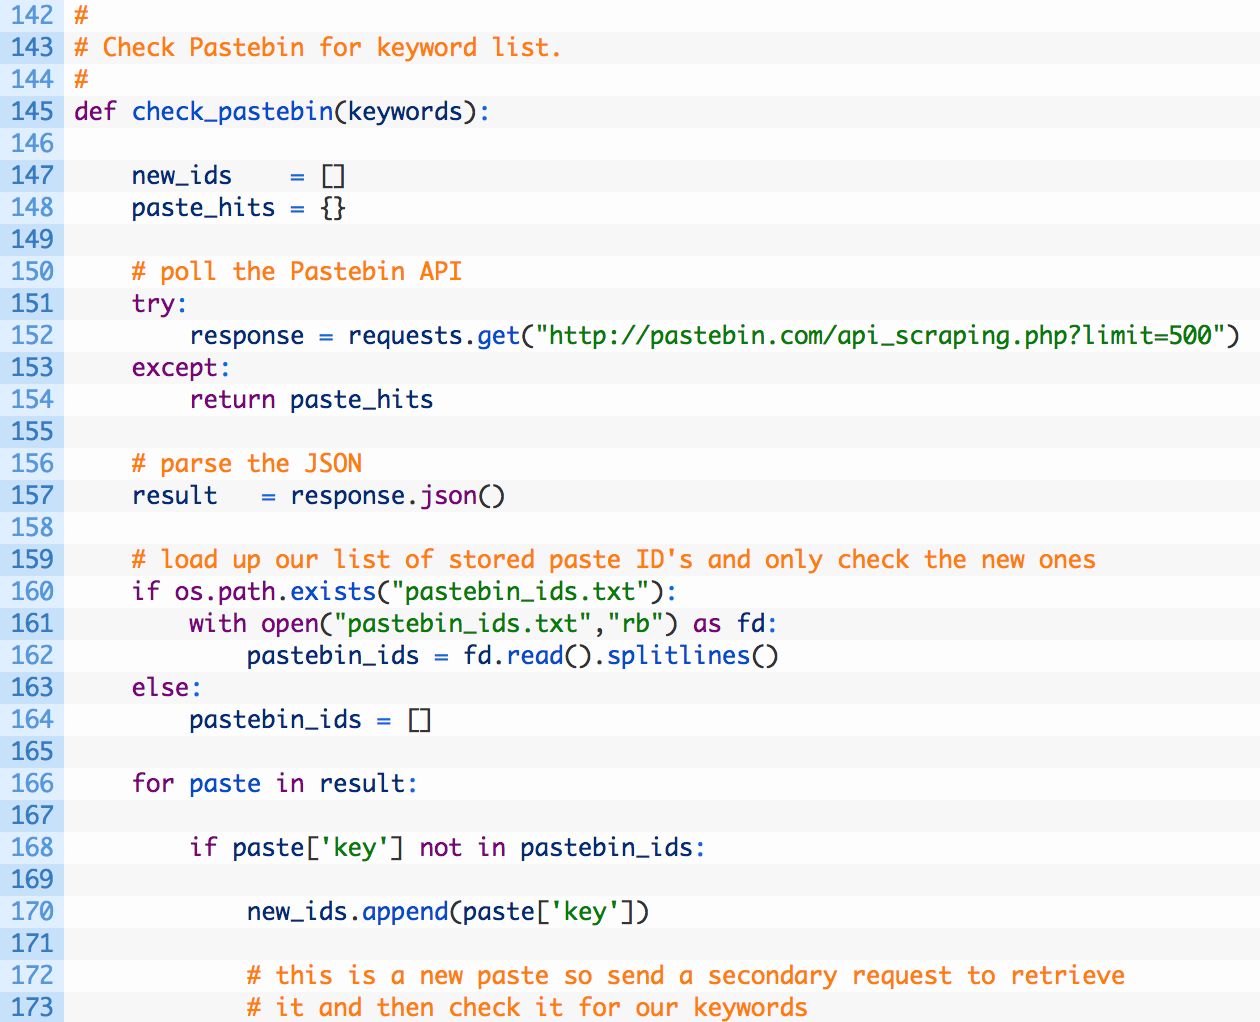
Alright, now that the Searx portion of the script is finished we can move on to working with Pastebin which has a different bit of logic involved.
Whew that’s a lot of code! Let’s break this down a little:
Line 145: we define our check_pastebin function that accepts a keywords parameter that is a list of keywords that we will check against each Paste we discover.
Line 147: when users post content (Pastes) to Pastebin, each Paste gets its own unique identifier. We setup a list to track any new Paste IDs that we have encountered (147) so that we can track them. We don’t want to continually check old Pastes that we have already looked at.
Lines 151-154: now we send off our request to the Pastebin scraping API. If you have not properly put your IP address into their whitelist, this will fail and the function will return an empty list of hits (154).
Line 157: we parse the JSON response so that we can walk through the results.
Lines 160-164: as mentioned previously, we want to be able to track all of the Pastebin IDs that we have previously checked. We check to see if this file exists (160) and if it does we open it up (161) and then read all of the Pastebin IDs into a list (162). If we don’t have any previously tracked IDs we create a new empty list to hold all of the IDs we are about to process (164).
Lines 166-170: we begin walking through the results (166) and if the Paste ID has not been seen yet (168) we add it to our list of new Paste IDs (170).
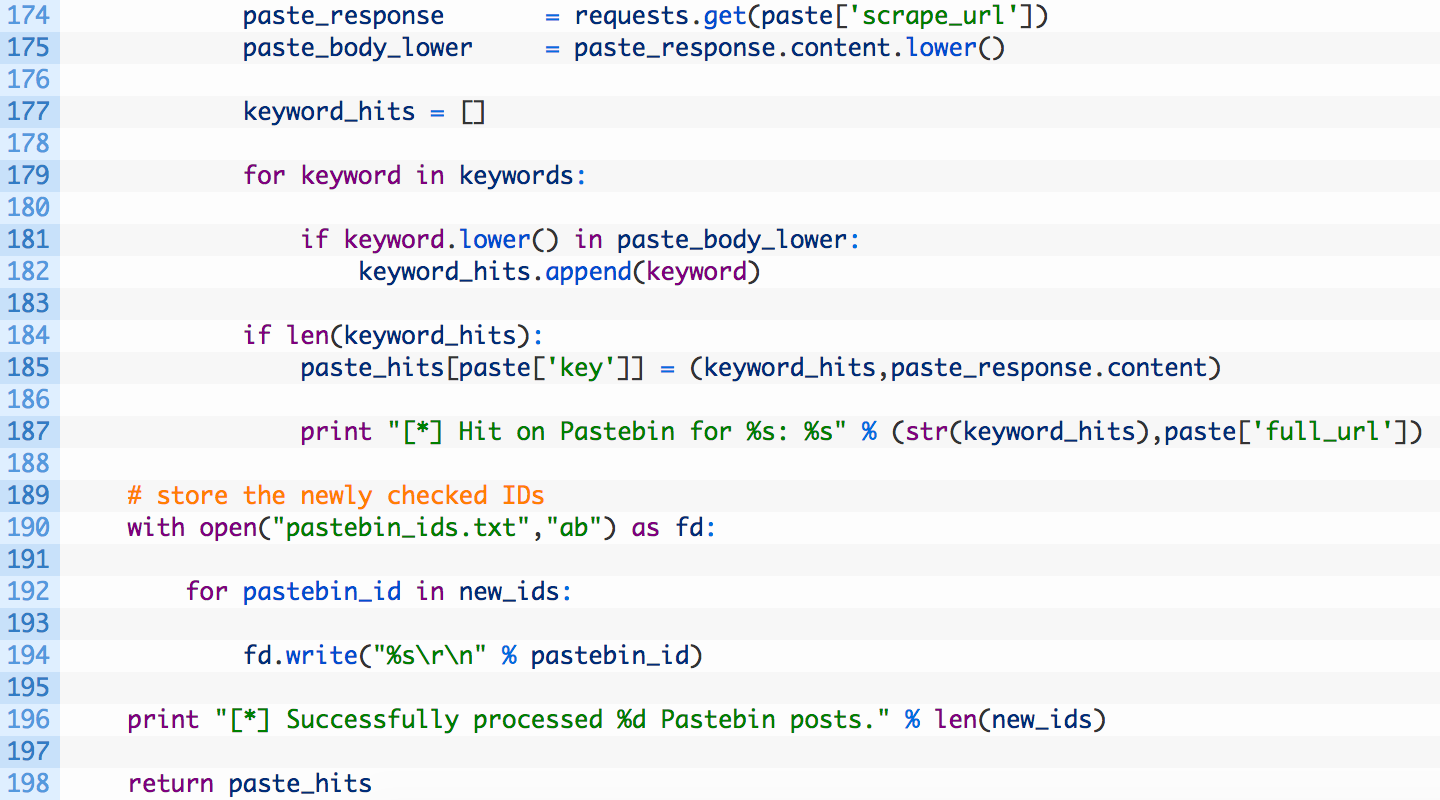
Lines 174-175: we send a secondary request (174) to retrieve the full body of the Paste and then normalize it to all lowercase (175).
Lines 177-182: we setup a list to hold our keyword hits (177), and then walk through the list of keywords (172) and check to see if they are found in the Paste body (181). If a keyword matches we add it to our keyword_hits list (182).
Lines 184-187: if there were any hits (184) for the current paste we add the hits and the full content of the Paste (185) to our paste_hits dictionary, which is keyed by the Paste ID.
Lines 190-198: now that we have finished checking the keywords we open our log file of Paste IDs (190) and then write out each of the Paste IDs (192,194). We then return the hits so that we can use them in our alert emails (198).
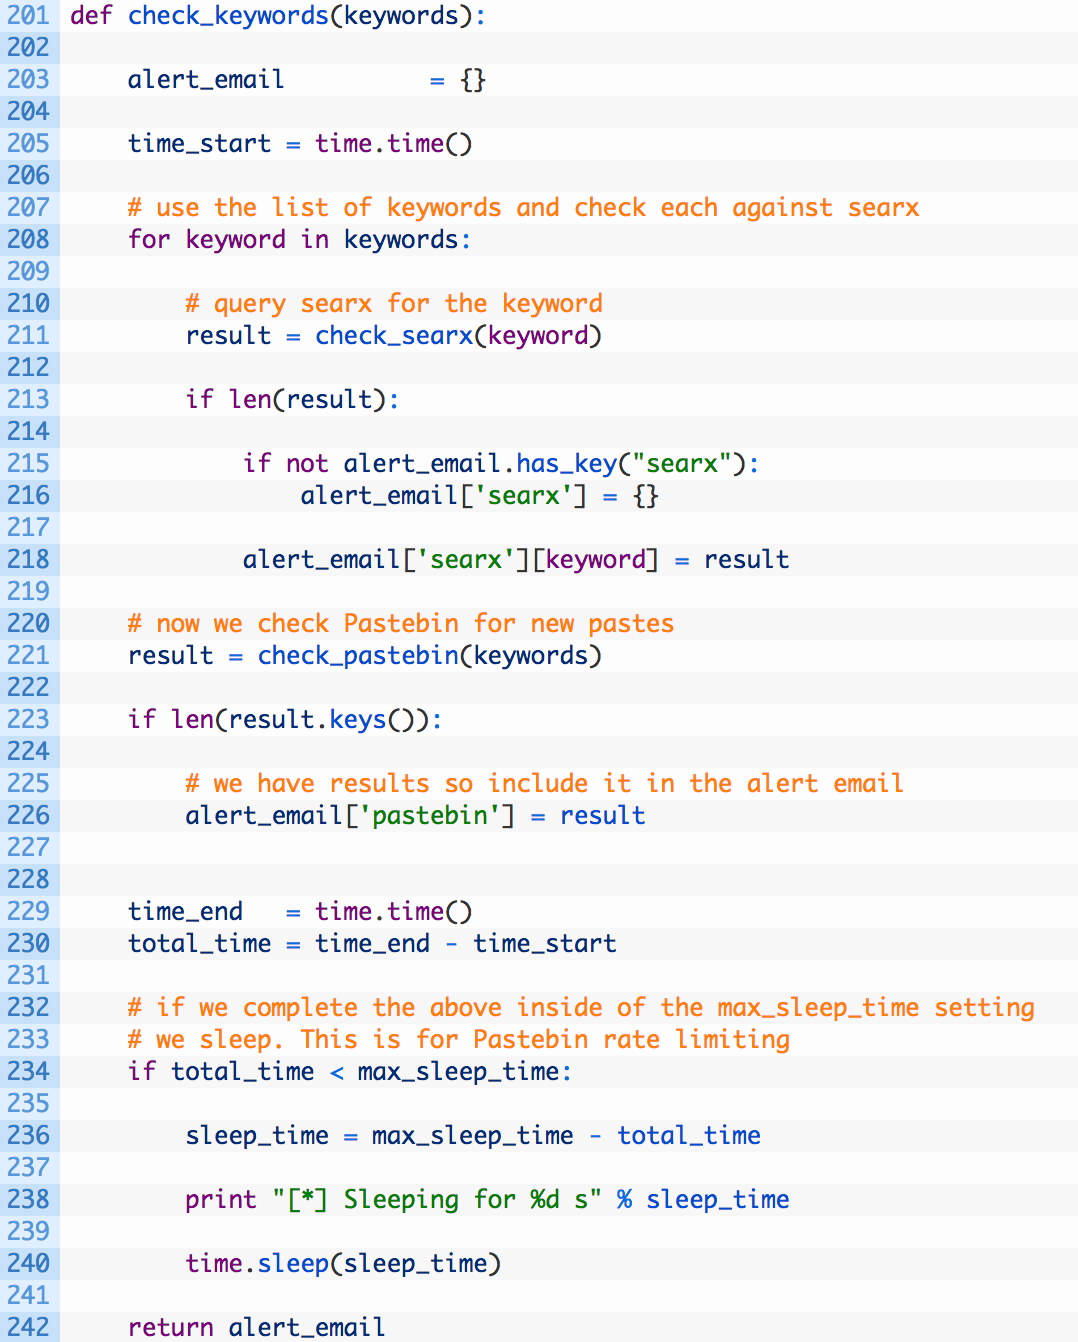
If you have survived thus far, don’t worry we are nearly finished! We are going to create a wrapper function that will handle calling our other functions and handing back the results for alerting. Let’s do this now:
This is pretty straightforward code, but let’s break the major points down:
Line 203: we setup our alert_email dictionary that our send_alert function will use to send email alerts.
Line 205: we note the current time so that we can measure how long it takes for our keyword searches to occur. This is important later in the function.
Lines 207-218: this little block is responsible for walking through our list of keywords (207) and then checking our Searx instance (211) for hits. If there are any (213) we add them to our alert_email dictionary (218).
Lines 221-226: we check Pastebin for any results (221) and if we have results (223) we add them to our alert_email dictionary (226).
Lines 229-240: we take another timestamp (229) and then subtract the time_start we collected above (230) to determine the total execution time. If we have completed our searches in less than the max_sleep_time (234), we determine how long we need to sleep for (236) and then sleep (240). This is so that we are always staying within the suggested rate limiting times that Pastebin recommends. My recommendation is to leave the 120 seconds setting in place.
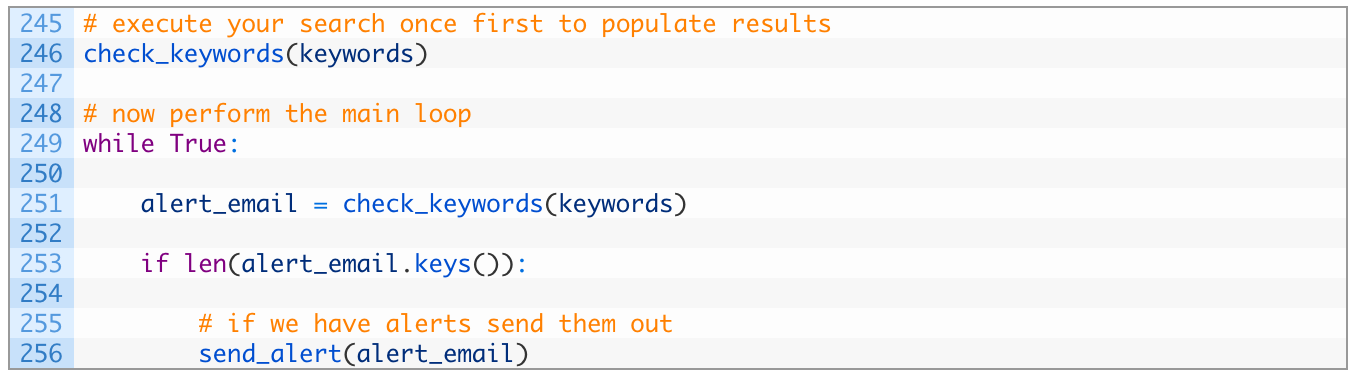
Alright! The last thing we need to do is write a little loop that will handle calling our check_keywords and send_alert functions repeatedly. Let’s add this little bit of code now:
Pretty straightforward. We just run the check_keywords function once to set a baseline (this won’t send any alerts), and then run an infinite loop to keep checking keywords, and sending alerts if there are results. It will do this over and over again until you stop the script from executing.
Let It Rip
Now it’s time to shine! Open a new file in the same directory as your keywordmonitor.py script and name it keywords.txt. Add the keywords you want to monitor, one per line to the file. In my case it would look like:
jms_dot_py
justin@automatingosint.com
Save this file and run the keyword monitor from within Wing (Debug Menu -> Set Current as Main Debug File and then click the Play button) or from the command line. Make sure you have your keywords loaded into a keywords.txt file that lives in the same directory as your Python script.
You will start to see results showing up in your terminal like so:
searx@searx:~$ python keywordmonitor.py
[*] Querying Searx for: jms_dot_py
[*] New URL for jms_dot_py discovered: https://twitter.com/jms_dot_py/status/768559761818324992
[*] New URL for jms_dot_py discovered: https://twitter.com/jms_dot_py/status/826116048541859841
[*] New URL for jms_dot_py discovered: https://twitter.com/jms_dot_py/status/791704263999295488
[*] Querying Searx for: automatingosint.com
[*] Querying Searx for: justin@automatingosint.com
[*] New URL for justin@automatingosint.com discovered: https://computercrimeinfo.com/wp/?cat=9&paged=2
[*] Querying Searx for: hunchly
[*] New URL for hunchly discovered: https://www.reddit.com/r/craftofintelligence/comments/5otcmz/bulk_extracting_exif_metadata_with_hunchly_and/
[*] Successfully processed 48 Pastebin posts.
[*] Sleeping for 97 s
[!] Alert email sent!
And there you have it, you would have an email in your inbox that has the keywords and associated links. Leaving your virtual machine running or setting up Searx on a Digital Ocean droplet (get 2 free months here) will give you 24/7 monitoring of those keywords.
As a quick test, head to Pastebin.com and enter a paste that has one of your keywords in it. You should receive an email in a few minutes showing you the hit. How cool is that?