Expanding Skype Forensics with OSINT and Python: IP Addresses
Translations:
This article was originally published on AutomatingOSINT.com.
In the first part of this series we covered how to extract email accounts from SQLite databases and pull additional information from FullContact.com to find social media accounts or other online profiles that are associated with those email addresses. In this post we will apply much the same technique except we are going to be interested in looking at extracting IP addresses, geolocating them, and then displaying the result on a map to visualize the location of Skype calls. Most of the heavy lifting has been done in the previous post so we are just going to build on that foundation a bit. Let’s get started!
Changing Our Regular Expression
First grab a copy of our sqlite_osint.py script from here, and then save it as sqlite_osint_geoip.py. The first thing we need to do is modify the regular expression to match IP addresses instead of email addresses. Get rid of line 10 and paste in the following monstrosity:
I know, it makes my eyes bleed too. Now that we have this in place, let’s move on to getting setup to convert IP addresses to a geographic location.
Geolocating IP Addresses
Although an imprecise science, it is still useful at times to try to geolocate IP addresses. This involves using a database of some kind that has various IP subnets mapped to geographic locations. One of the tried and true databases is the Maxmind Geolite Database (download it here). Once you have the database downloaded you will need to unzip it using 7-zip (Windows) or on OSX a simple double-click will get it decompressed. Take note of where the resulting file is because we will need it shortly.
Maxmind has also graciously provided us with a Python module (docs here) that will enable us to easily work with their database format, and thankfully you can install it using pip:
pip install geoip2
Wonderful, now let’s add some more to our script. Just beneath all of your import statements, add the following:

This imports the geoip2 module, specifically for dealing with a database file (4) and then we initialize the database reader by passing in the path to the database file (6). The path should reflect the current location on your machine. We are now setup to start resolving IP addresses to geographic locations. Next we need to get the necessary mapping pieces installed.
Building Maps with Folium
A student of mine Carlos Diaz (@dfirence) sent me this awesome Python module calledFolium. Folium allows you to create awesome map visualizations using Leaflet maps that will be output into an HTML file. To install Folium, as you probably guessed, you can just use pip:
pip install folium
Boom! Now let’s just add the import to the top of our script on line 5 like so:

Ok now we are ready to start doing some real coding. We will write some Python to walk through our list of results from our regular expression, check the IP address against the Maxmind database and then lay it on a map that we can explore in a web browser. Let’s get started.
Bringing it All Together
First drop down to the bottom of your script which in my editor is line 52 or so right after the last print statement. Remove the two lines of code that walk through match_list (lines 52 and 53) and start punching in the following code:
Let’s dig into this a bit:
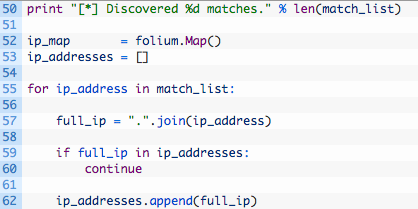
- Line 52: we initialize the Folium Map object which we will use to add markers to. Markers are map-speak for those little balloons you see on maps.
- Line 53: an empty list that we will use to track what IP addresses we have resolved so that we aren’t double-resolving them and cluttering up our map.
- Lines 55-62: we begin walking through our extracted IP addresses (55) and then create a string that will hold the IP address with the dots in place (57). Next we check if the current IP is in our list of resolved addresses (59) and if it isn’t then we add it to the list (62).
That is the housecleaning part of our script, and now we need to actually leverage the geoip2 module to resolve the IP address to a location. Let’s add this code now:
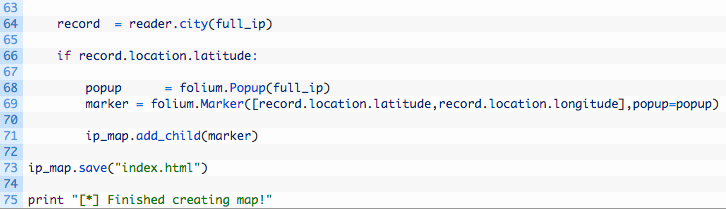
- Line 64: we use our reader object and pass in the IP address we wish to resolve.
- Line 66: we test the resulting record variable for a valid latitude to make sure that we got a good location reading back.
- Line 68: we create a Folium Popup object that will contain the IP address. This is just so that we can click on the little balloons on the map and have it display the IP behind the location.
- Line 69: we create a Folium Marker object by passing in a list containing our resolved latitude and longitude, as well as the Popup object that we created on line 68.
- Line 71: we use the ip_map object and call the add_child function to add the marker to the map.
- Line 73: we save the map to index.html.
And that’s it! Just a little bit of code added to what we have previously built and we have a brand new capability. Let’s give this badboy a run!
Let It Rip!
When you run it against your Skype database, you should see some results (assuming you have made Skype calls). The results will likely surprise you as you’ll be able to visualize where you have been making Skype calls. Run the script like so:
python sqlite_osint_geoip.py -d /Users/justin/Desktop/main.db
[*] Scanning table…DbMeta
[*] Scanning table…AppSchemaVersion
[*] Scanning table…Contacts
[*] Scanning table…LegacyMessages
[*] Scanning table…Calls
[*] Scanning table…Accounts
[*] Scanning table…Transfers
[*] Scanning table…Voicemails
[*] Scanning table…Chats
[*] Scanning table…Messages
[*] Scanning table…ContactGroups
[*] Scanning table…Videos
[*] Scanning table…SMSes
[*] Scanning table…CallMembers
[*] Scanning table…ChatMembers
[*] Scanning table…Alerts
[*] Scanning table…Participants
[*] Scanning table…VideoMessages
[*] Scanning table…MediaDocuments
[*] Scanning table…Translators
[*] Scanning table…tracker_journal
[*] Scanning table…MessageAnnotations
[*] Scanning table…Conversations
[*] Discovered 52 matches.
[*] Finished creating map!
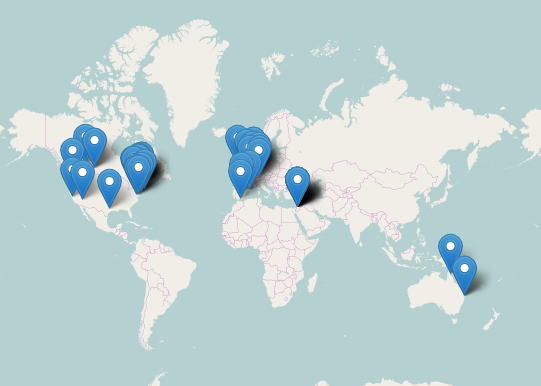
Now if you check the same directory as your script you should see an index.html file that you can open in your browser and you will be shown a map that you can begin to explore. Mine looks like this: