Historic Bombing Runs: The Memphis Belle Case
Co-authored with Annique Mossou.
Geolocation is not just useful for investigations involving current events. The same techniques that we use to geolocate images in modern day cases of human rights violations and child sexual abuse can be used to determine the location of images captured long ago. Historians and film buffs, for example, can use geolocation to find out more details and discover new facts about past events.
In 1943, the United States War Department began filming a documentary called “Memphis Belle: A Story of a Flying Fortress” about the Boeing B-17 bomber of the same name. The airplane became famous that year after completing its 25th bombing run over Europe. The feat earned the crew a trip home, where they went on tour selling war bonds. The documentary was released in 1944, and claims to show the Memphis Belle’s last mission over Wilhelmshaven, Germany.
The documentary includes combat footage of German fighter interceptions as well as bombing runs on targets. As the movie’s Wikipedia page claims, while this footage is presented as being part of one mission, it was in fact filmed over the course of several missions aboard different aircraft, and edited together for the film.
This begs the questions: Does the documentary actually show a bombing mission over Wilhelmshaven? If so, can we geolocate the footage to determine which parts of the city were bombed in the film? And if the footage is not from Wilhelmshaven, can we geolocate it to its actual location?
Stitching Together Panoramas
The first step in this process is collecting screenshots from the film. By stitching together screenshots of the bomb run footage, we can create panoramic shots of the entire run to help us geolocate the targets.
To make the panoramas, we can use a free image editing program like GIMP to overlay the images on top of each other, using features as matching points. For example, take these four images captured during one of the documentary’s bomb run sequences. Images 1 and 4 share no matching features, but we can connect them together using images 2 and 3. We can do this by finding matching features (like bomb craters or buildings) to “stitch” the scene together. Note that in the images below, we’ve highlighted these features in matching colours.
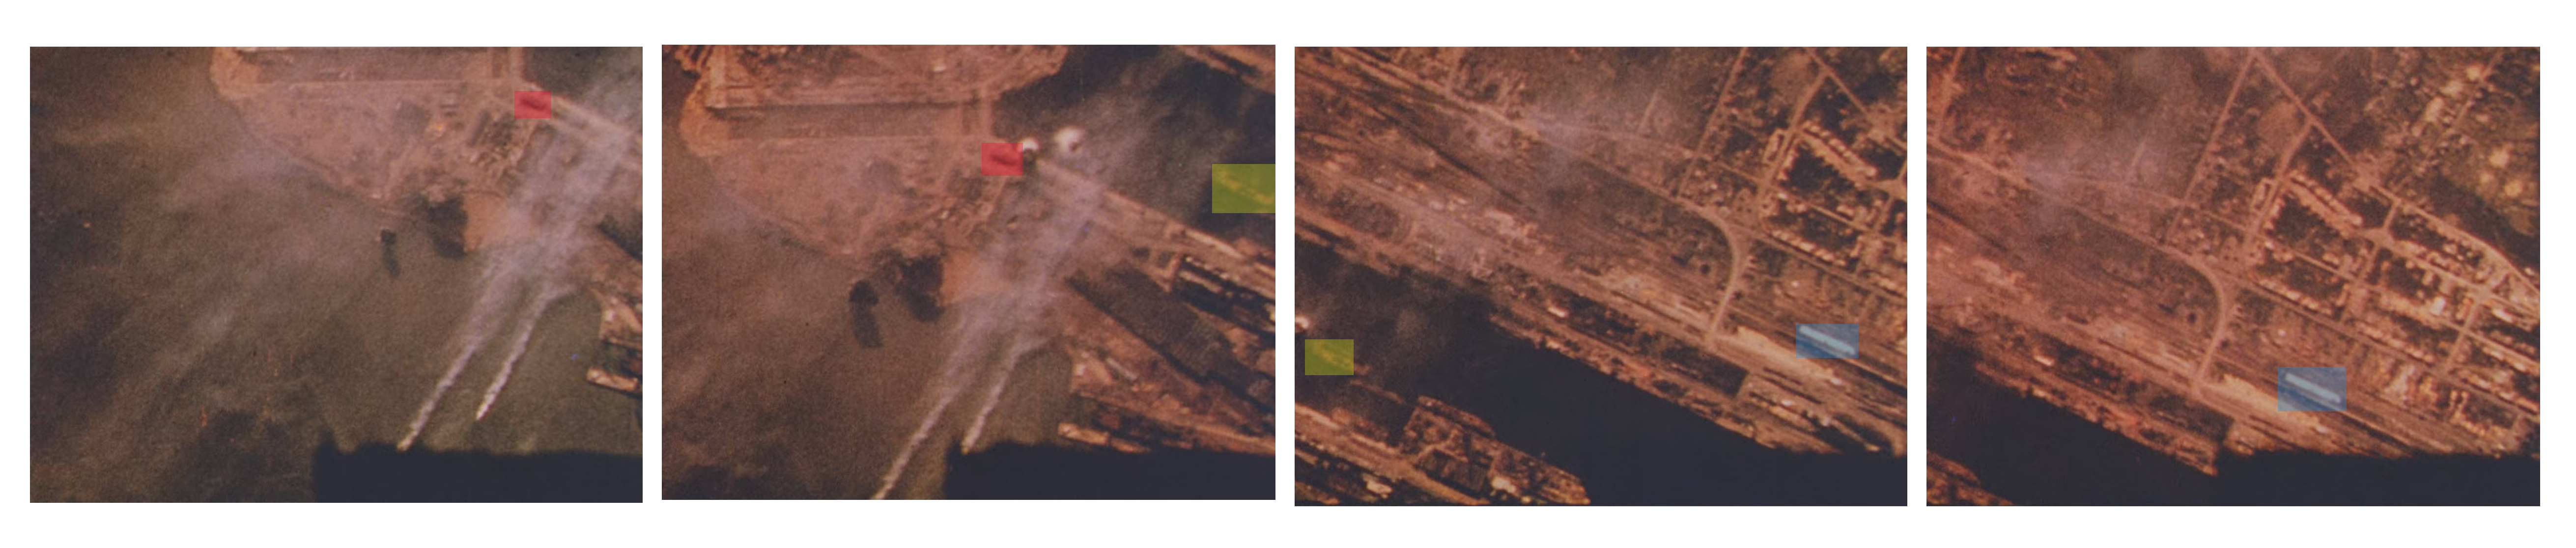
These four screenshots were captured during one of the documentary’s bombing run sequences. Note the matching features in each image, which we’ve colour-coded (Source: “Memphis Belle: Story of a Flying Fortress”)
To stitch the images together, we simply add each one as a separate layer in our image editing workspace. We can reduce the opacity of each layer to make the job of finding the matching features easier. Once we’ve found the feature and made the match, we can increase the opacity of the layers to 100% to complete the scene. (Note: Microsoft has a program called Image Composite Editor that can do this as well).
We repeat this process with every image until we have a full panorama:
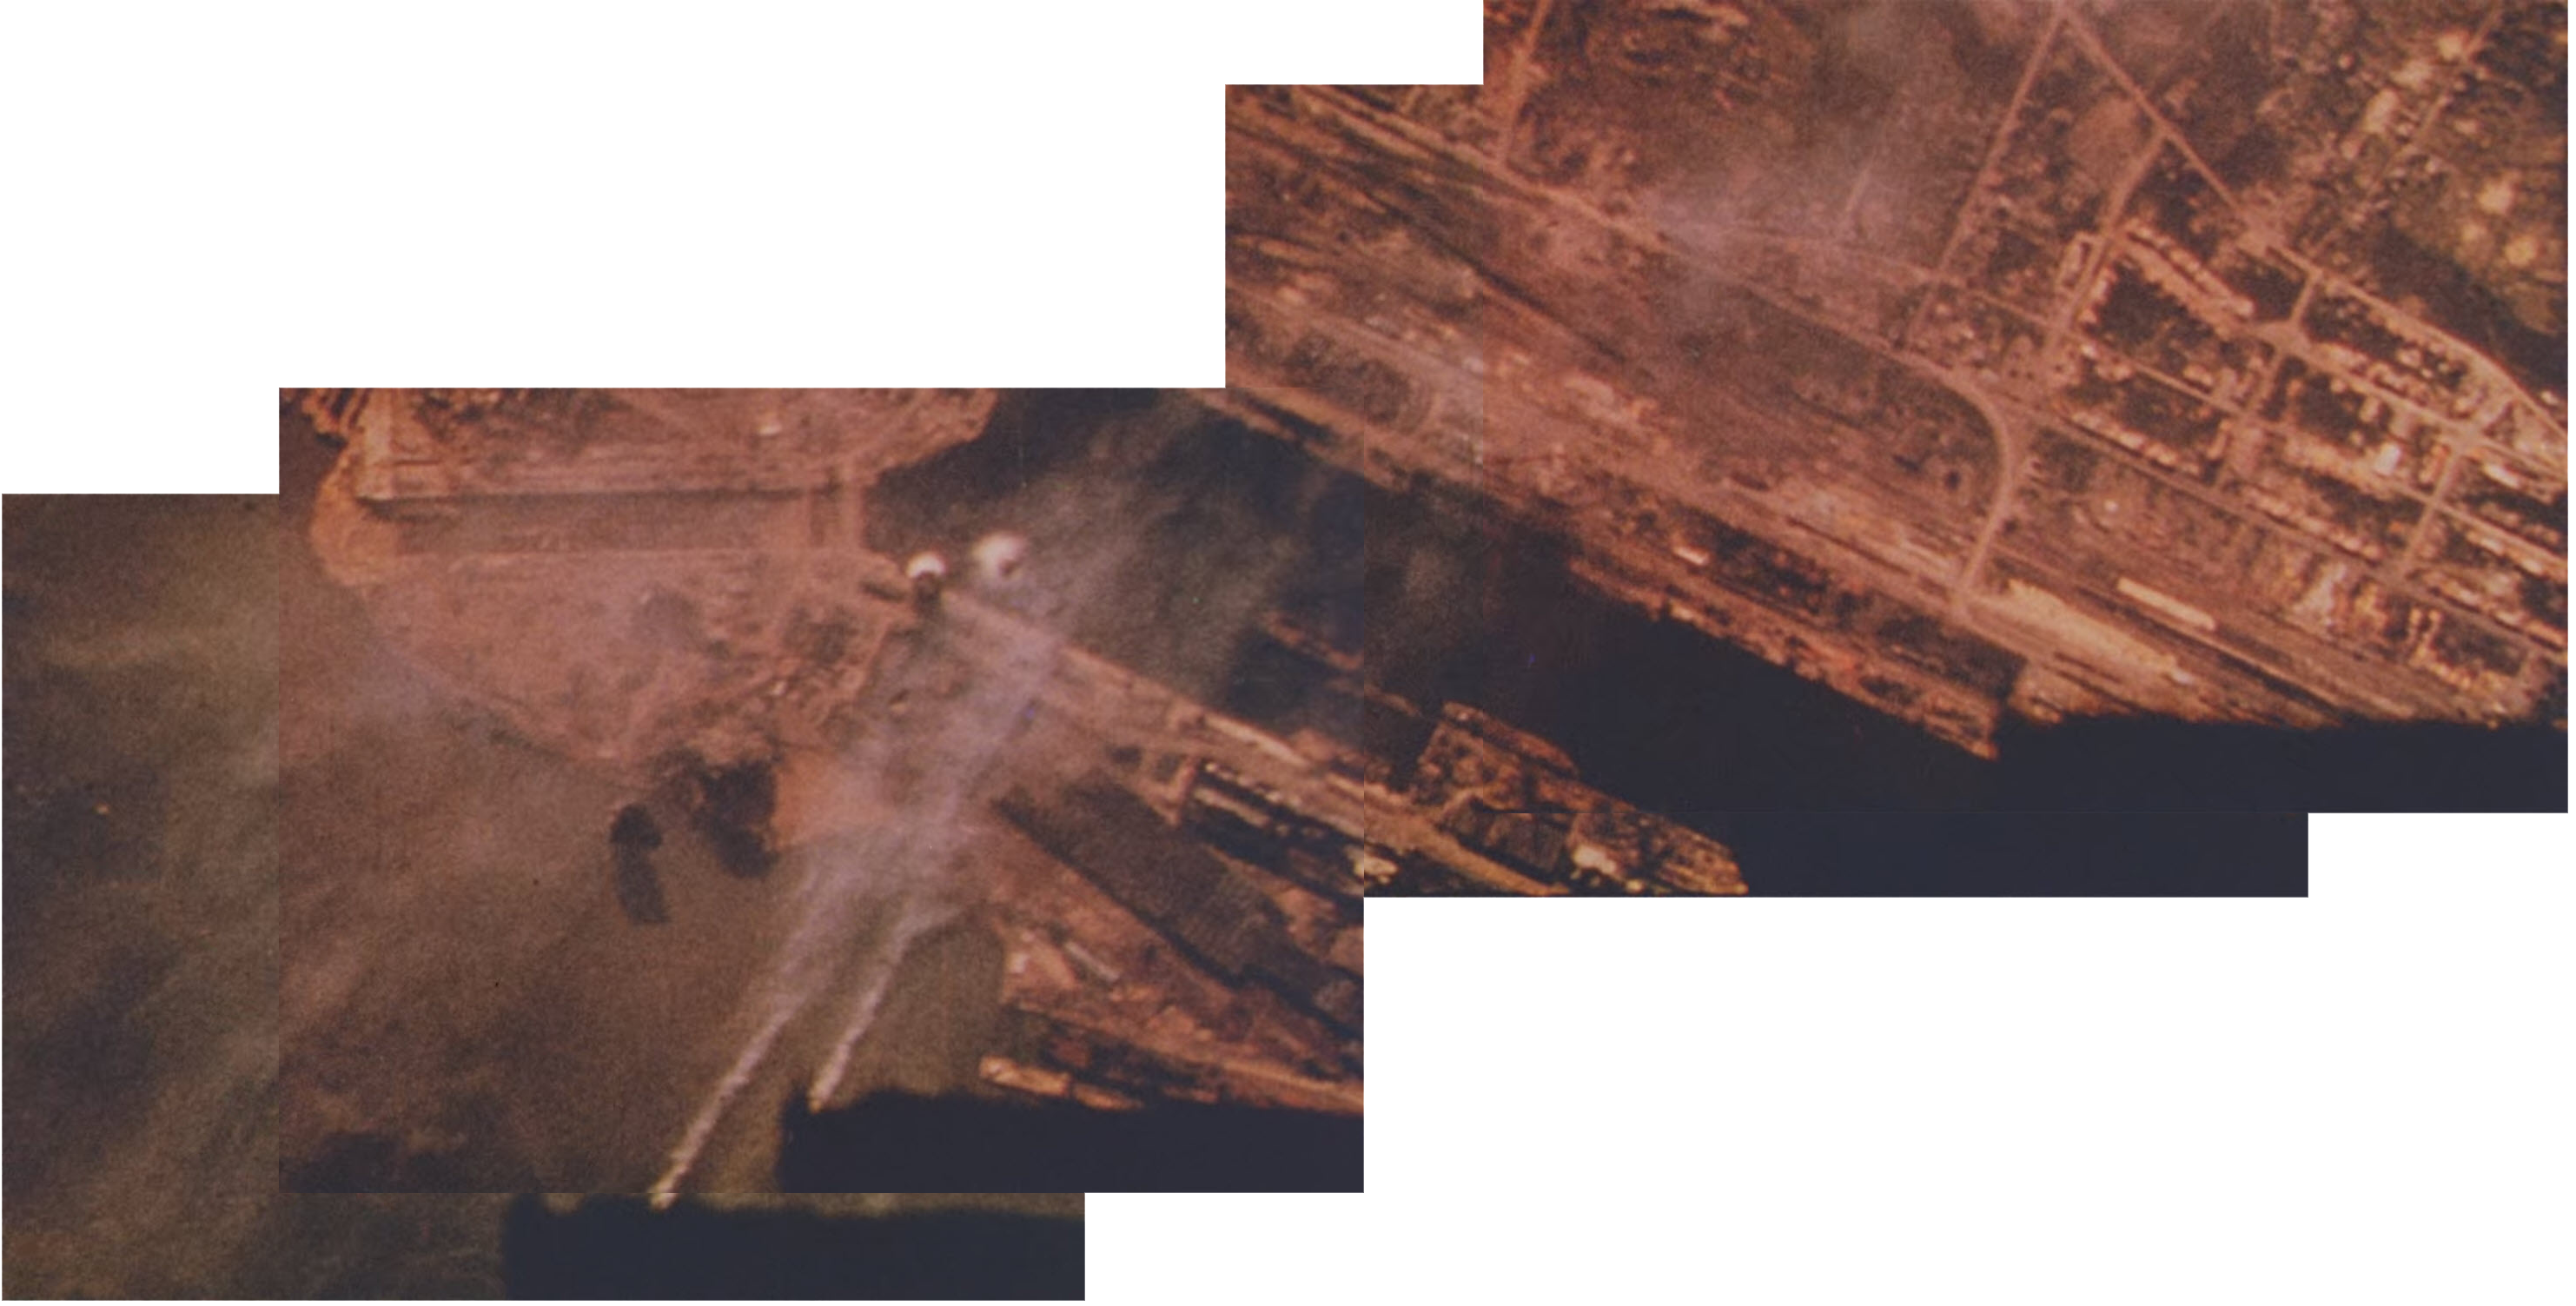
This is what the four images look like once they’ve been stitched together using the matching features (Source: “Memphis Belle: Story of a Flying Fortress”)
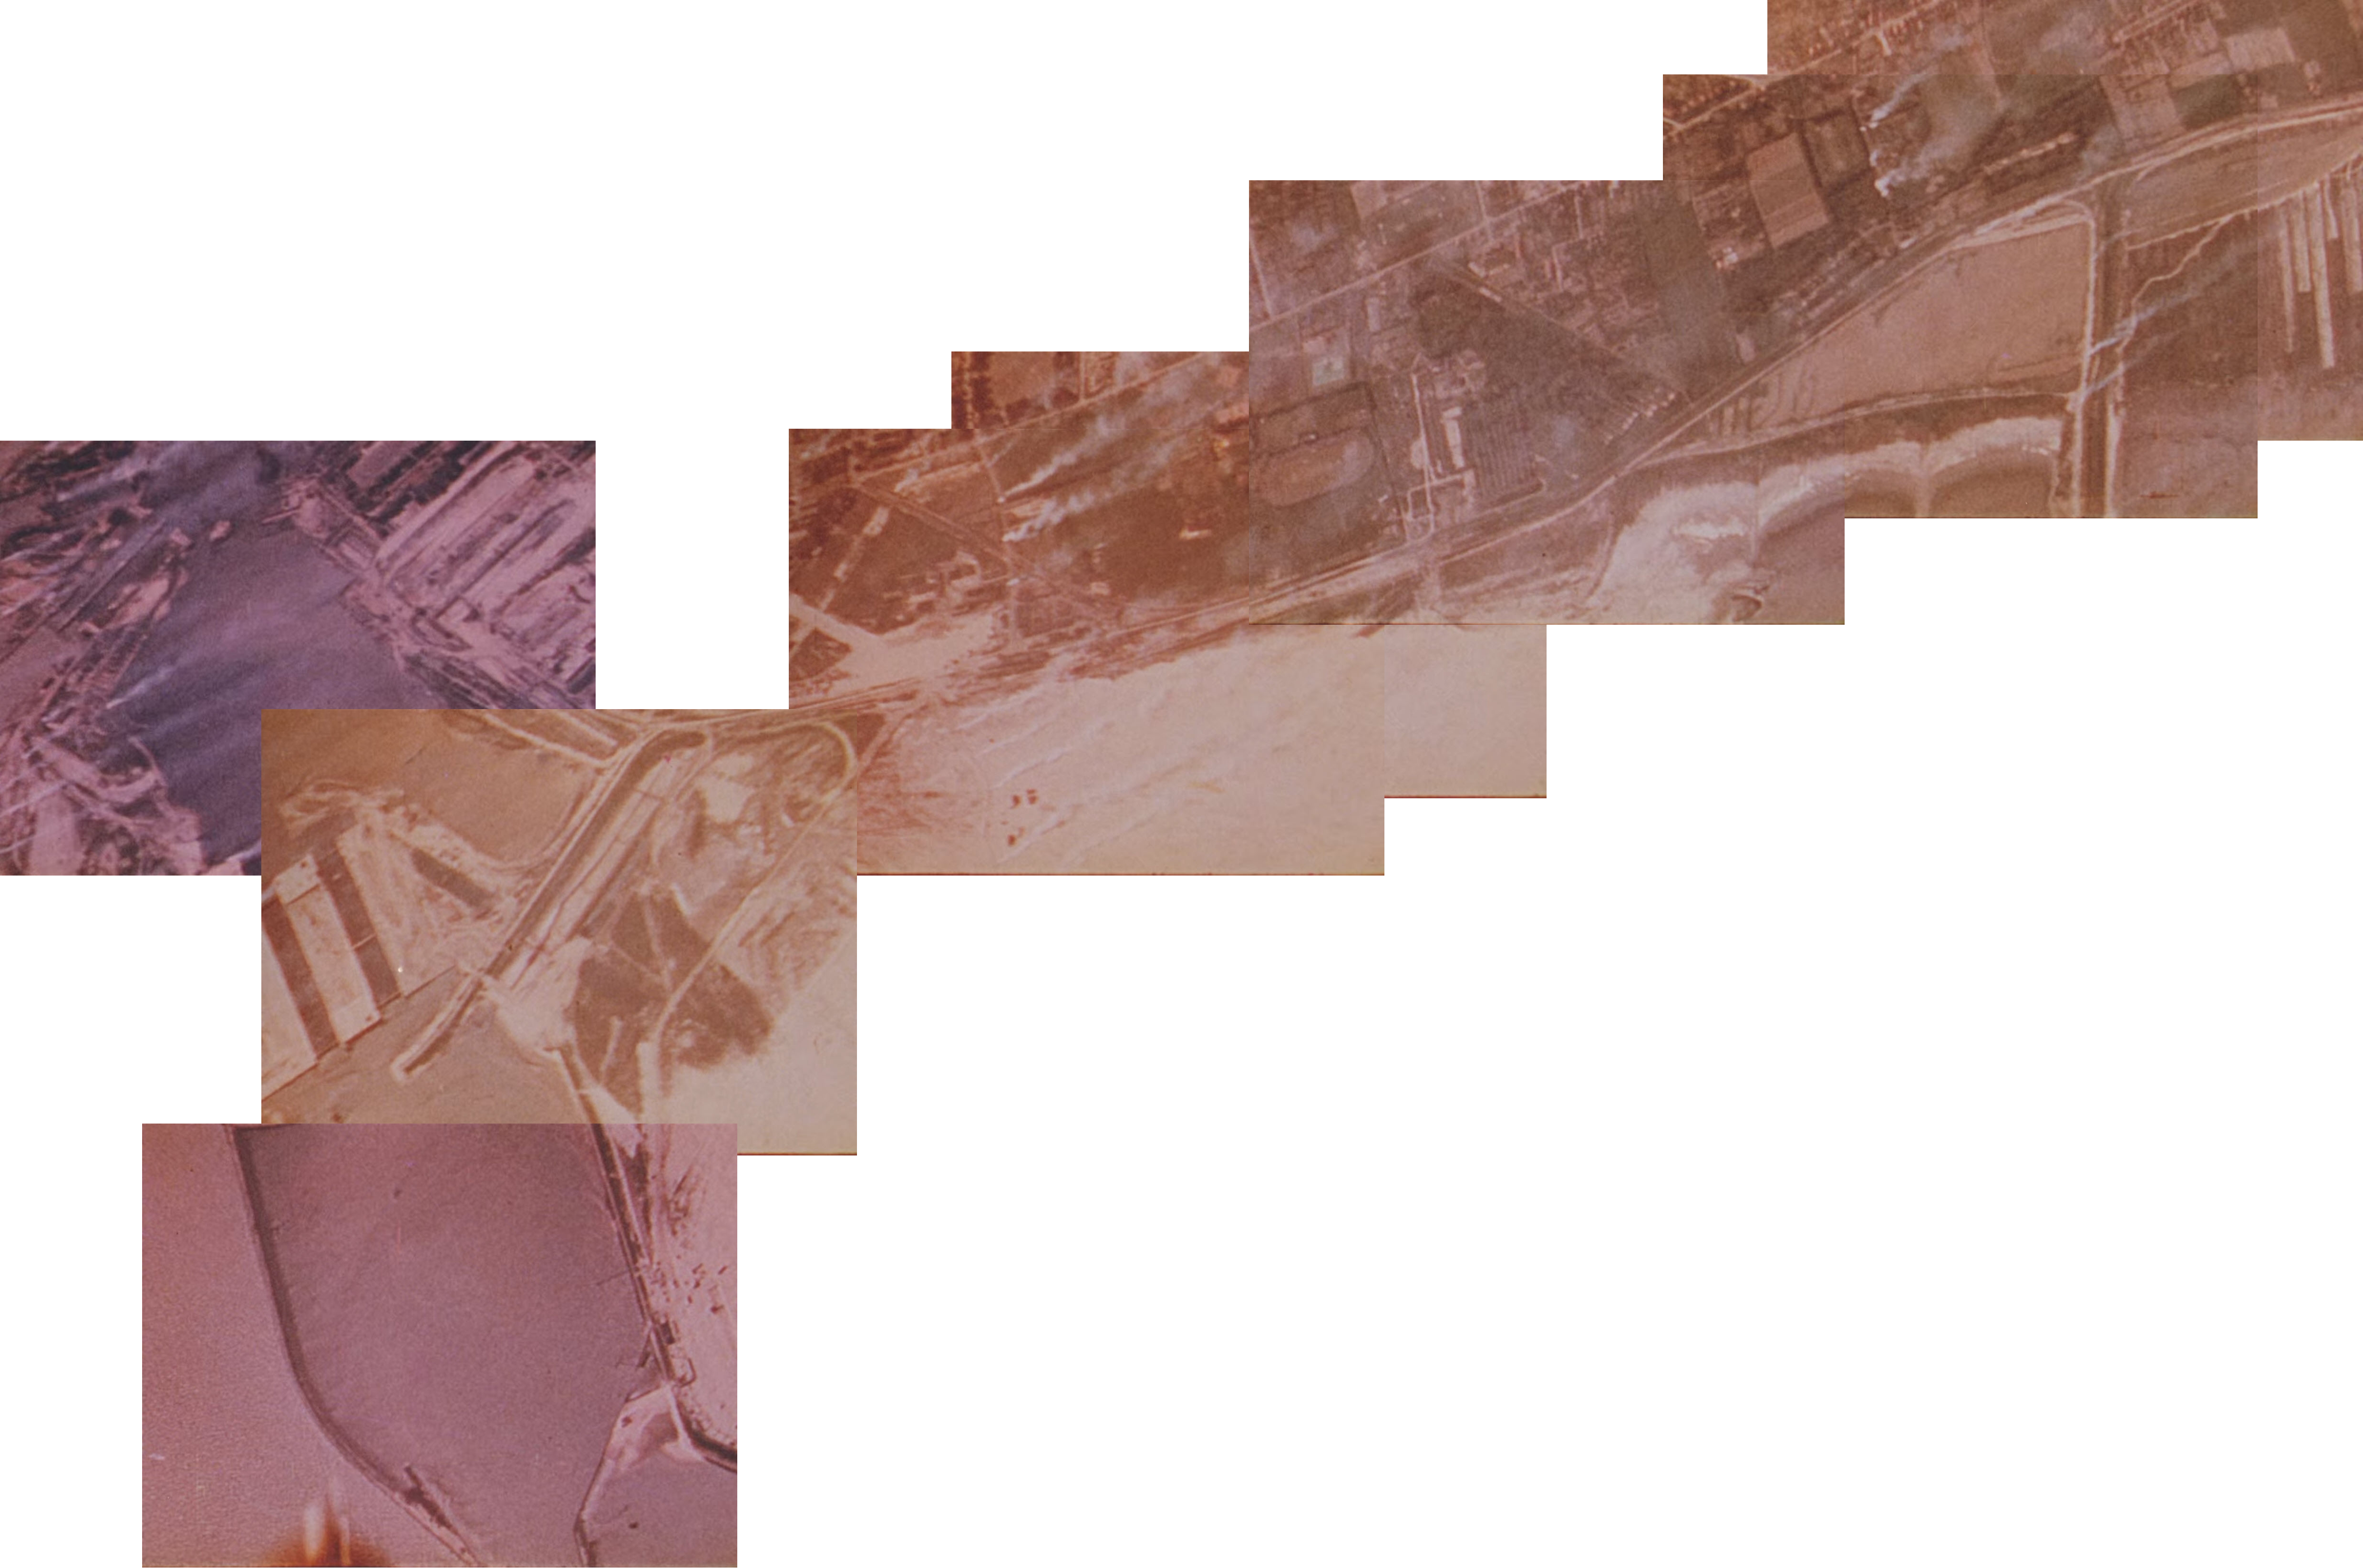
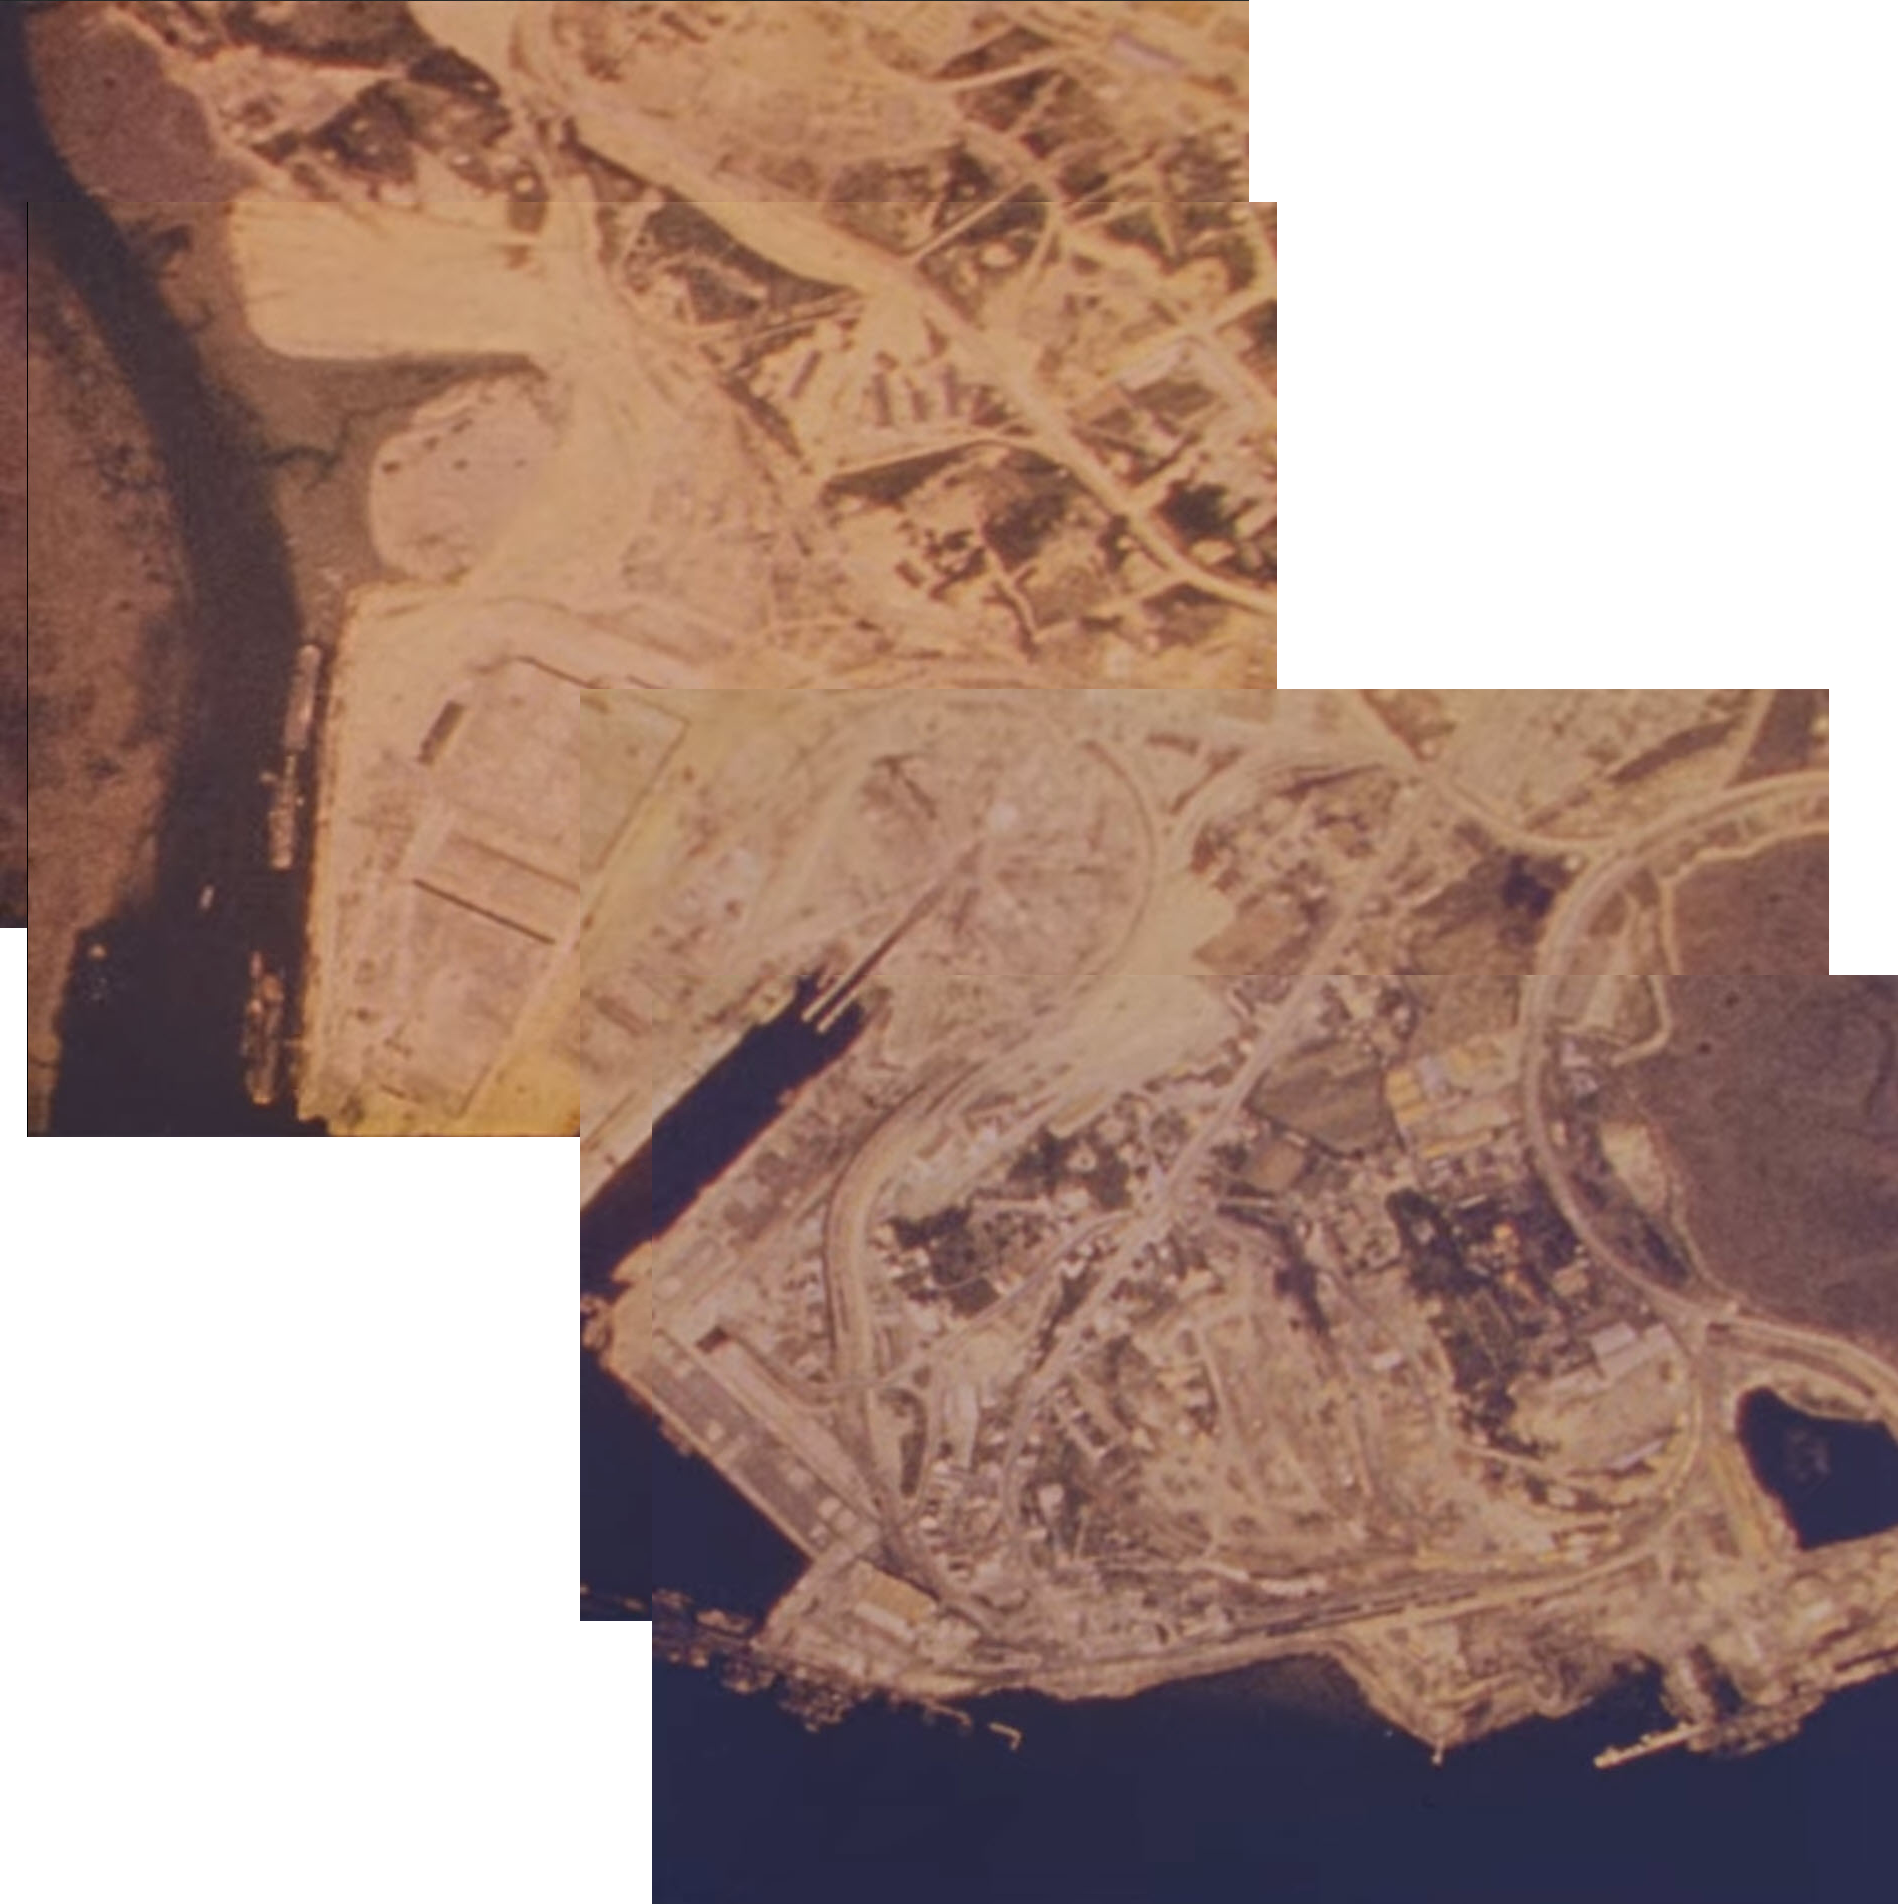
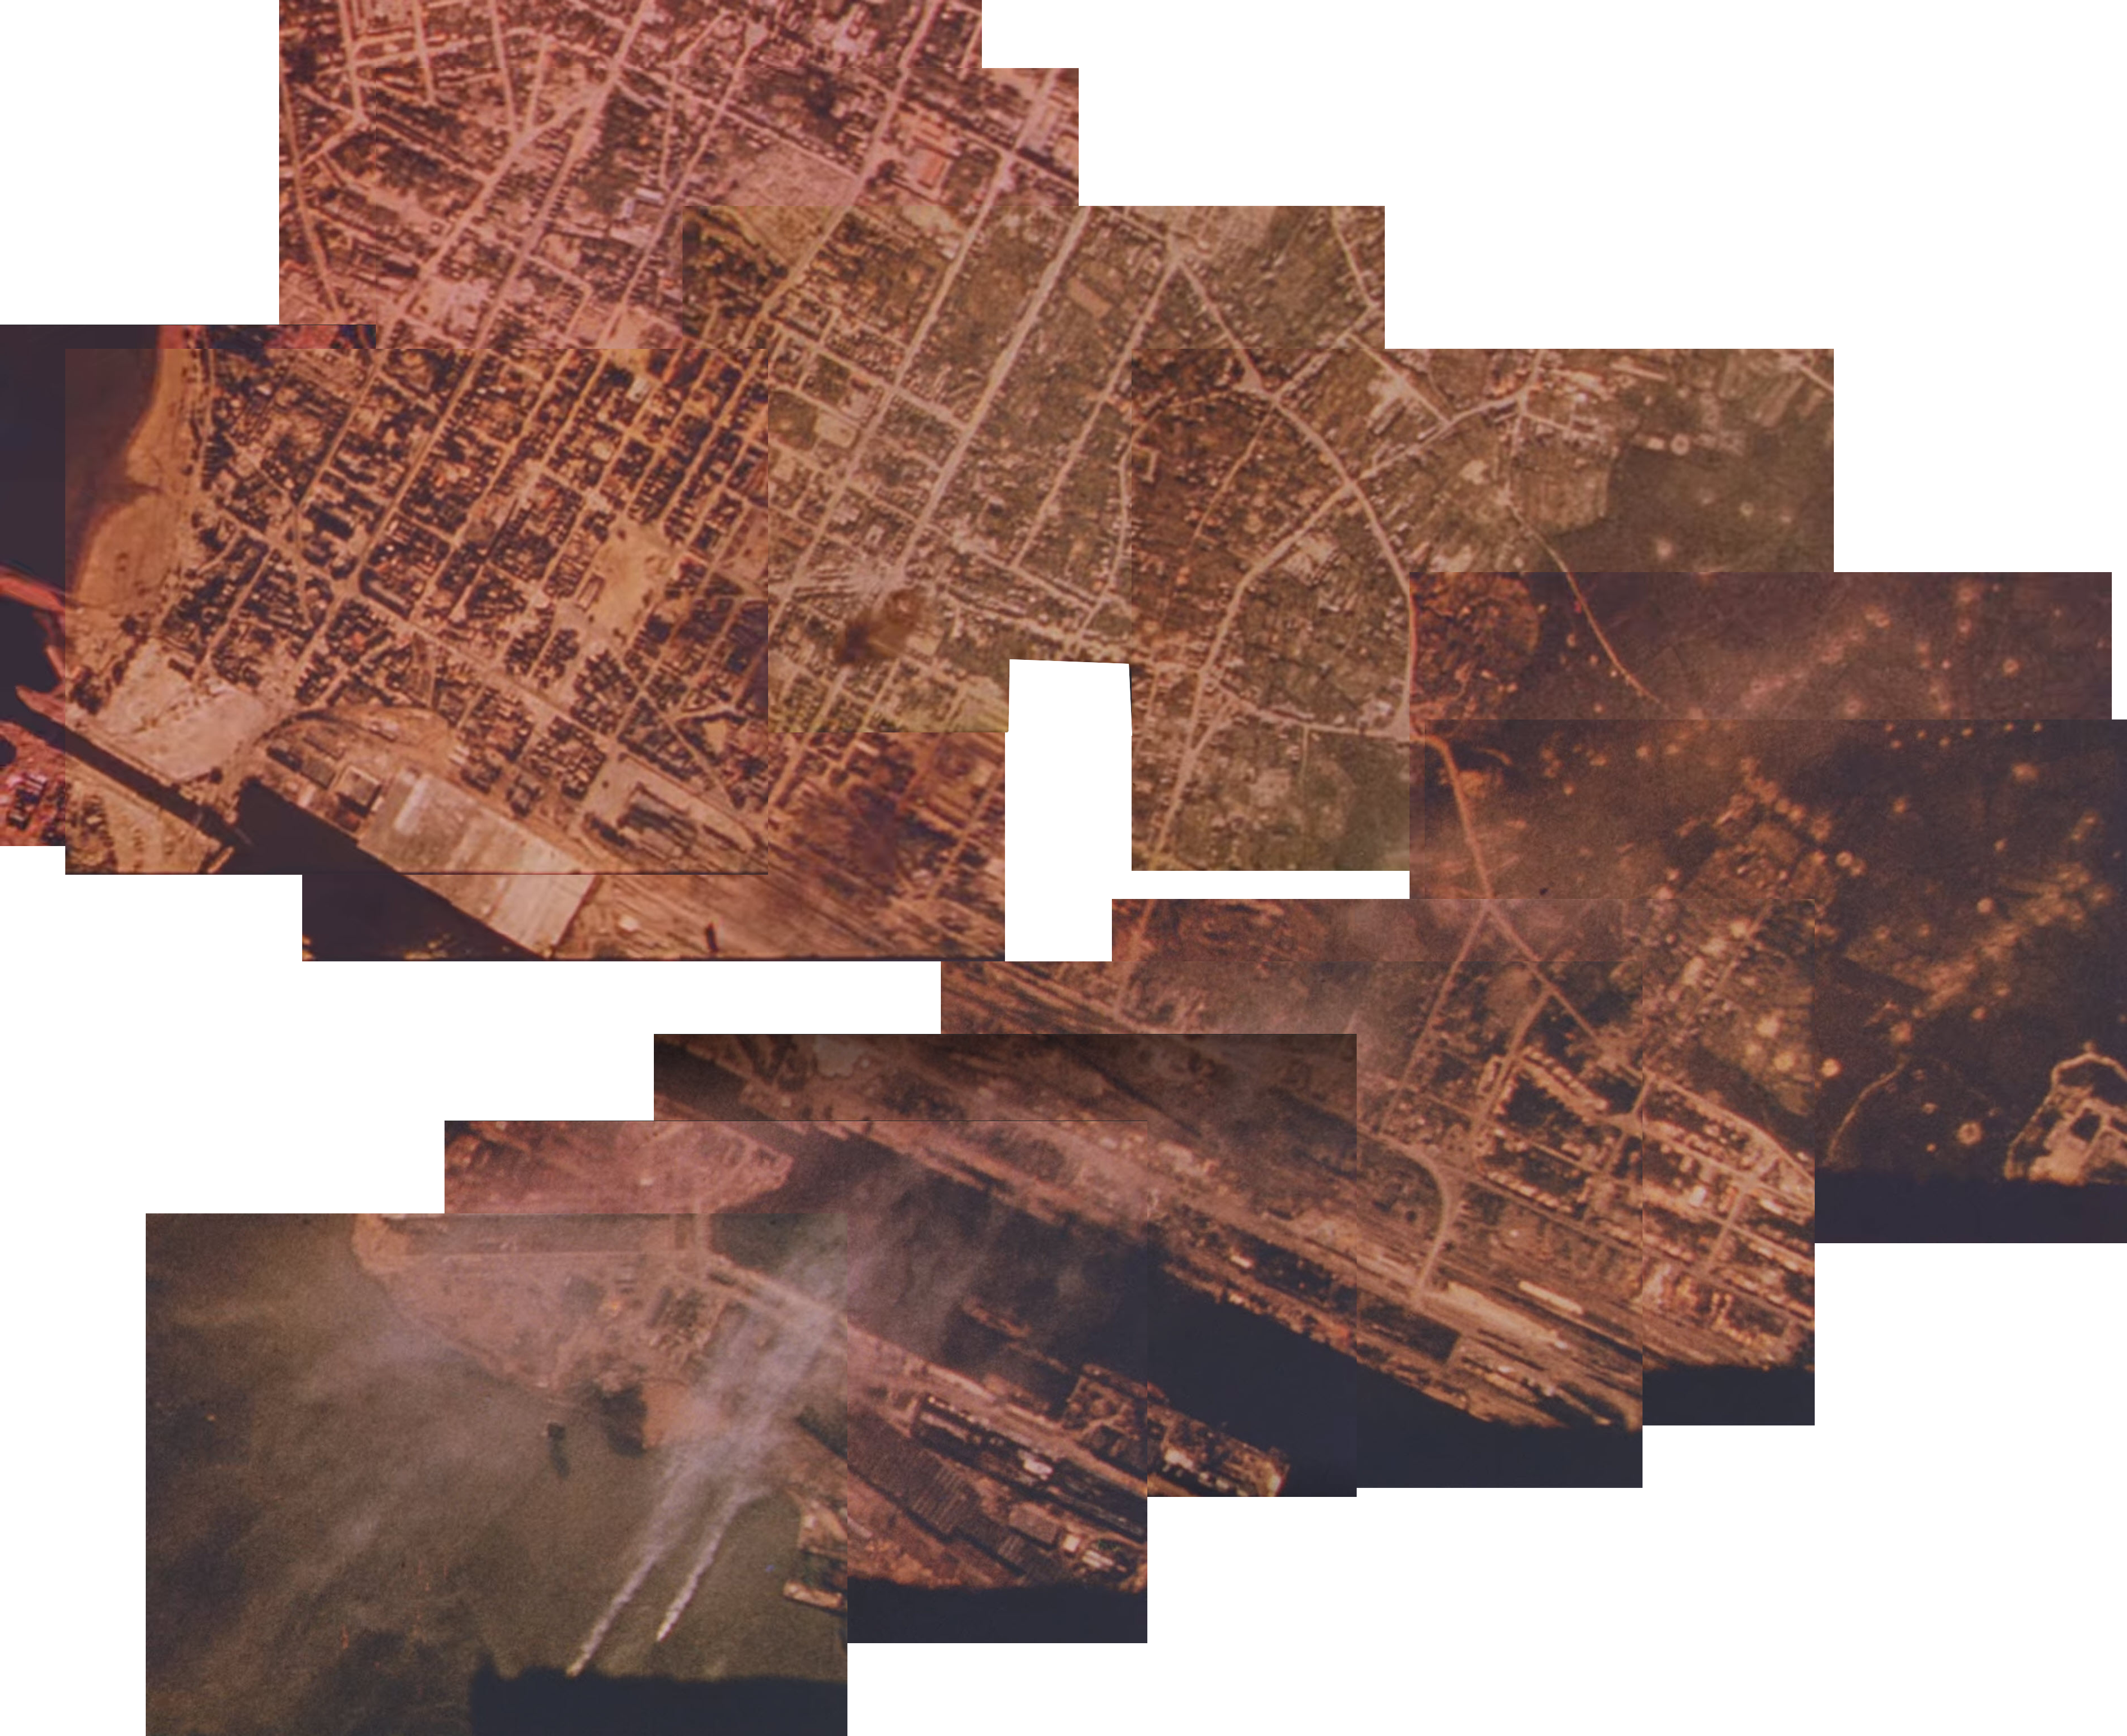
In total, we created four panoramas from four different sites, as seen in the documentary. You can see these panoramas below:
A bombing run on a coastal/dock area (Source: “Memphis Belle: Story of a Flying Fortress”)

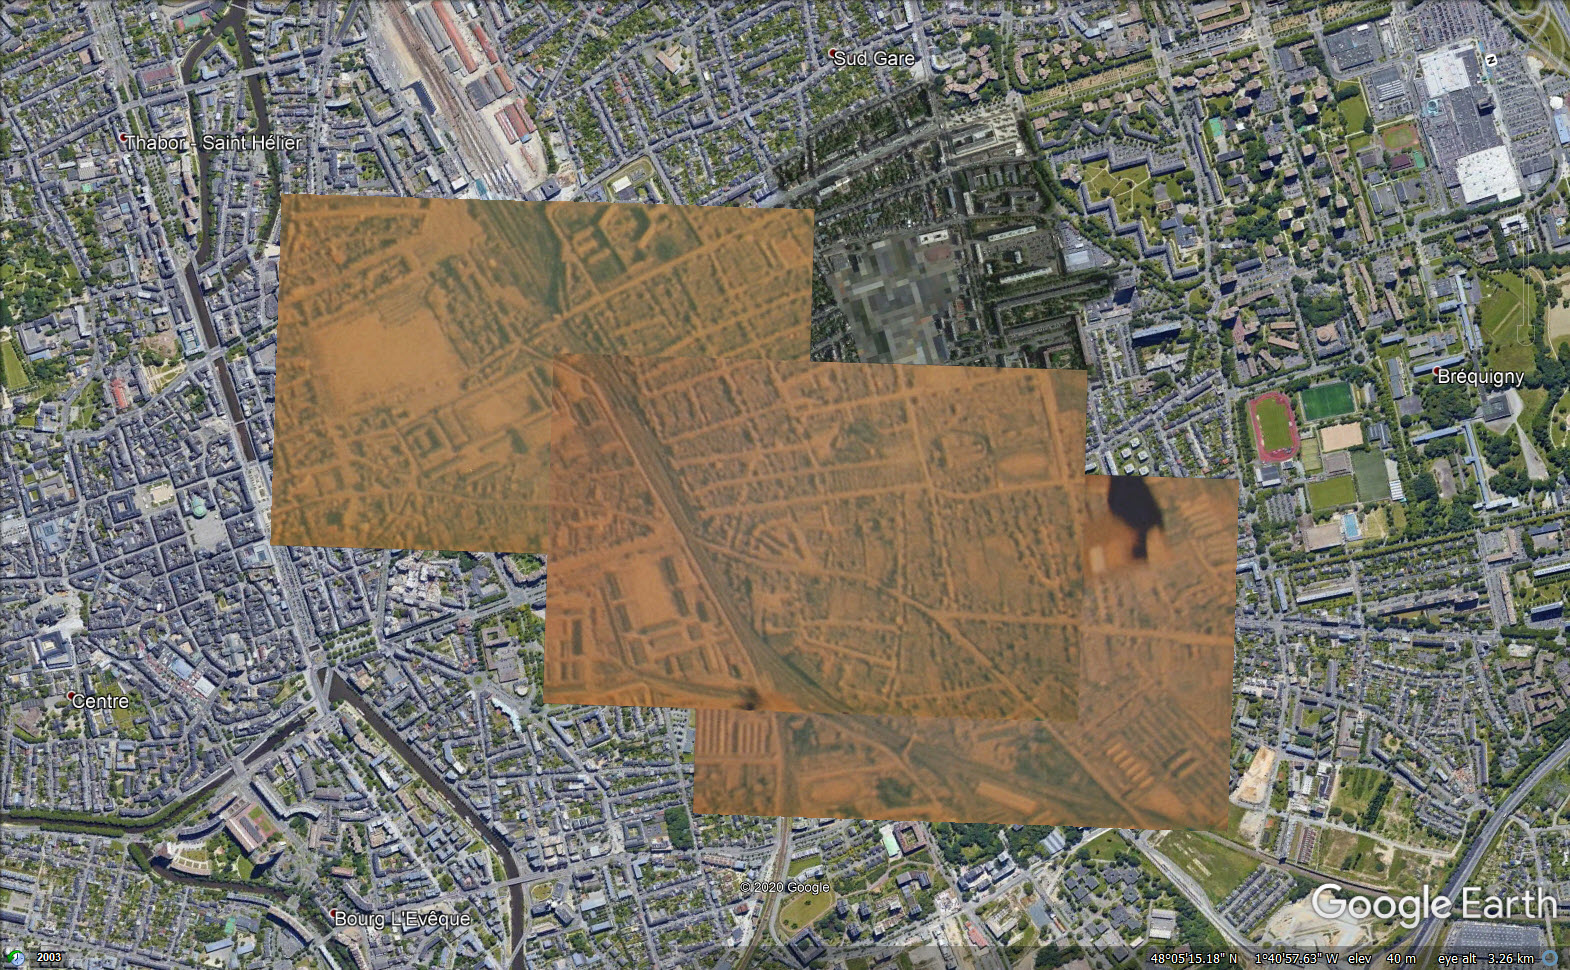
An urban centre being bombed. Note what appears to be a railway station at the top of the image, and tracks running down the middle. This same sequence also appears in a 1943 film called “8th Air Force Battles Over Wilhelmshaven” (Source: “Memphis Belle: Story of a Flying Fortress”)
Another coastal region, this one with a distinctive port features (Source: “Memphis Belle: Story of a Flying Fortress”)
This panorama is a composite of two different bomb run sequences in the documentary over a naval installation (Source: “Memphis Belle: Story of a Flying Fortress”
Geolocating the Bombing Runs
Creating the panoramas was the easy part. Then came the more difficult (but nevertheless fun!) part: geolocation.
We started under the assumption that, as the movie claimed, all four composites showed sites in or around the German city of Wilhelmshaven. While satellite image services like Google Earth Pro can show us historical imagery going back many years, Wilhelmshaven is likely to have changed dramatically over the past 77 years, especially given the fact that large parts of the city were bombed during the war. What we needed were images of the city from around the time of the war.
Aerial reconnaissance photography was a tool used by Allied forces to get a view of cities in Europe from above. Our research turned up resources from the Imperial War Museum (IWM), including this reconnaissance image composite of Wilhelmshaven taken near the start of the war:

Allied aerial reconnaissance images from Wilhelmshaven showing German naval assets (Source: Imperial War Museum © IWM HU 91201A)
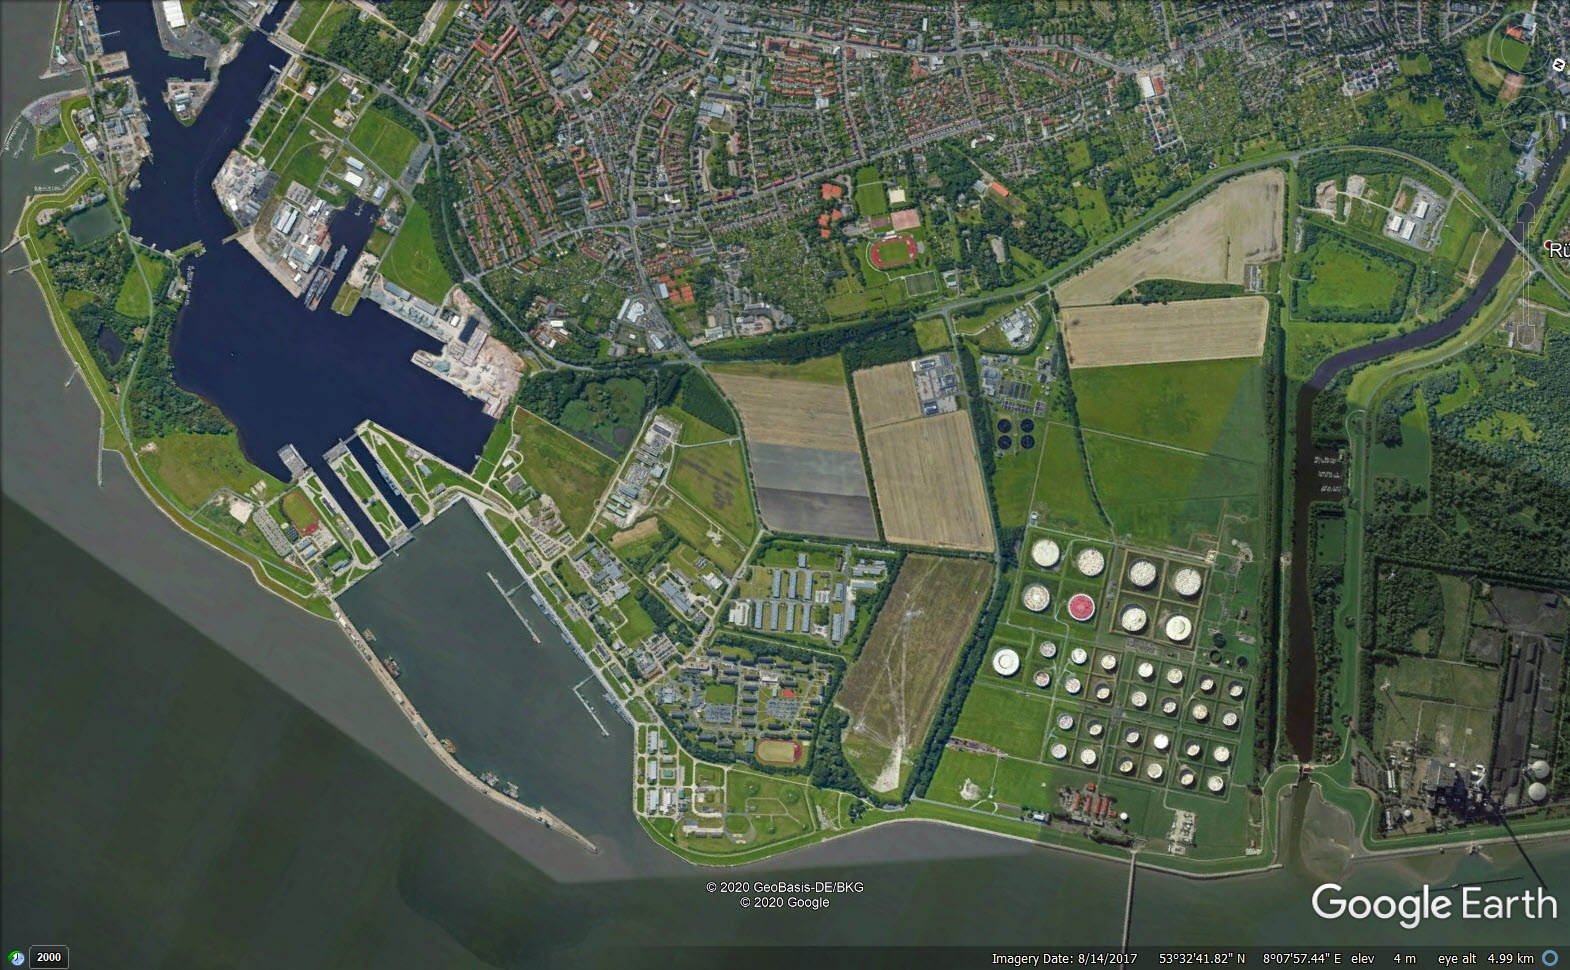
We compared the reconnaissance images from the IWM with contemporary satellite imagery from Wilhelmshaven and discovered that, overall, the layout of the city’s coastline is remarkably similar today to how it was in the early 1940s:
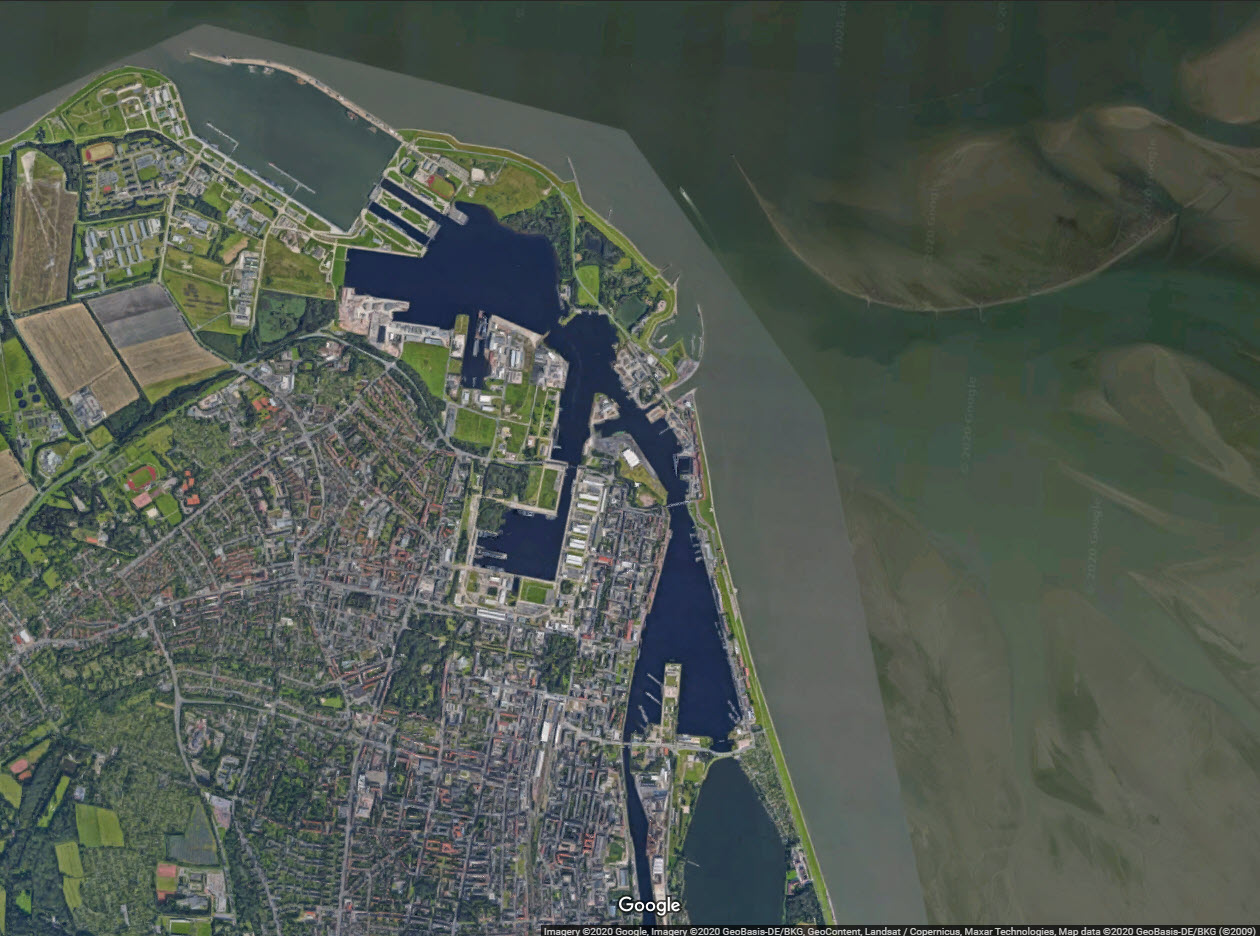
Note the similarities between modern-day Wilhelmshaven and the reconnaissance images (Source: Google Earth/Maxar Technologies)
What this comparison indicated to us was that, in fact, current satellite imagery was a good starting point to give us a sense for whether or not the bomb runs in the documentary actually showed Wilhelmshaven.
One of the panoramas from the documentary caught our attention, because it showed features similar to those in both the IWM reconnaissance shots and the modern day satellite images. The footage from the film showed a coastal area that included a pair of what looked like canals or locks. That structure is visible not only in the IWM reconnaissance picture, but also in satellite imagery from the city today. The identification of this feature allowed us to geolocate the panorama to the city’s northern coast.
Below, an image slider showing Wilhelmshaven in modern satellite imagery (left), and the same area with an overlay of the panorama created from the documentary footage (right):
(Source: Google/Maxar Technologies/”Memphis Belle: Story of a Flying Fortress”)
Having confirmed that at least one of the documentary’s sequences was filmed over Wilhelmshaven, we looked to see if the other three panoramas were also filmed over the city. However, after searching through the images of Wilhelmshaven we determined that they were not filmed there.
At this point, we took to Twitter for help. Giancarlo wrote a thread where he explained how he’d come to be involved in the project, and asked readers to try to geolocate the other three panoramas themselves. Two Twitter users answered the call, and soon enough, all three locations had been found.
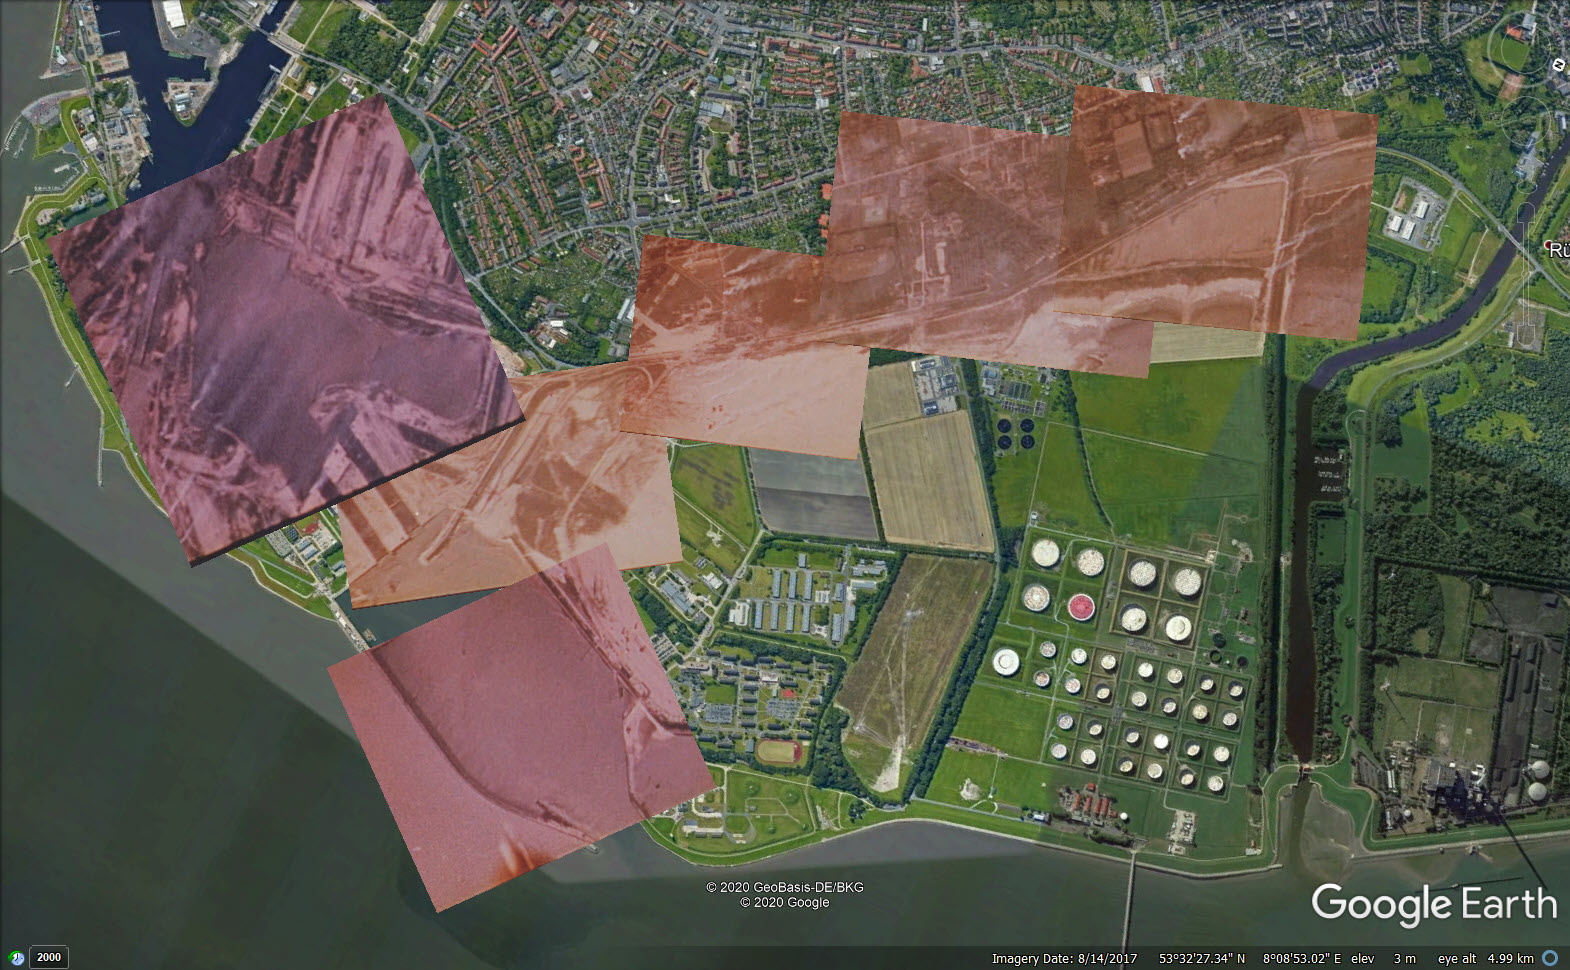
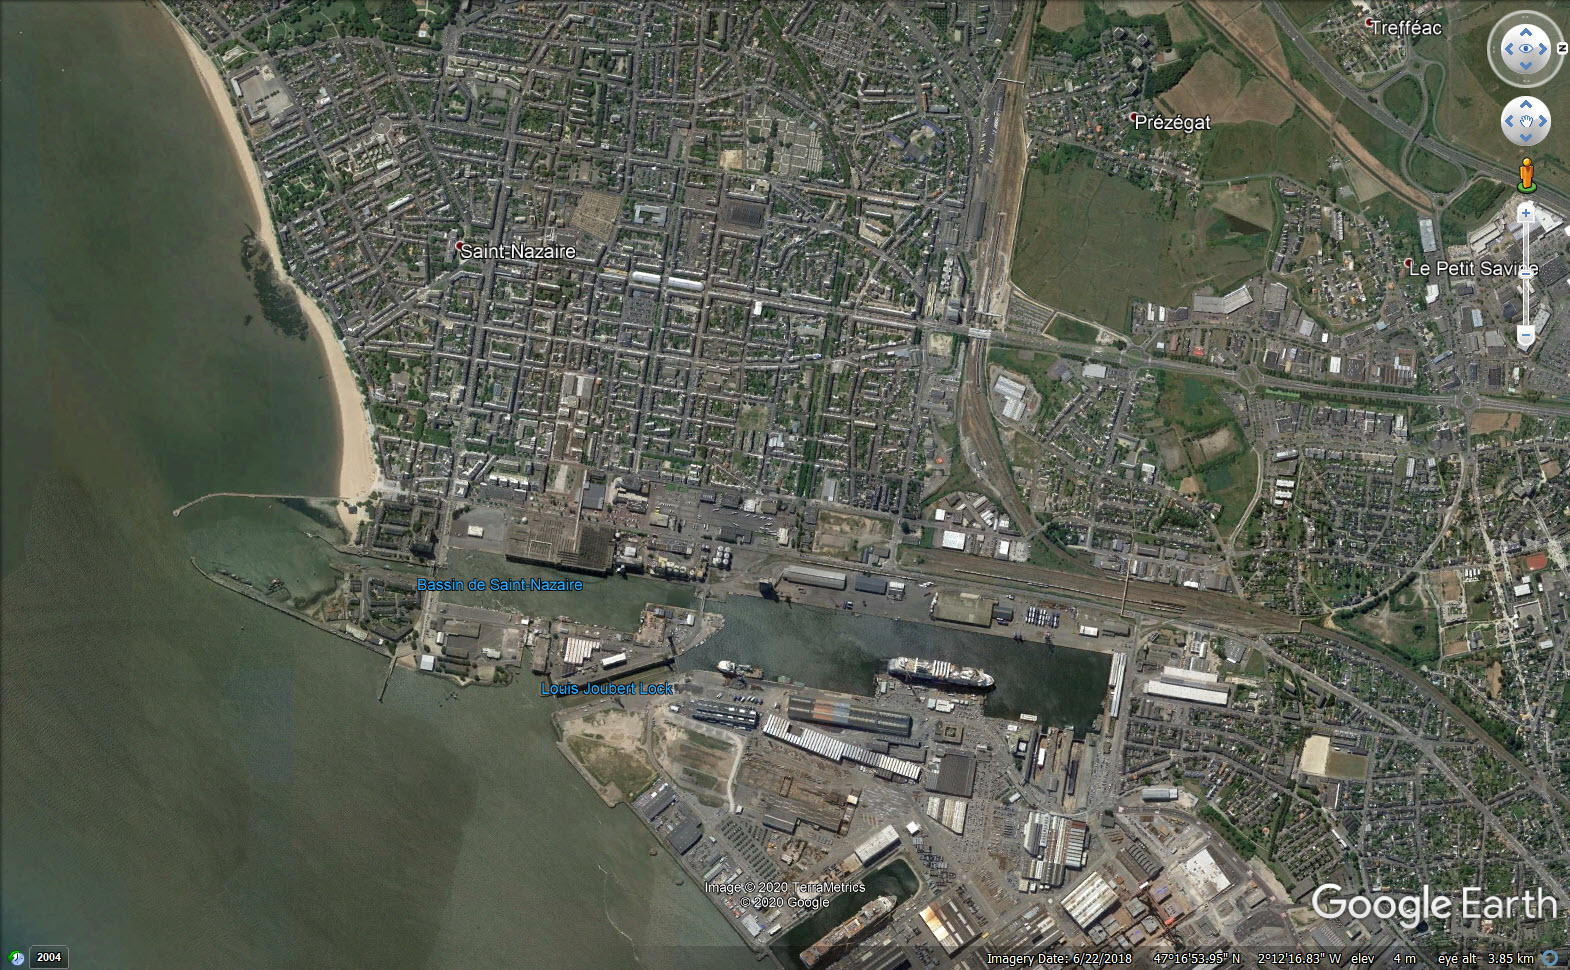
Twitter user @_Hydrofish geolocated one of the panoramas to the port at the French city of Saintt-Nazaire. According to the Memphis Belle’s Wikipedia page, the aircraft took part on bombing missions on the city five times between November 1942 and May 1943:
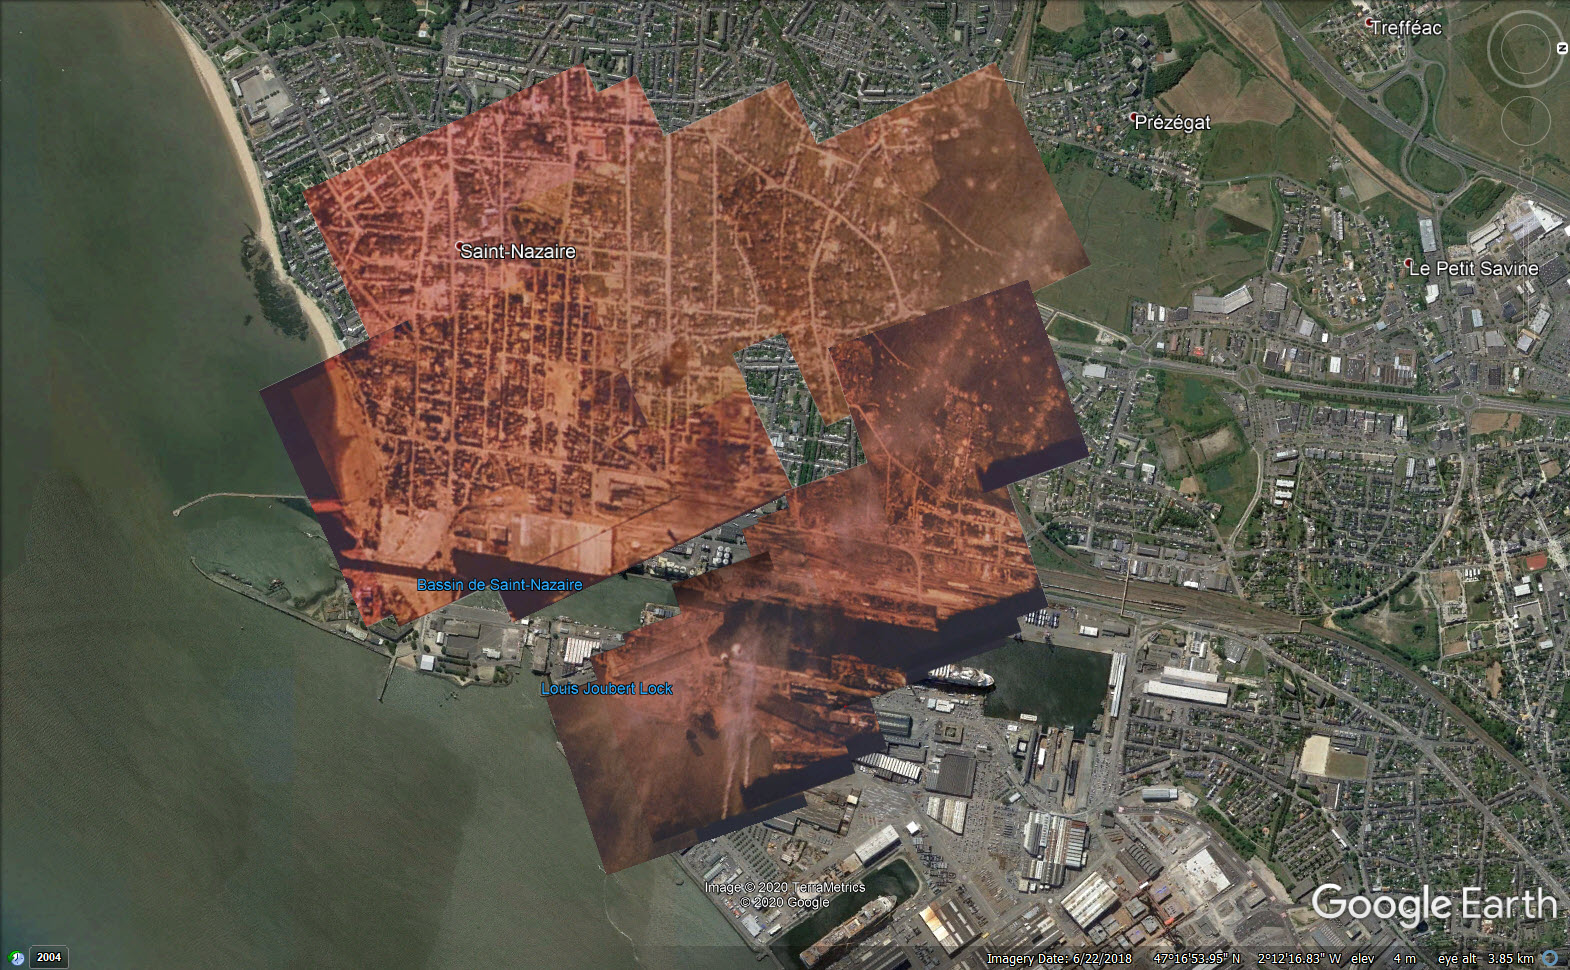
(Source: Google/Maxar Technologies/”Memphis Belle: Story of a Flying Fortress”)
Another Twitter user, @nixintel, geolocated the two other panoramas. One of them showed an area in Lorient, France, which the Memphis Belle bombed five times between December 1942 and May 1943:

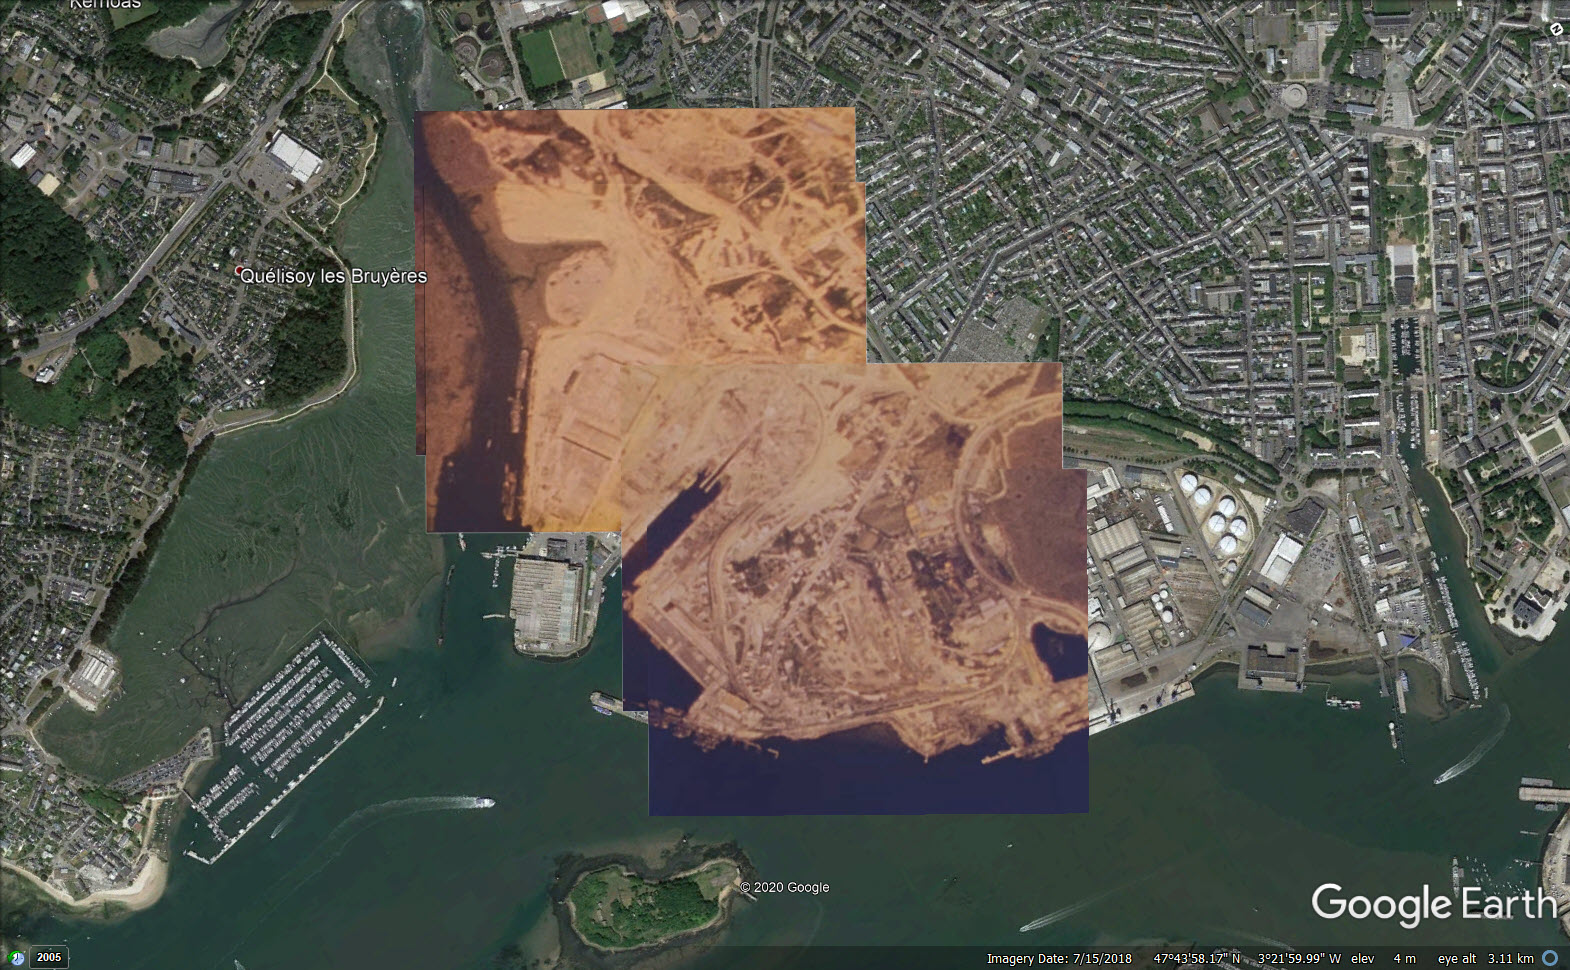
(Source: Google/Maxar Technologies/”Memphis Belle: Story of a Flying Fortress”)
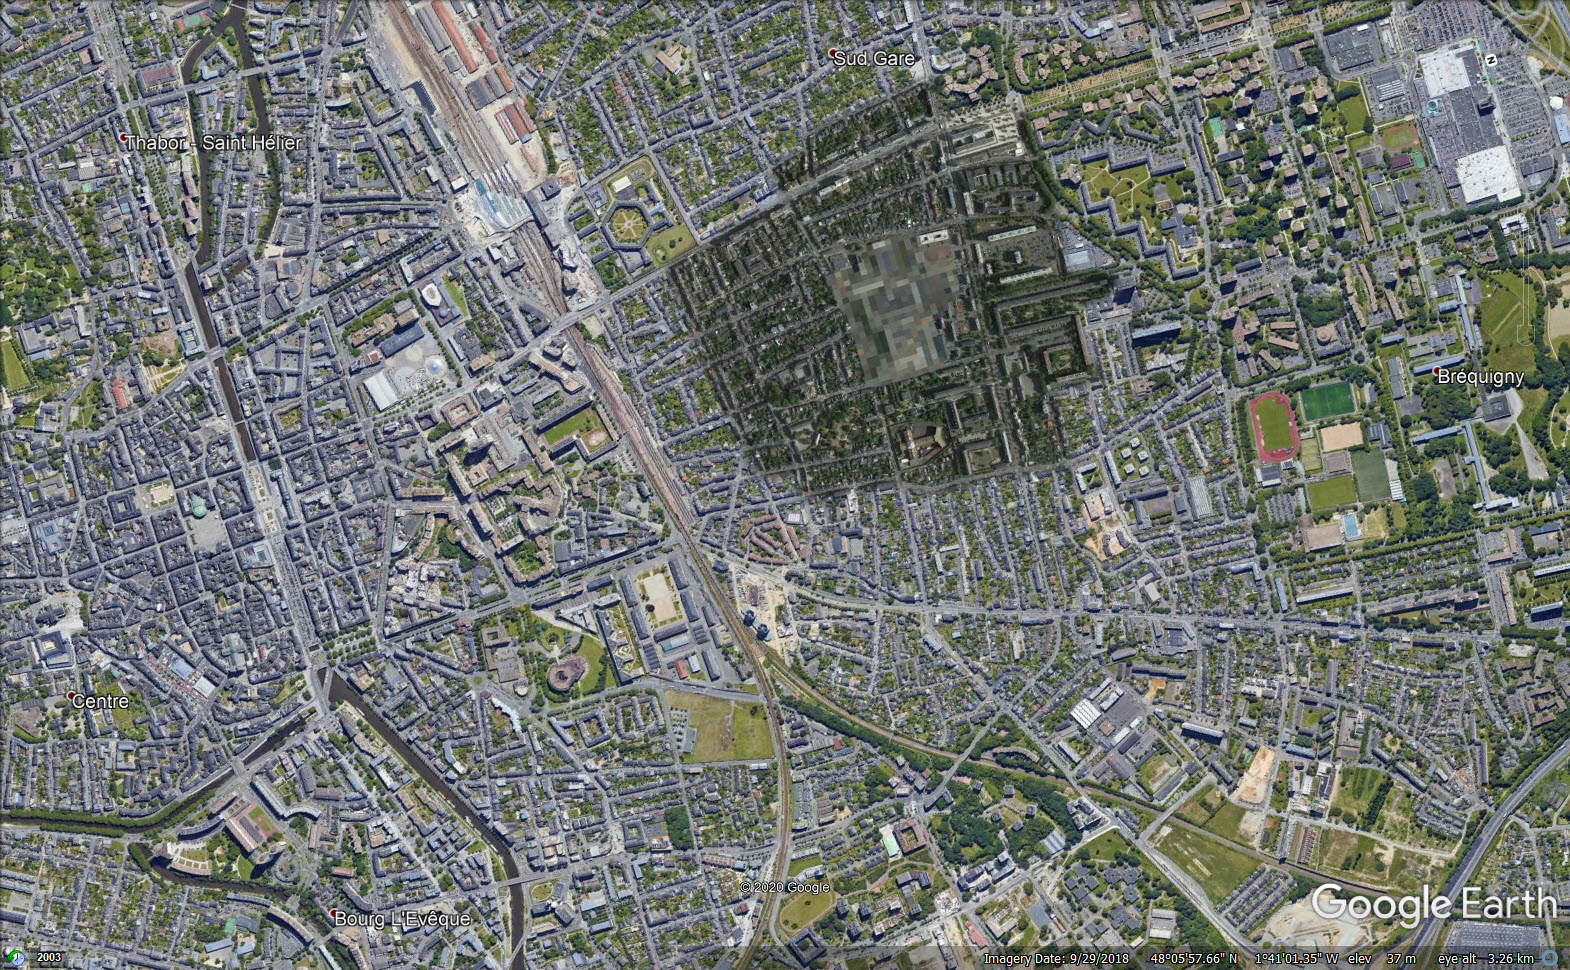
The last panorama — the one showing the railway tracks in the urban centre — turned out to be in Rennes, France (which was bombed during the war, but not by the Memphis Belle, at least according to its Wikipedia page):
(Source: Google/Maxar Technologies/”Memphis Belle: Story of a Flying Fortress”)
Making and Sharing .kmz Files
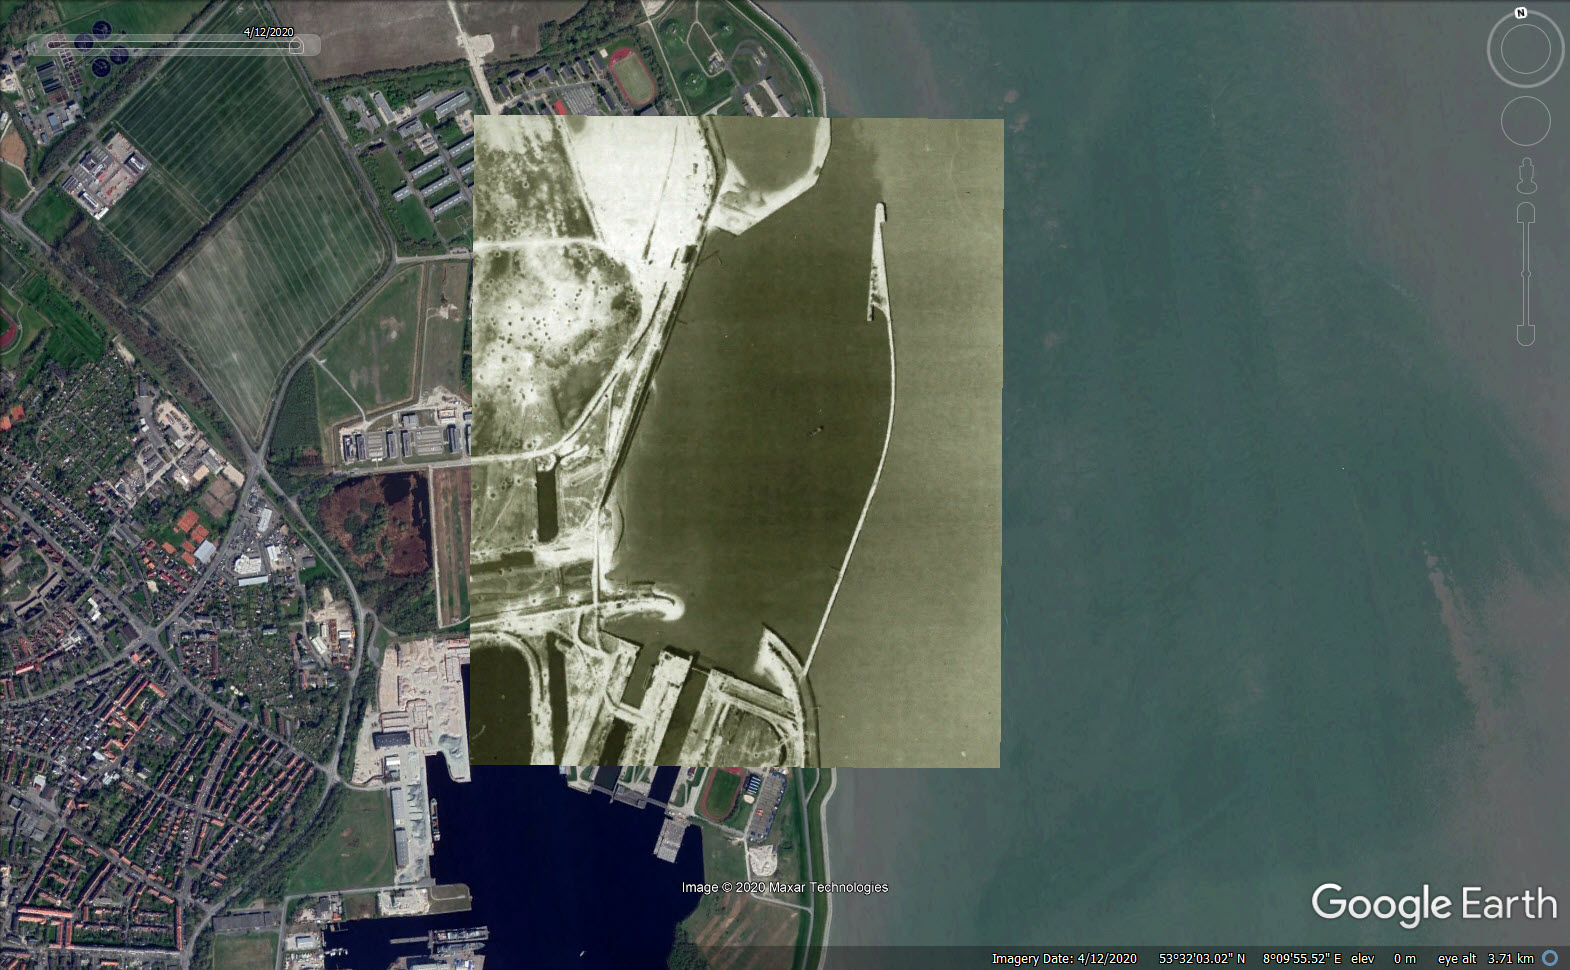
Using the “Image Overlay” feature in Google Earth Pro, you can place image files on top of the satellite imagery (this is the same technique that we used to create the sliders above). The image below was also created this overlay technique, using an aerial reconnaissance picture from Wilhelmshaven taken during the war:

(Source: Google/Maxar Technologies/http://www.bunker-whv.de/)
According to the source of the image, this aerial picture was taken on April 14th 1945, which means that almost 75 years to the date had gone by between when it was taken and when the satellite image from Google Earth was taken.
Placing the image overlay in the right position might take some time and patience. Keep in mind that landscapes change over time. As you can see in the picture above, the roads in the middle don’t line up exactly, but the pier does. If the image is moved so the roads match, then the pier will appear to be in the wrong place.
These overlays exist as .kml files, and to share them online we can zip them into folders with the .kmz extension.
You can place an image overlay by pressing “Add” in the top menu in Google Earth Pro, and selecting “Image Overlay”. After that, you can select the picture you want to use and move it using the green cross in the middle of the interface. Make sure to keep the options menu open so you can move and resize the image. In this menu, you can also adjust the transparency of the selected image to make it easier to match its features to the satellite image, as well as add notes to the overlay.
Once you add the images, you can download them all as a .kmz file on Google Earth Pro. The easiest way to do that is to create a folder (right click “My Places”, and then “Add folder”), add the image overlays you want, and make sure they are in the folder you just created. Right click the folder and select “Save as” to save the folder as a .kmz file.
If you want to open a .kmz file in Google Earth, just drag the file or folder into “My Places” on the left side of the screen. You can find the .kmz folder with the documentary geolocations in this article here.
You can search for .kmz files on Google using the “filetype:” operator. To find .kmz files that people have made showing the locations of military bases in Canada, for example, you could search “filetype:kml Canada military bases”. Searching for these types of files is a great way to get up-to-speed on any geospatial project, and sharing your own could be very useful to a fellow open source researcher in the future.